
Flutter Riverpod: StateProvider, StateNotifier, StateNotifierProvider, FutureProvider, StreamProvider
Understand all the important providers with real-world examples.


Previously...
Greetings! Appreciate you taking the time to read this piece. If you have been following the Flutter Riverpod series, you may have read the preceding article on Providers.
In the article before this one, we discussed Providers, developed a basic Provider, and learned about the ConsumerWidget.
We also took a look at the Ref and some of its applications. If you haven't read the article yet, it's highly recommended that you do so.
Now, in this article, we are going to review the different types of Providers made available by Riverpod; these are quite powerful and make it easier to handle the state of the application.
So, let's get started!
StateProvider

In the article prior to this, we got an introduction to Provider. The Provider allows its listener to access the data and the values cannot be altered since they are read-only.
Nevertheless, in many practical scenarios, the values may vary due to the user's interaction.
StateProvider comes to our rescue as it lets us modify its value. So, if you are dealing with basic values such as a string, boolean, integer, enumeration, etc, you can easily manage them with StateProvider.
Let's take a look at an example to understand how this works.
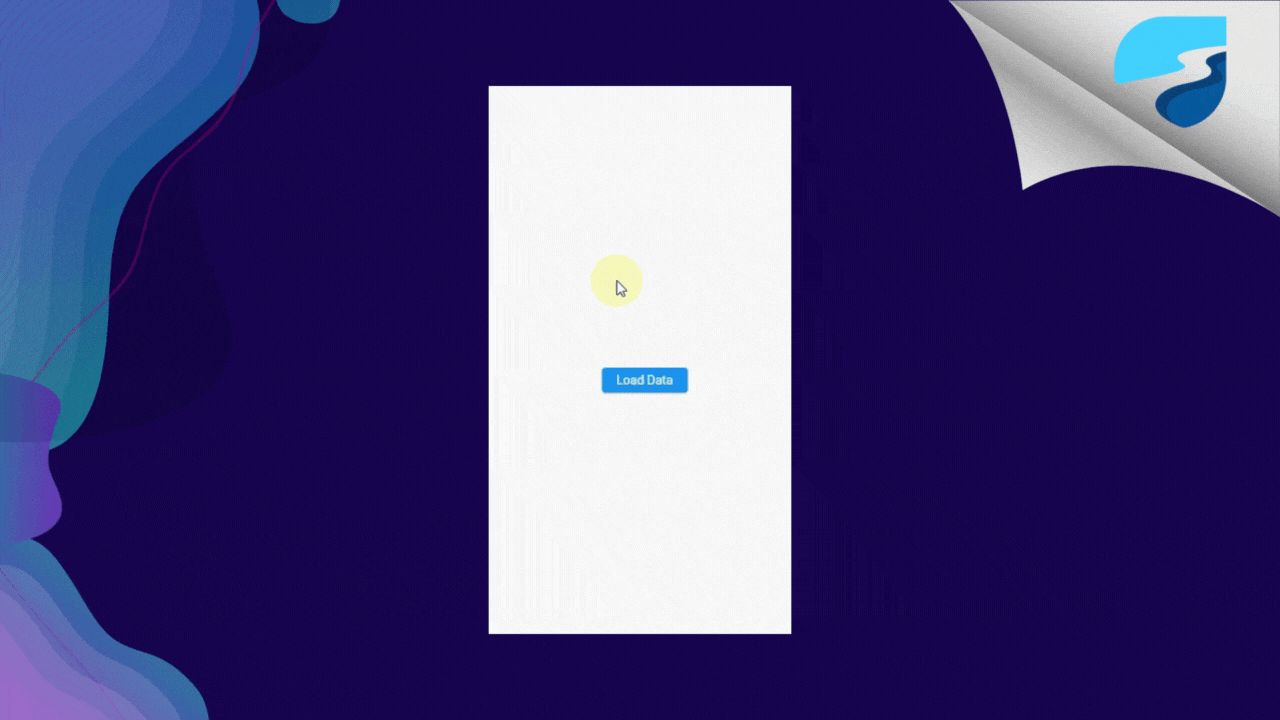
Suppose we have an application that collects data from an API. When the user presses the Load Data button, we need the loader to appear.
To achieve this, we require a boolean state that can determine if the loading is in progress or not so that the loader is visible to the user.
final isLoadingProvider = StateProvider<bool>((ref) {
  return false;
});
- In the above snippet, we have created a StateProvider of type boolean which initially returns a value false.
class HomePage extends ConsumerWidget {
  const HomePage({super.key});

  @override
  Widget build(BuildContext context, WidgetRef ref) {
    // 1 --------------------------------------
    final isLoading = ref.watch(isLoadingProvider);
    return Scaffold(
      appBar: AppBar(
        title: const Text('Riverpod'),
      ),
      body: Center(
        // 2 --------------------------------------
        child: !isLoading
            ? ElevatedButton(
                child: Text(
                  'Load Data',
                  style: Theme.of(context)
                      .textTheme
                      .bodyText1
                      ?.copyWith(color: Colors.white),
                ),
                onPressed: () {
                  // 3 --------------------------------------
                  ref.read(isLoadingProvider.notifier).state = true;
                  Future.delayed(const Duration(seconds: 3), () {
                    ref.read(isLoadingProvider.notifier).state = false;
                  });
                },
              )
            : const CircularProgressIndicator(),
      ),
    );
  }
}
Initially, we take advantage of ref.watch to monitor the state of the provider. As soon as the isLoadingProvider variable is altered, the widget is reconstructed.
Subsequently, we use the isLoading value to conditionally render the Loader.
Lastly, within the onPressed callback of the ElevatedButton, we modify the value of the provider.
- Pay attention to the syntax we are using:
ref.read(isLoadingProvider.notifier).state = true;
- In this what we are actually doing is, we are accessing the notifier, and saying just give me the current snapshot of the provider as it is, and using this snapshot we can access the state of that provider and mutate it.
Output:
StateProvider is useful where you have simple state like boolean, integer, string,etc.
Avoid using StateProvide when your state is a complex object (such as a custom class, a list/map, ...), the logic for modifying your state is more advanced.
StateNotifier & StateNotifierProvider
We have already discussed how StateProvider can be beneficial when dealing with basic states such as Boolean, Integer, and String.
But, how can we handle more complicated states such as lists, maps, and custom classes?
This is where StateNotifier and StateNotifierProvider become necessary.
StateNotifier:
This is an observable class that can store one single state.
StateNotifier is designed to be subclassed, which means you need to extend your class with this class. For example:
class FruitsNotifier extends StateNotifier<List<String>> {}
The code line mentioned above implies that your class now comprises a state with the type List<String>. When this state is assigned a fresh value, the widgets which are observing it will be reconstructed.
It is essential to note that when you extend your class with StateNotifier, you must pass the initial value in the constructor, or else you will encounter an error. So let's provide the initial value.
class FruitsNotifier extends StateNotifier<List<String>> {
  FruitsNotifier() : super(['Apple', 'Banana']);
}
After providing initial values, now you can use this class as a normal class, you can write methods to allow other objects to modify your state which is List<String>.
For example:
class FruitsNotifier extends StateNotifier<List<String>> {
  FruitsNotifier() : super(['Apple', 'Banana']); // Initializing List.

  void add(String name) {
    state = [...state, name];
  }

  void remove(String name) {
    state = [...state.where((element) => element != name)];
  }

  void update(String name, String updatedName) {
    final updatedList = <String>[];
    for (var i = 0; i < state.length; i++) {
      if (state[i] == name) {
        updatedList.add(updatedName);
      } else {
        updatedList.add(state[i]);
      }
    }
    state = updatedList;
  }
}
The StateNotifier allows access to the state variable from within the class, so we can call up the list of fruits by simply inputting the state and assign a new value.
We have assigned our state a different value in the three methods.
This is essential since changing the state directly will not reconstruct the UI.
Therefore, when we update the state of FruitNotifier through any of its methods or by giving it a new value, it will automatically alert the listeners and rebuild the UI.
How can one access this state though outside this class? That's where StateNotifierProvider comes in.
StateNotifierProvider
Once we are done with the StateNotifier, we can create a StateNotifierProvider.
StateNotifierProvider is a provider that is used to listen to and expose a StateNotifier.
Let's create a provider for our FruitProvider:
final fruitsProvider =
    StateNotifierProvider<FruitsNotifier, List<String>>((ref) {
  return FruitsNotifier();
});
Here, we need to define two things:
The notifier itself and (FruitesNotifier)
The actual data type of the state (List<String>).
Let's complete the example by displaying this list of fruits on a screen.
class HomePage extends ConsumerWidget {
  const HomePage({super.key});

  @override
  Widget build(BuildContext context, WidgetRef ref) {
    final fruits = ref.watch(fruitsProvider);
    return Scaffold(
      appBar: AppBar(title: const Text('Riverpod')),
      floatingActionButton: FloatingActionButton(
        onPressed: () {
          ref
              .read(fruitsProvider.notifier)
              .add('Fruit ${Random().nextInt(100)}');
        },
        child: const Icon(Icons.add),
      ),
      body: Center(
        child: Column(
          children: fruits
              .map(
                (e) => GestureDetector(
                  onLongPress: () {
                    ref
                        .read(fruitsProvider.notifier)
                        .update(e, '$e updated');
                  },
                  onTap: () {
                    ref.read(fruitsProvider.notifier).remove(e);
                  },
                  child: Text(e),
                ),
              )
              .toList(),
        ),
      ),
    );
  }
}
The .notifier allows us to access all of the methods contained in our StateNotifier.
We are able to add items by pressing the FloatingButton and executing the add() method, and then, by tapping the item, the remove() method is called.
The update() is triggered through a long press.
Every time one of these methods is used, a rebuild will occur if the state has changed in any way.
Output:

FutureProvider
If you are calling an API to get the data, then using FutureProvider is a better option.
FutureProvider is mainly used for this type of scenario where your code is asynchronous. Let's understand this using an example:
final userProvider = FutureProvider.autoDispose<List<User>>((ref) async {
  final dioClient = ref.read(dioClientProvider);
  final res = await dioClient.get('https://jsonplaceholder.typicode.com/users');
  return (res.data as List).map((e) => User.fromJson(e)).toList();
});
- As you can see, we are calling JSON placeholder api to get the list of users. And after getting the data we are simply returning the value.
I've used a modifier with FutureProvider `autoDispose`. We will learn more about modifier later. For the time being just know that it is used dispose the listener whenever the provider is no longer in use.
- Now, that we've created a provider, we want to listen to that provider's state. You can do that by using .watch() just like below.
class HomePage extends ConsumerWidget {
  const HomePage({super.key});

  @override
  Widget build(BuildContext context, WidgetRef ref) {
    final user = ref.watch(userProvider); // <====
    return Scaffold(
      appBar: AppBar(
        title: const Text('Riverpod'),
      ),
      body: ...
    );
  }
}
Now here is a twist, if you hover over the user variable you will see it is of type AsyncValue . So why is that? Why we are not directly getting the value?
AsyncValue is basically a class that is used to safely manipulate asynchronous data.
By using AsyncValue, you are guaranteed that you cannot forget to handle the loading/error state of an asynchronous operation.
So, we can use .when to convert an AsyncValue into either a progress indicator, an error screen, or to show the data:
class HomePage extends ConsumerWidget {
  const HomePage({super.key});

  @override
  Widget build(BuildContext context, WidgetRef ref) {
    final user = ref.watch(userProvider);
    return Scaffold(
      appBar: AppBar(
        title: const Text('Riverpod'),
      ),
      body: Center(
        child: user.when(
          data: (data) {
            return Column(
              children: data.map((e) => Text(e.name ?? '')).toList(),
            );
          },
          error: (error, stackTrace) {
            return Text(error.toString());
          },
          loading: () => const CircularProgressIndicator(),
        ),
      ),
    );
  }
}
- This will automatically rebuild the UI when the Future completes.
StreamProvider
StreamProvider is used to watch a Stream of results from a realtime API and reactively rebuild the UI.
This is usually used where we want to:
listen to Firebase or web-sockets
rebuild another provider every few seconds
Example:
final authStateChangeProvider = StreamProvider.autoDispose<User?>((ref) {
  final firebaseAuth = ref.watch(firebaseAuthProvider);
  return firebaseAuth.authStateChanges();
});
- And to use this inside the widget :
Widget build(BuildContext context, WidgetRef ref) {
  final authStateAsync = ref.watch(authStateChangesProvider);
  return authStateAsync.when(
    data: (user) => user != null ? HomePage() : SignInPage(),
    loading: () => const CircularProgressIndicator(),
    error: (err, stack) => Text('Error: $err'),
  );
}
Wrapping Up
We've covered all the important providers that riverpod has to offer. If you want to look more into how all the things work in detail I encourage you to visit Riverpod Official Docs.
In the upcoming article, which will be the final article of this series, we will use all these concepts by creating a real-world application.
I hope you enjoyed and learned something from this article. If you have any feedback/queries, leave them in the comments.
Thank you for spending time reading this article. See you in the next article. Until then....