Flutter Bloc (v8): Google Sign In and Firebase Authentication - 2022 Guide
A blog around using Firebase Auth and BLoC Architecture to authenticate users with email/password and Google Sign In.
Table of contents
- Introduction
- UI Design
- Folder Structure
- Firebase Setup
- Add Required Dependencies
- Firebase Initialization
- Writing Logic For Authentication - AuthRepository
- BLoC Implementation
- Providing AuthRepository and AuthBloc To UI
- Implementing SignIn/SignUp and Google ButtonPress
- Rendering UI According to States
- Dashboard Page Implementation
- Persisting authentication state
- Final Result
- Github Repo
- Wrapping Up
Introduction
- Authentication is the process of identifying yourself to the system using a set of credentials that only you know so that the system can ensure your identity and provide various resources only to you.
- In the previous article, we saw how to fetch data from an API using BLoC architecture. Today's article will be about authenticating users with Firebase and Google Sign In.
- Let's roll up our sleeves and get started!

UI Design
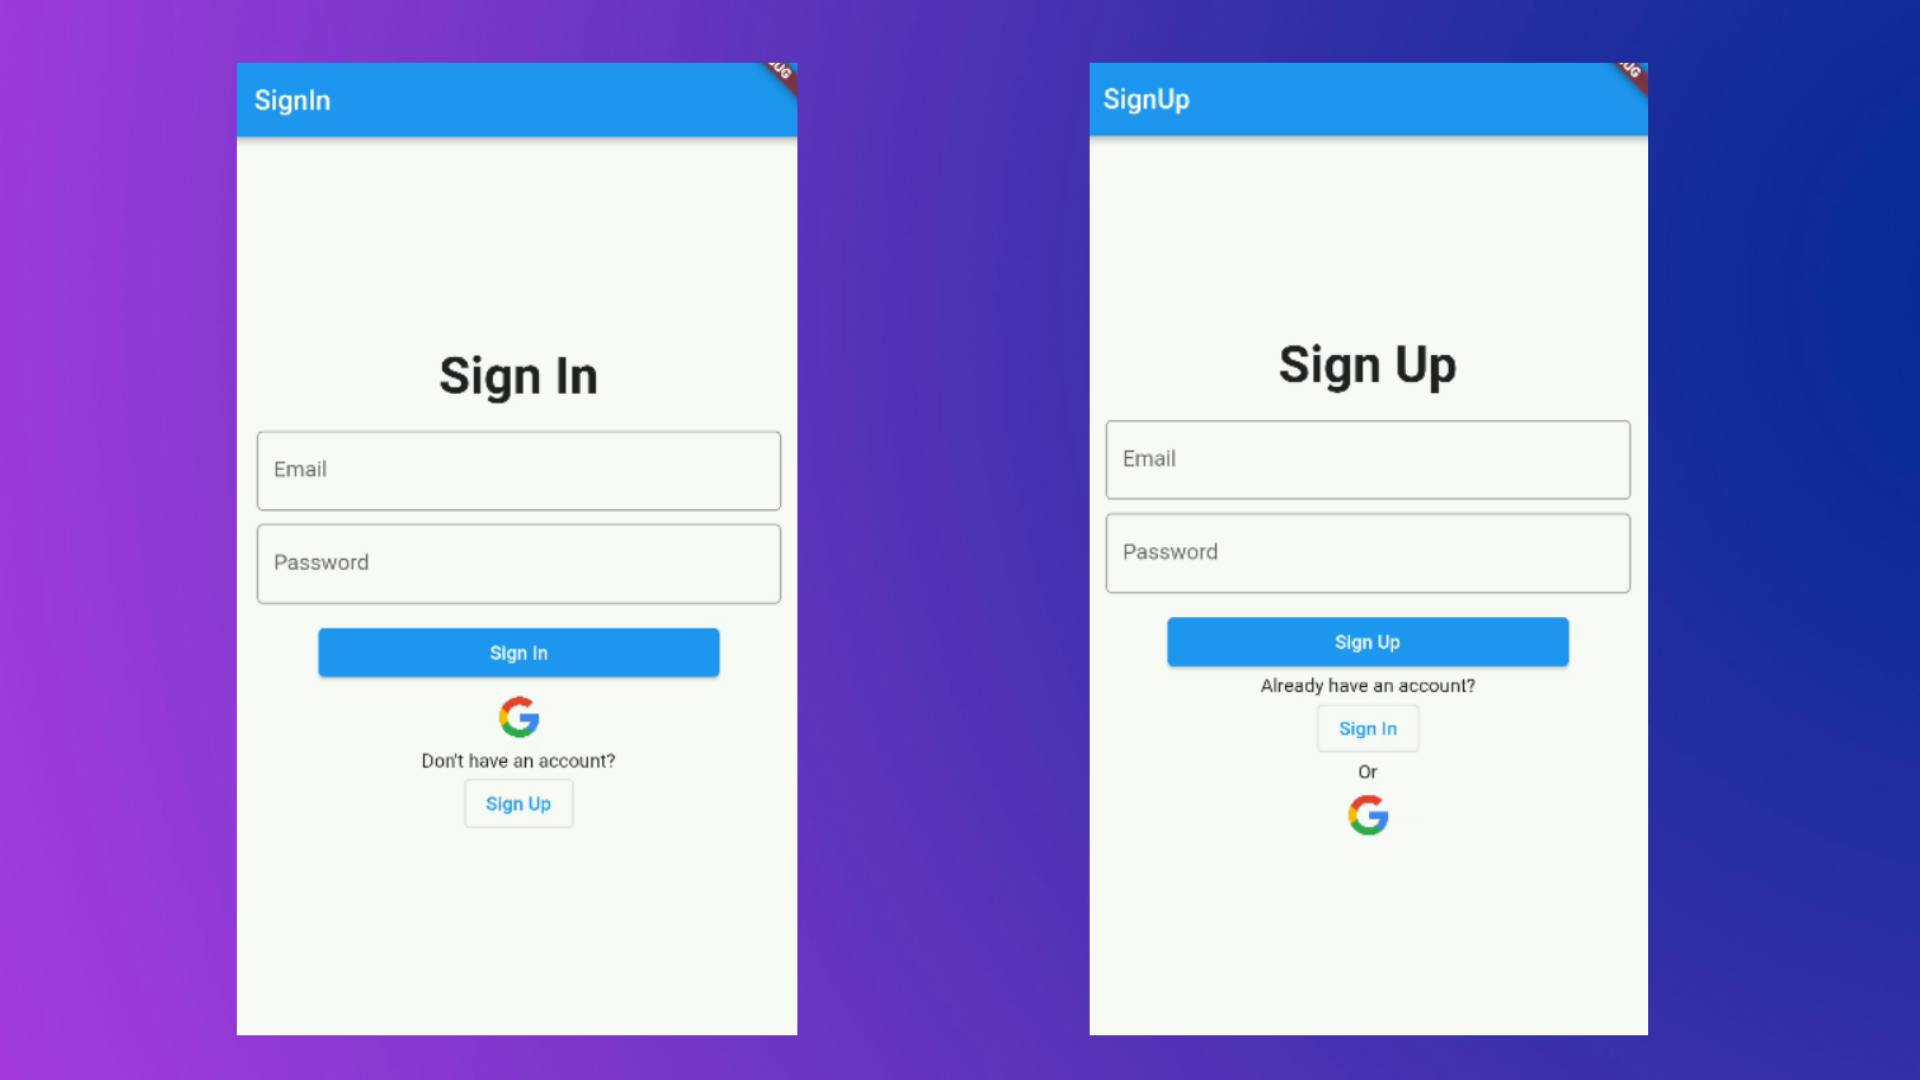
- The design is straightforward; there are mostly three screens. Screens for Sign In, Sign Up, and Dashboard.
- The Sign In and Sign Up screens provide two TextFormField, one for Email and the other for Password. It has one button beneath it for signing up and logging in to the application.
- We will also implement Google Sign In. As a result, there is a Google Logo for that as well.
- The user interface will look like this:
- Code for sign_in.dart and sign_up.dart
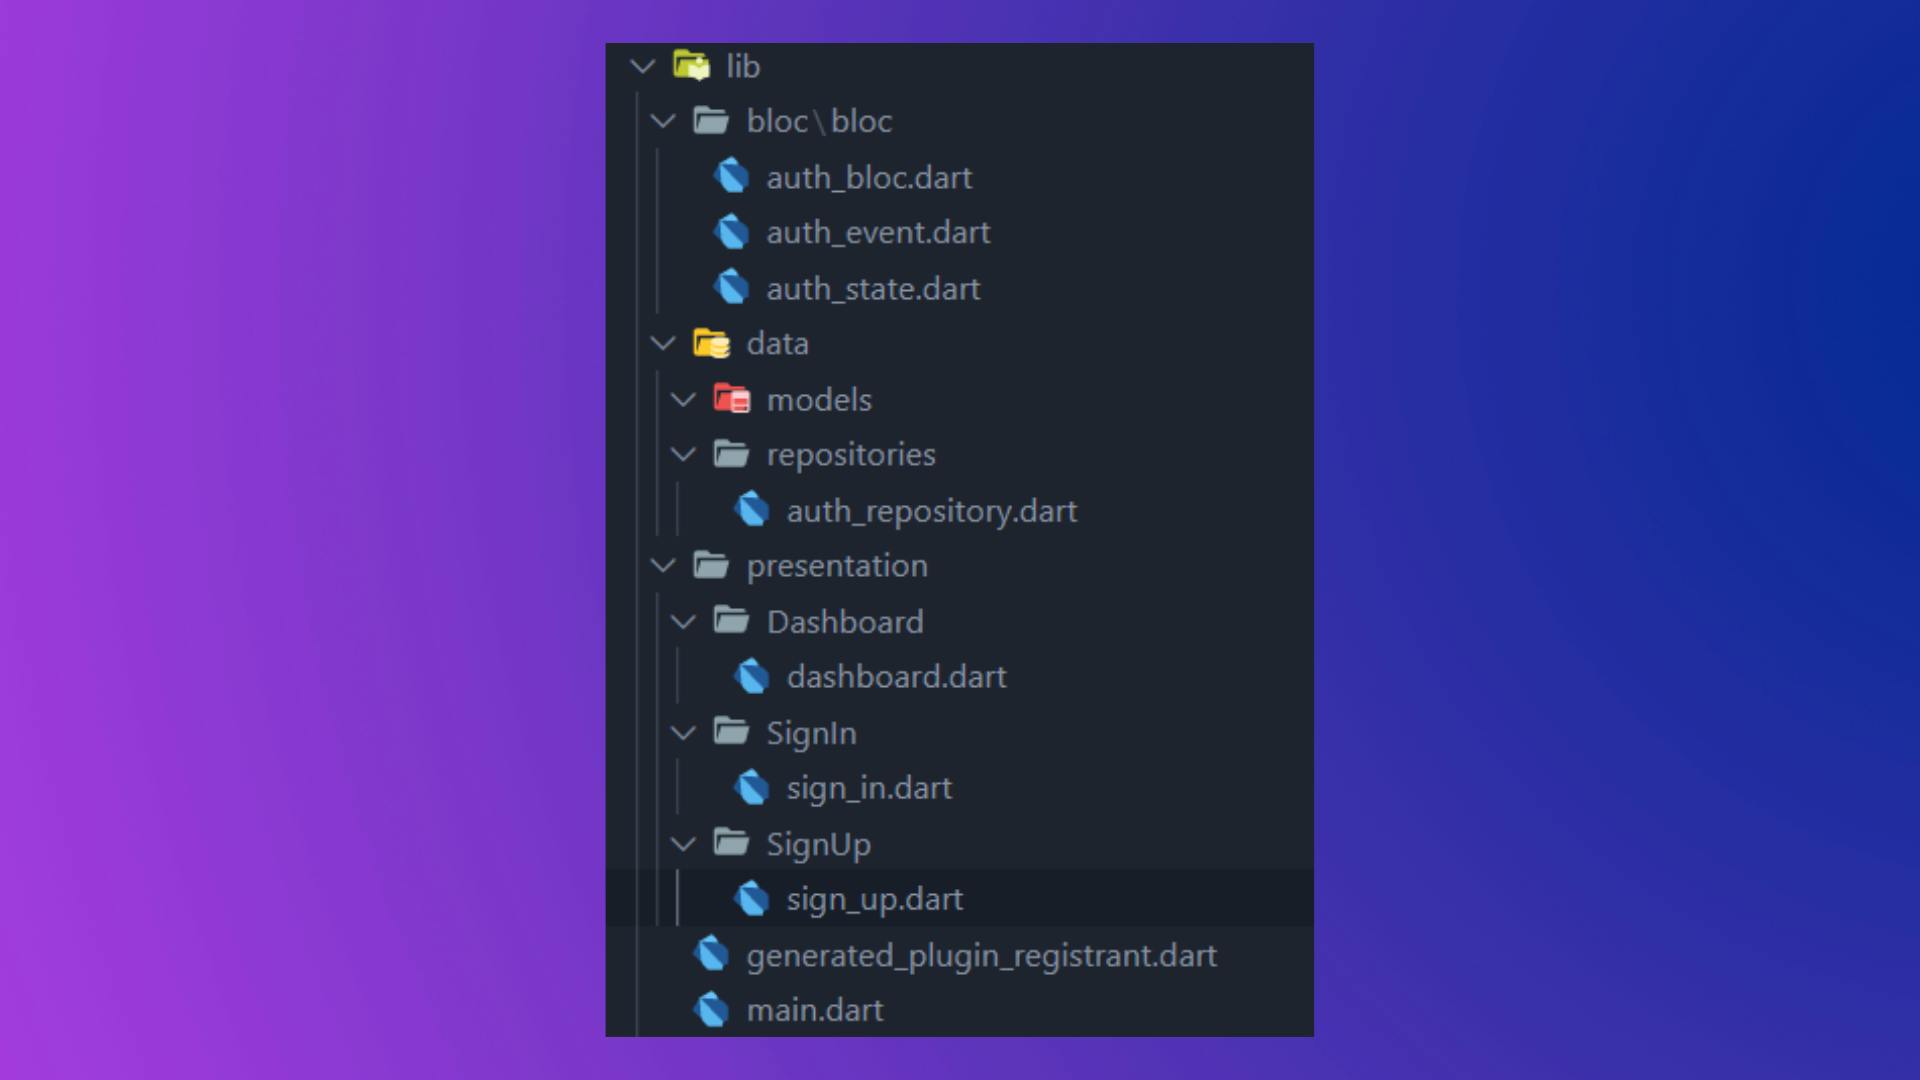
Folder Structure
Firebase Setup
- Before we begin with the Authentication section, we must first connect our app to Firebase.
- To do so, go to Firebase Console and create a new project.
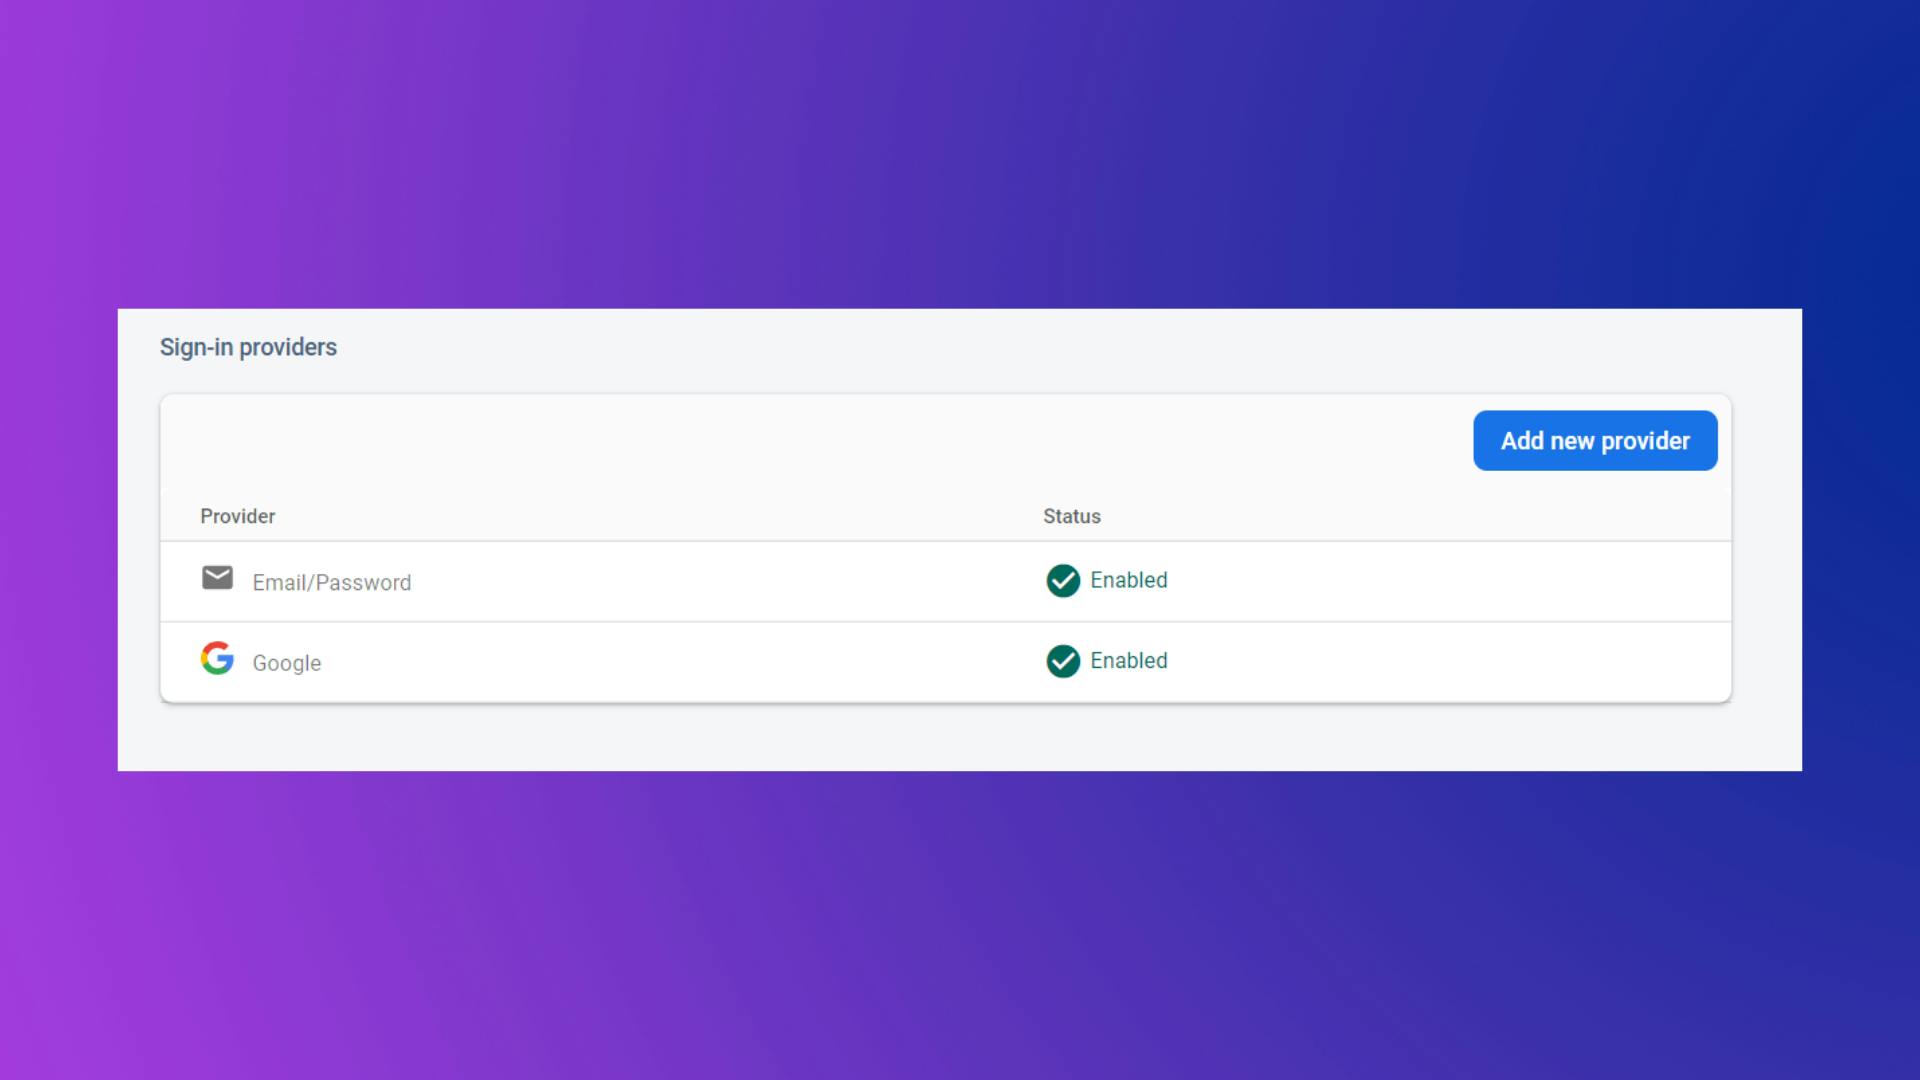
- After the creation of a project. Enable Email and Password Auth and Google Sign In Auth in the Authentication panel.
- For Google Sign In to work, we need to add SHA -1 and SHA-256 keys to Firebase Project.
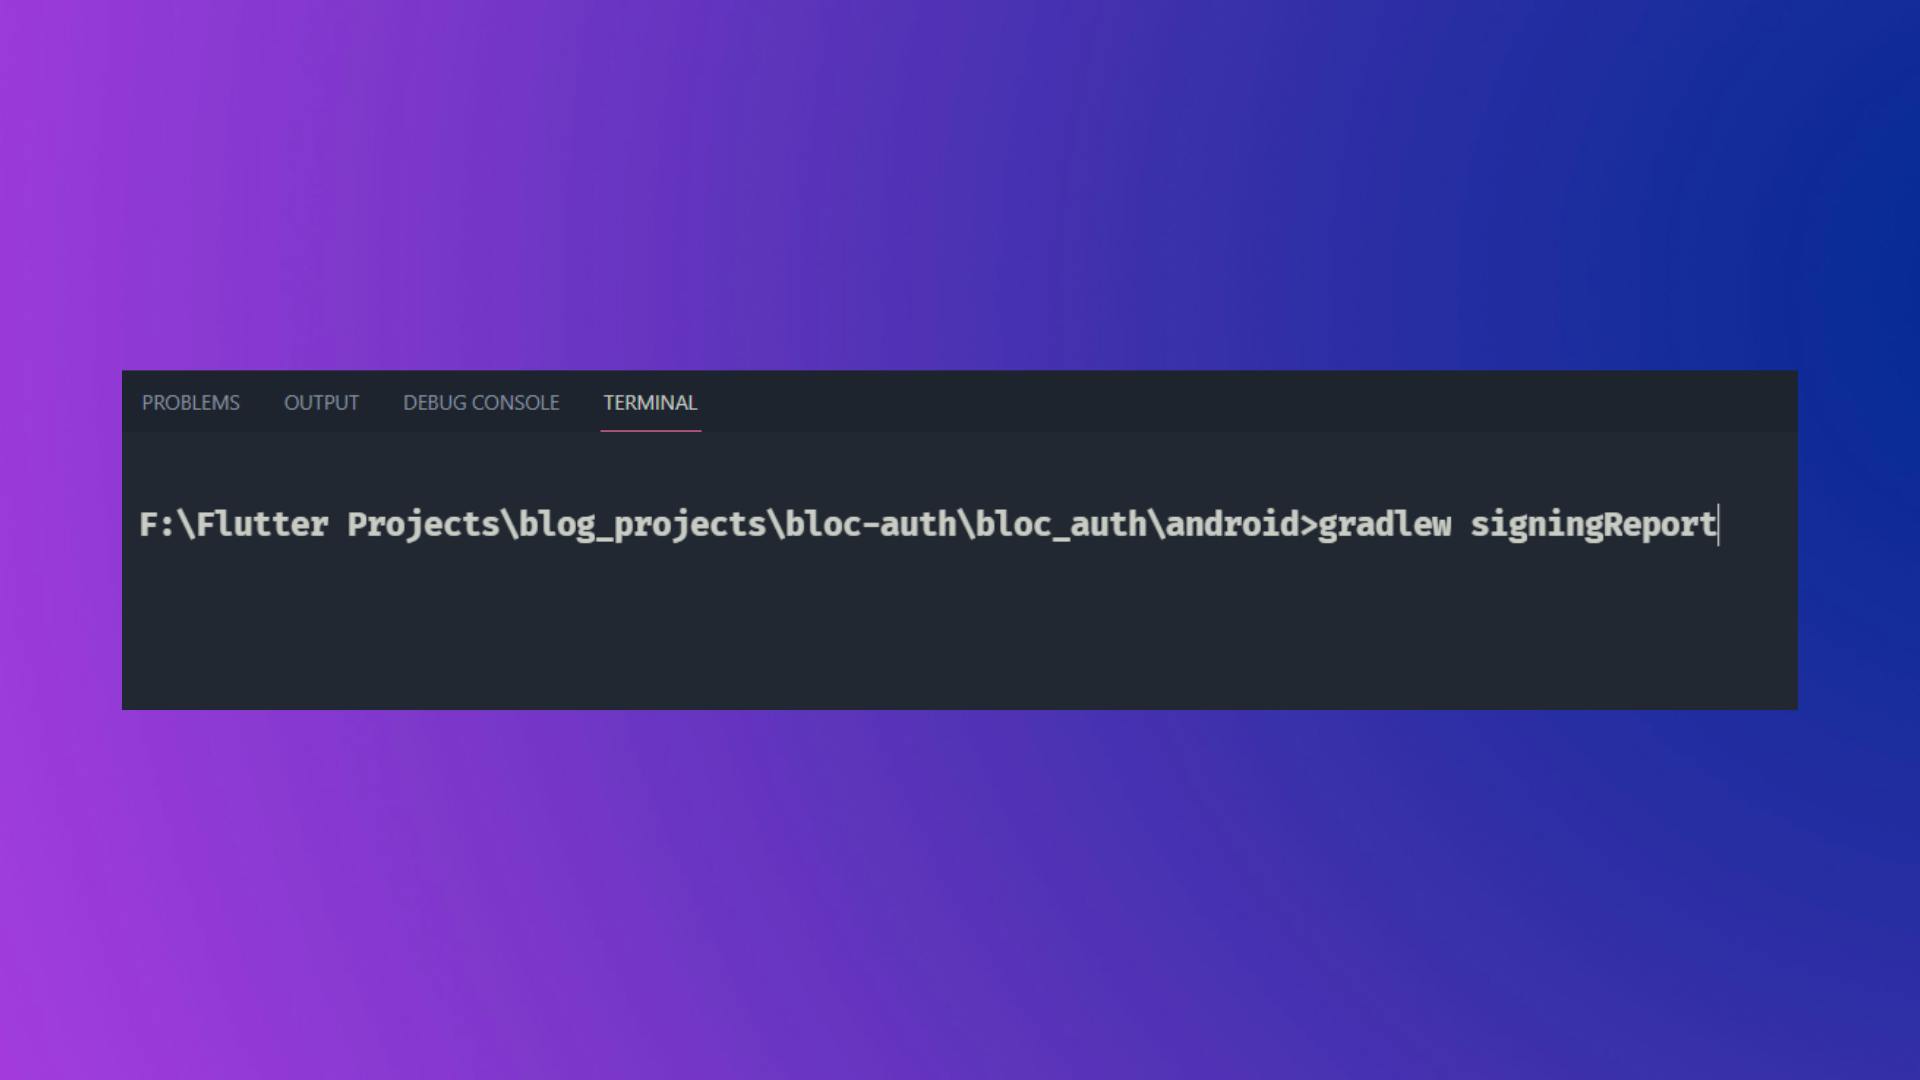
- To do that, head over to the project in VSCode, right-click on the android folder and open it in Integrated Terminal.
- And then run gradlew signingReport command. This will generate both SHA-1 and SHA-256 keys.
- Now head over to Project Settings in Firebase Dashboard and inside You App section just click on the Add FingerPrint and paste both the keys there.
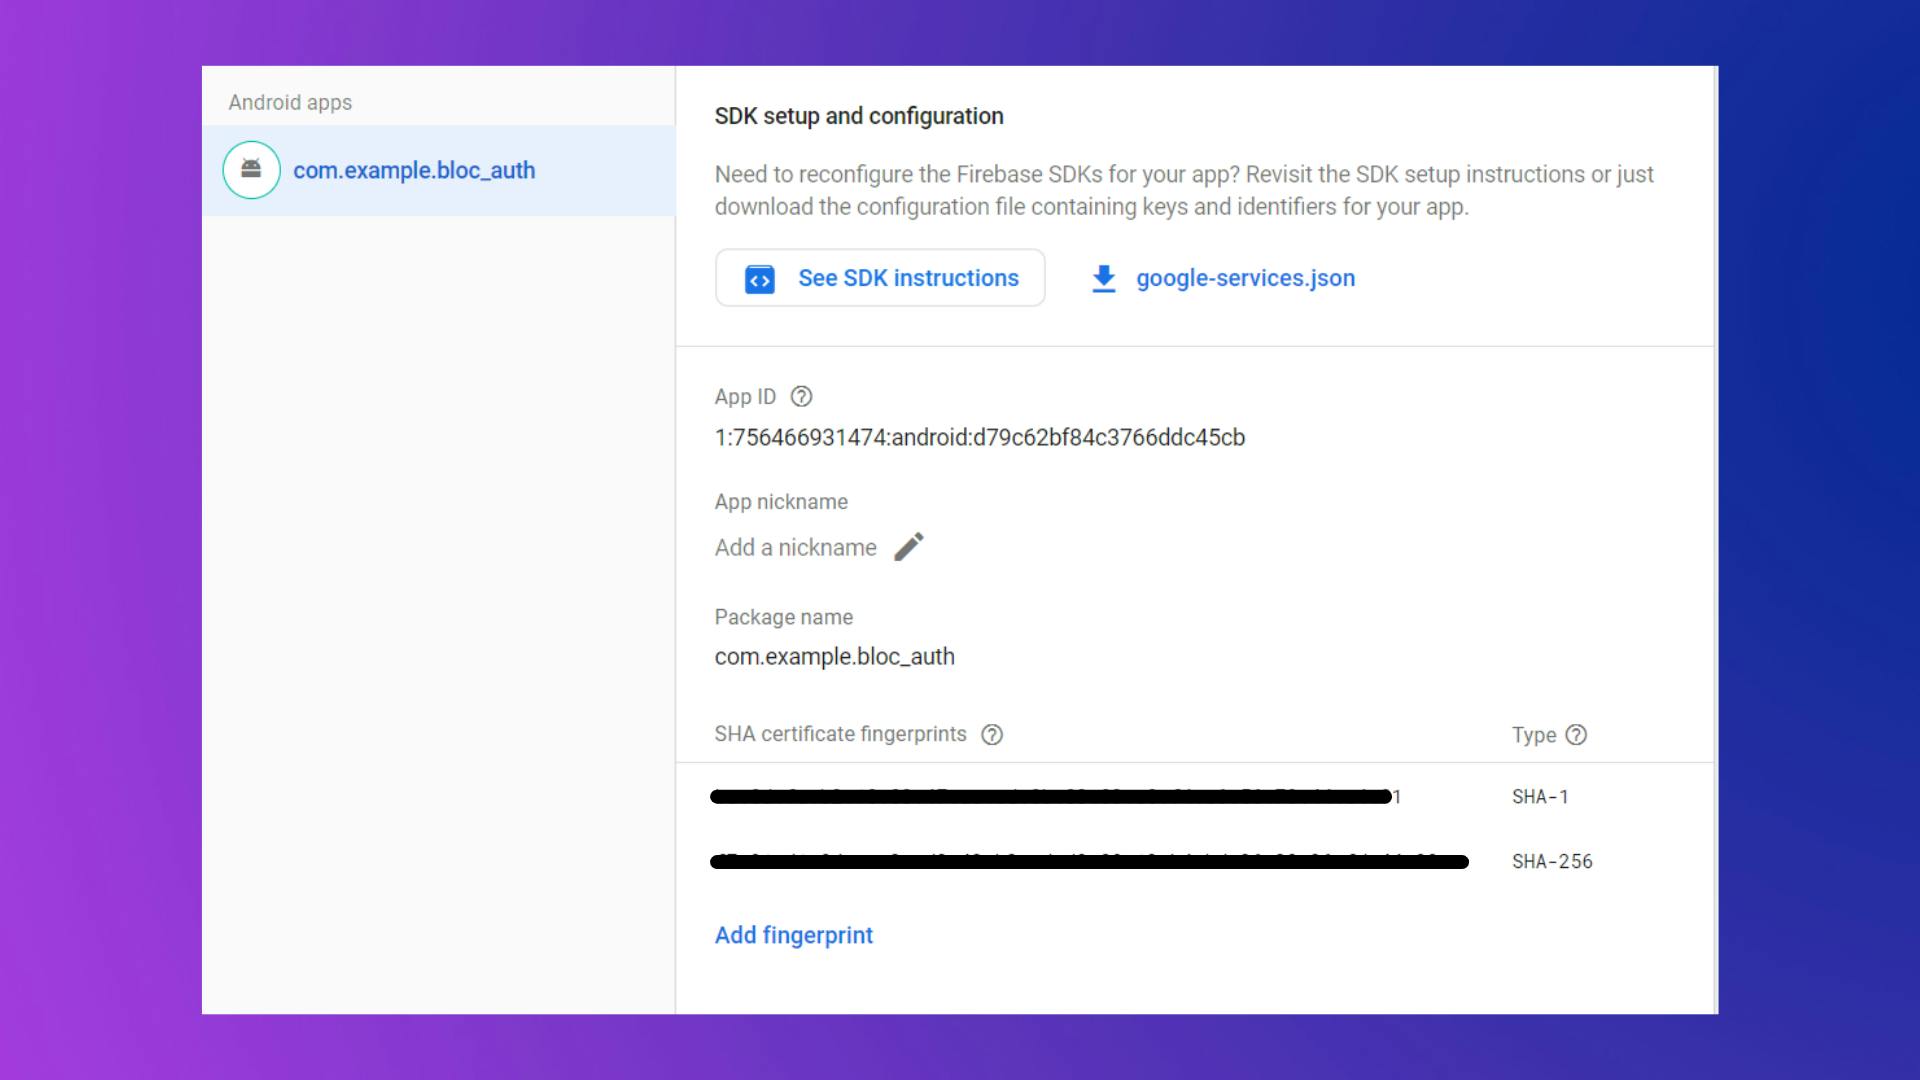
Do not forget to add an updated google-services.json file in your project.
Add Required Dependencies
- Add all the below packages to pubspec.yaml file.
dependencies:
  firebase_core: ^1.10.6
  firebase_auth: ^3.3.4
  equatable: ^2.0.3
  flutter_bloc: ^8.0.1
  google_sign_in: ^5.2.1
  email_validator: ^2.0.1
Firebase Initialization
- To initialize the Firebase in our app replace your main function with the below code.
Future<void> main() async { WidgetsFlutterBinding.ensureInitialized(); await Firebase.initializeApp(); runApp(const MyApp()); } - Firebase.initializeApp() function will initialize the Firebase app in our application.
- And now we are ready for the Authentication.
Writing Logic For Authentication - AuthRepository
- We should now write different function for each of the user's authentication activities.
- For authentication, we primarily need to implement 4 functions: signIn(), signUp(), signOut(), and signInWithGoogle().
- So let's put it in
lib\data\repositories\auth_repository.dart - First and foremost, we must establish an instance of FirebaseAuth.
class AuthRepository{ final _firebaseAuth = FirebaseAuth.instance; } - Now let's first create a method for Signing Up the user.
signUp()
Future<void> signUp({required String email, required String password}) async { try { await FirebaseAuth.instance .createUserWithEmailAndPassword(email: email, password: password); } on FirebaseAuthException catch (e) { if (e.code == 'weak-password') { throw Exception('The password provided is too weak.'); } else if (e.code == 'email-already-in-use') { throw Exception('The account already exists for that email.'); } } catch (e) { throw Exception(e.toString()); } } - This method is quite straightforward; we simply send the email and password to the createUserWithEmailAndPassword() function, and it does the rest.
- I'm also throwing various Exceptions for weak-password and email-already-in-use to handle errors.
signIn()
- Let's construct a method signIn and add the functionality for Signing In the user.
Future<void> signIn({
    required String email,
    required String password,
  }) async {
    try {
      await FirebaseAuth.instance
          .signInWithEmailAndPassword(email: email, password: password);
    } on FirebaseAuthException catch (e) {
      if (e.code == 'user-not-found') {
        throw Exception('No user found for that email.');
      } else if (e.code == 'wrong-password') {
        throw Exception('Wrong password provided for that user.');
      }
    }
}
signOut()
- And for Signing Out the user
Future<void> signOut() async {
    try {
      await _firebaseAuth.signOut();
    } catch (e) {
      throw Exception(e);
    }
}
signInWithGoogle()
Let's make a method called signInWithGoogle for Google Sign In. Which is in charge of displaying the Google Sign In Dialog and logging in with a Google account.
Future<void> signInWithGoogle() async { try { final GoogleSignInAccount? googleUser = await GoogleSignIn().signIn(); final GoogleSignInAuthentication? googleAuth = await googleUser?.authentication; final credential = GoogleAuthProvider.credential( accessToken: googleAuth?.accessToken, idToken: googleAuth?.idToken, ); await FirebaseAuth.instance.signInWithCredential(credential); } catch (e) { throw Exception(e.toString()); } }- Full
auth_repository.dartcode Here
BLoC Implementation
- Here, we are going to write the logic for authentication. So let's first write code for AuthState.
States (auth_state.dart)
- The UI will update according to the State it receives from the Bloc.
- In our case, we have 4 different states: Loading, Authenticated, UnAuthenticated, AuthError.
- As you can see it's fairly simple to understand what each state is responsible for.
Events (auth_event.dart)
- Events are nothing but different actions (button click, submit, etc) triggered by the user from UI. It contains information about the action and gives it to the Bloc to handle.
- In our case, there are mainly 4 events : SignInRequested, SignUpRequested, GoogleSignInRequested, and SignOutRequested.
- Let's implement these events inside
lib\bloc\auth_events.dart.
Bloc (auth_bloc.dart)
- This file acts as a middle man between UI and Data layer, Bloc takes an event triggered by the user (ex: SignIn button press, SignUp button press, etc) as an input, and responds back to the UI with the relevant state.
- In this, we are going to emit the State according to the Events requested by the user.
- Here we also need an AuthRepository for accessing the methods. So initialize it within the constructor.
Providing AuthRepository and AuthBloc To UI
- To access the AuthRepository in the UI we need to wrap the MaterialApp around RepositoryProvider.
- And To access the States and Events of the bloc we need to wrap the MaterialApp around BlocProvider
class MyApp extends StatelessWidget { const MyApp({Key? key}) : super(key: key); @override Widget build(BuildContext context) { return RepositoryProvider( create: (context) => AuthRepository(), child: BlocProvider( create: (context) => AuthBloc( authRepository: RepositoryProvider.of<AuthRepository>(context), ), child: MaterialApp( home: SignIn() ), ), ); } }- We also need to pass the AuthRepository to the AuthBloc. So to do that we can simply access the AuthRespository using:
RepositoryProvider.of<AuthRepository>(context)
Implementing SignIn/SignUp and Google ButtonPress
- Now, in order to authenticate users when they press the SignIn/SignUp/Google button, we must add events to our bloc and begin the authentication process.
- To do so, add two methods listed below to the SignIn page.
void _authenticateWithEmailAndPassword(context) { if (_formKey.currentState!.validate()) { // If email is valid adding new Event [SignInRequested]. BlocProvider.of<AuthBloc>(context).add( SignInRequested(_emailController.text, _passwordController.text), ); } } // void _authenticateWithGoogle(context) { BlocProvider.of<AuthBloc>(context).add( GoogleSignInRequested(), ); }- And now pass these methods on respective Button callbacks.
IconButton( onPressed: () { _authenticateWithGoogle(context); }, icon: ... ), // SizedBox( width: MediaQuery.of(context).size.width * 0.7, child: ElevatedButton( onPressed: () { _authenticateWithEmailAndPassword(context); }, child: const Text('Sign In'), ), )- And also on the SignUp page. Add below two methods.
void _authenticateWithEmailAndPassword(context) { if (_formKey.currentState!.validate()) { // If email is valid adding new event [SignUpRequested]. BlocProvider.of<AuthBloc>(context).add( SignUpRequested(_emailController.text, _passwordController.text), ); } } // void _authenticateWithGoogle(context) { BlocProvider.of<AuthBloc>(context).add( GoogleSignInRequested(), ); }- Also pass these methods on respective Button callbacks.
IconButton(
    onPressed: () {
          _authenticateWithGoogle(context);
   },
   icon: ...
),
//
SizedBox(
    width: MediaQuery.of(context).size.width * 0.7,
    child: ElevatedButton(
      onPressed: () {
         _createAccountWithEmailAndPassword(context);
     },
          child: const Text('Sign Up'),
     ),
)
Rendering UI According to States
- Now that we've completed all of the user authentication logic, we need to conditionally render the UI based on the states received from the BLoC.
- We must wrap the Scaffold's body around BlocConsumer to accomplish this. BlocConsumer? Because we require both BlocBuilder to construct the UI based on the state and BlocListener to listen for state changes and guide the user if the user is authenticated, as well as to show the error using SnackBar if there is an issue.
- BlocBuilder and BlocListener can be used independently as well. By doing it both ways, I'll demonstrate the differences.
- Let's start by adding it to the SignIn page. We'll use BlocBuilder and BlocListener separately in this example.
- And now let's make use of BlocConsumer inside the SignUp page.
Dashboard Page Implementation
- After the successful authentication we can show the authenticated user's details on the Dashboard page.
- We can get the current authenticated user information as shown below:
final user = FirebaseAuth.instance.currentUser!; - Now let's design the Dashboard UI and display the user information
- Here I've also added a Sign Out button for signing out the user from the app. After signing out the user will be redirected to the SignIn Screen.
- Now if you try to log in with google you will be redirected to the dashboard screen and the information will be shown on that page.
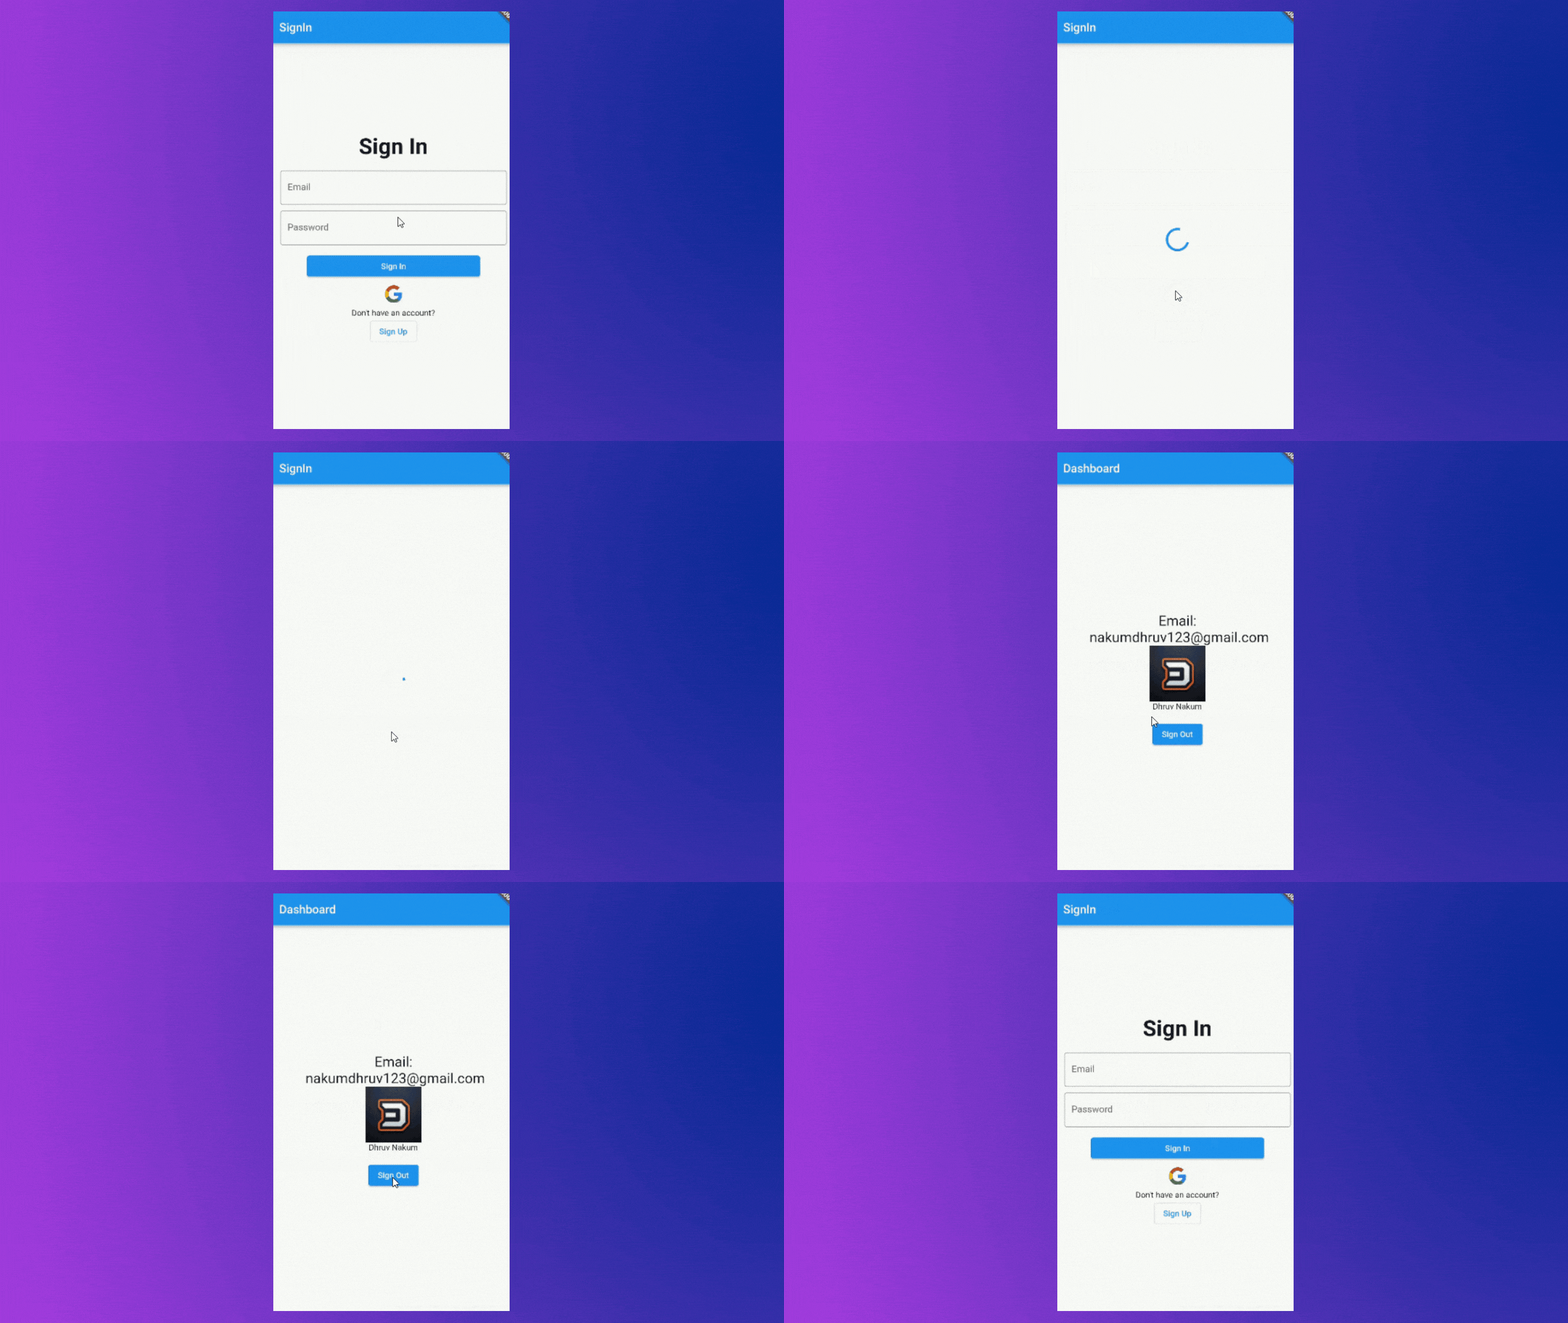
- Let's also try to log in with an email/password. First, we will create an account and then we will also check the credentials by signing in.

- All seems fine, right? Then, go to the SignIn page and sign in with your credentials and after you are authenticated and reached to Dashboard screen, Hot Restart the app or Simply Close the App and Reopen it.

- As you can see, even if we are authenticated, we are being redirected to the SignIn page again. Why? Let's see.
Persisting authentication state
- Our app has been functioning and authenticating users as expected up to this point. However, there is a snag. And it is: after successfully signing in, whether we refresh the app or try to reopen it, the SignIn page comes once again. This is because we don't keep track of the authenticated user's state in our app.
- To accomplish so, we'll use Stream to listen to the authentication state. authStateChange() Stream is provided by FirebaseAuth and is used to listen to the user's authentication state.
- Let's use this stream to keep track of our user's current status. To do so, go to
main.dartand paste the code below.
Final Result

Github Repo
Wrapping Up
- I hope you found this article to be beneficial. If you have any feedback/queries, leave them in the comments.
- Thank you for spending time reading this article. See you in the next article. So, until then...


