Becoming an Expert in Flutter with Clean Architecture: The Implementation-Part 3
Create a real-world Flutter application using Clean Architecture from the ground up

Introduction
Heleww there 👋🏻, welcome again or welcome if you are coming here for the first time. Thanks for clicking on this blog and taking the time to read it.
I'm writing a series on Clean Architecture in Flutter, and this is the last article in that series.
In Part 1, we covered the basics of Clean Architecture, what it is, and why it's important for Flutter developers or any developer to use this architecture when coding.
In Part 2, we looked at how to organize your Flutter project and build an application using Clean Architecture. We set up Data, Domain, and Presentation layers, along with Core and other necessary folders. We went through each folder, explaining its purpose and how to use it.
The Objective of Part 3
- In this blog, we are going to create two feature.
News:
Here, we will use a dummy news API to get News.
We will also cache all the news using Hive DB, allowing users to read and interact with the app even when they are offline.
Number/Count Info:
We'll use the Numbers API. Here, we'll send a random number to the API, and it will give us an interesting fact about that number.
We'll also use Hive to cache everything for this feature.
- This blog is going to be very interesting. You'll learn a lot, not just about Clean Architecture, but also how to organize code, name things properly, and much more.

Are you readyyy!!!?
- Yes!!!? Then let's get started without any delay.
There is one💡BONUS for you too. So stay tuned.
Setting up the environment and project structure
- To get started clone below repository in your local machine:
Feature 1: News
- Let's create a feature called news inside
lib/features/

Now, let's also create sub-folders for each of these directories:
data:
datasources
models
repositories
domain:
entities
repositories
usecases
presentation
cubit
pages
widgets

- So, we've set up the basic structure for the news feature. What's next? Let's begin with the presentation layer.
Setting up routes
- Let's create a page named
news_page.dartinfeatures/news/presentation/pages/so we can add it to the route and get started.
import 'package:flutter/material.dart';

class NewsPage extends StatelessWidget {
  const NewsPage({Key? key}) : super(key: key);

  @override
  Widget build(BuildContext context) {
    return Scaffold(
      appBar: AppBar(
        title: const Text('News'),
      ),
    );
  }
}
- To add this route go to
routes.dartandpaths.dartfile and add below code snippets:
// paths.dart
class Paths {
  static String newsPage = '/news';
}
// routes.dart
final router = GoRouter(
  initialLocation: Paths.newsPage,    // <---- Add initial route too
  routes: [
    GoRoute(
      path: Paths.newsPage,
      builder: (context, state) => const NewsPage(),
    ),
  ],
);
- We also have to update
app.dartfiles' configurations.
// app.dart
import 'package:clean_architecture_bloc/routes/routes.dart';

class App extends StatelessWidget {
  const App({super.key});

  @override
  Widget build(BuildContext context) {
    return ScreenUtilInit(
      designSize: const Size(390, 844),
      builder: (_, __) => MaterialApp.router(    // <------
        // other configuration
        routerConfig: router,     // <---- Provide our `router` as routerConfig
      ),
    );
  }
}
Now, If we run the app you will see News text in AppBar

Implementing Domain Layer
- As we know that Domain layer is the heart of the Clean Architecture. Let's start with this layer.
News Entity
- Let's start with the entity. First we need to see what the data looks like so click on this link and analyse the data : News API
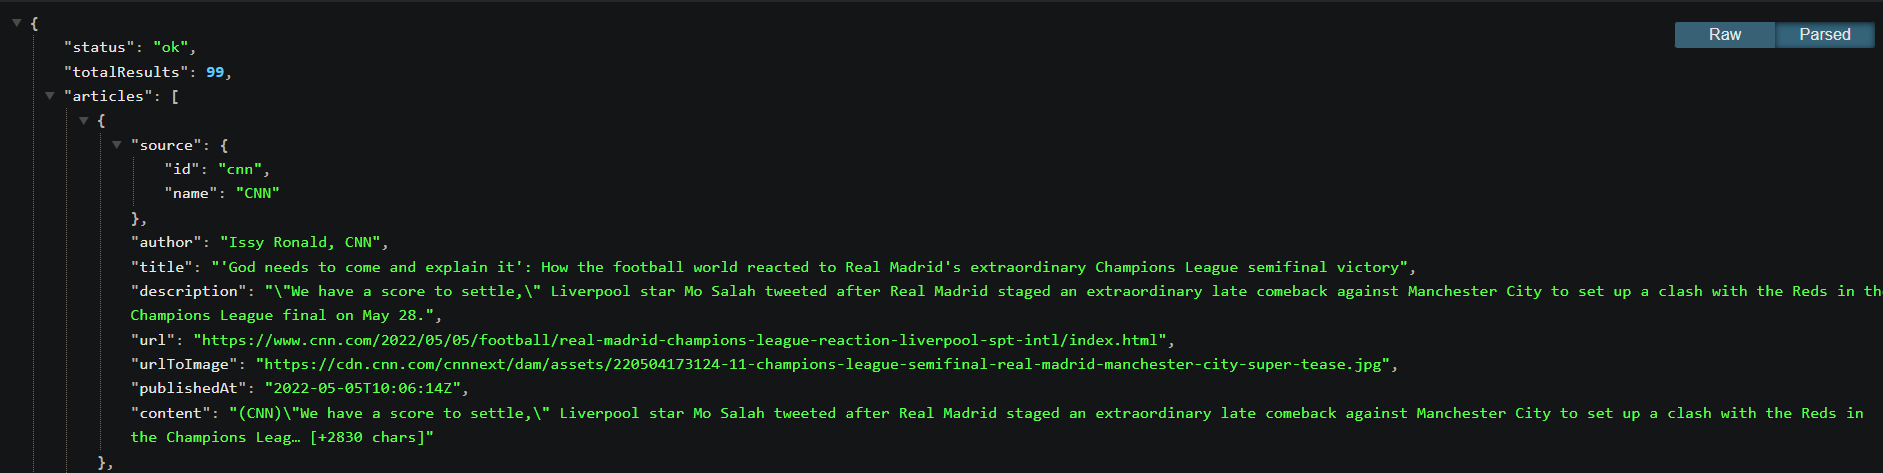
Here, we see that the main data we need is a list of
articles, right? So, this becomes our entity because, remember, what is an Entity?They are like the main characters in a story. They are real-world things or concepts important to your app. For example, in an e-commerce app, entities could be
Product,Customer, andOrder.So let's create
news_entityinsidefeatures/news/domain/entitiesfolder.
class NewsEntity extends Equatable {
  @HiveField(0)
  final String? status;
  @HiveField(1)
  final int? totalResults;
  @HiveField(2)
  final List<ArticlesEntity>? articles;

  const NewsEntity({this.status, this.totalResults, this.articles});

  @override
  List<Object?> get props => [status, totalResults, articles];
}

class ArticlesEntity extends Equatable {
  @HiveField(1)
  final SourceEntity? source;
  @HiveField(2)
  final String? author;
  @HiveField(3)
  final String? title;
  @HiveField(4)
  final String? description;
  @HiveField(5)
  final String? url;
  @HiveField(6)
  final String? urlToImage;
  @HiveField(7)
  final String? publishedAt;
  @HiveField(8)
  final String? content;

  const ArticlesEntity(
      {this.source,
      this.author,
      this.title,
      this.description,
      this.url,
      this.urlToImage,
      this.publishedAt,
      this.content});

  @override
  List<Object?> get props => [
        source,
        author,
        title,
        description,
        url,
        urlToImage,
        publishedAt,
        content
      ];
}

class SourceEntity extends Equatable {
  @HiveField(0)
  final String? id;
  @HiveField(1)
  final String? name;

  const SourceEntity({this.id, this.name});

  @override
  List<Object?> get props => [id, name];
}
- Here were also annotating every field of our Entity with
HiveField()because we want our news to be stored locally. If you don't have the functionality of storing data locally then you can exclude that step.
GetNews UseCase
What is the main goal of this feature? To get News from the API, right?
So that becomes our Usecase to GetNews from the API.
Recap: Use cases represent specific actions that users can do to accomplish something in your app. They act as the bridge between what the user does and the core logic covered by entities.
- Let's create a file
get_news.dartinsidefeatures/news/domain/usecasesand create GetNews use case
class GetNews {
  final NewsRepository newsRepository;

  GetNews({required this.newsRepository});

  Future<Either<Failure, NewsEntity>> call() async {
    return await newsRepository.getNews();
  }
}
Here, we have the NewsRepository, and we're using its
getNews()method to get data from the Data layer.We're using
dartzfor functional programming. The return type is Either, meaning this function will return either Failure or NewsEntity. For more info, check out the dartz package.You might see some errors because we haven't created NewsRepository yet. Let's create it now.
News Repository
The repository in the domain layer serves as a bridge between the domain layer and the data layer. It's essentially an abstract class, with its implementation detailed in the Data layer.
Think of it as a middleman that manages data operations, allowing the domain layer to remain unaware of the specifics of data storage or retrieval. Let's go ahead and create our NewsRepository now.
abstract class NewsRepository {
  Future<Either<Failure, NewsEntity>> getNews();
}
We've finished with the Domain layer. It's straightforward, right? Not complicated at all. But that's if you've read the previous blog 😅; otherwise, it might seem hard.
Now, let's move on to the Data layer.

Implementing Data Layer
- In this layer, we have
datasources,models, andrepositories. So, what's the Data layer for again, just to quickly recap?
The Data layer talks to APIs, Databases, and so on, and sends data back to the Domain layer, which the Presentation layer uses to show it on the screen.
- Let's start with the data source.
News Remote Data Source
- Before we start the implementation we need to define the API URL inside Endpoints class.
// endpoints.dart
class Endpoints {
  Endpoints._();
  // ...
  static const String newsBaseURL =
      'https://saurav.tech/NewsAPI/everything/cnn.json';
}
- Now create
news_remote_data_source.dartfile insidefeatures/news/data/datasourcesdirectory and paste below code.
abstract class NewsRemoteDataSource {
  Future<Response> getNews();
}

class NewsRemoteDataSourceImpl implements NewsRemoteDataSource {
  final _dioClient = getIt.get<DioClient>();

  @override
  Future<Response> getNews() async {
    try {
      final newsResponse = await _dioClient.get(Endpoints.newsBaseURL);
      return newsResponse;
    } on DioException {
      rethrow;
    }
  }
}
First, we created an abstract Remote Data Source class and then its implementation class
NewsRemoteDataSourceImpl.Simply put, we are using DioClient's
get()method to get the data and return the Response object. Nothing scary or complicated going on here.
News Local Data Source
We're also setting up offline viewing for our users, so we need to work on the Local Data source.
Before that, some setup is required.
Go to the
hive_helper.dartclass. First, we need to open a Hive box for our news feature.
class HiveHelper {
  static init() async {//...}

  static openBox() async {
    await Hive.openBox(kNewsBox);
  }
}
kNewsBoxis defined in theconstants.dartfile
// constants.dart
String kNewsBox = 'newsBox';
- Now that we have opened the box let's get the box by defining the
getNewsBox()function
class HiveHelper {
  static init() async {//...}
  static openBox() async {//...}

  static Box<dynamic> getNewsBox() {
    return Hive.box(kNewsBox);
  }
}
- Great!! Now we are good to go. Let's create
news_local_data_source.dartfile and paste code below.
abstract class NewsLocalDataSource {
  Future<void> cacheArticles({required List<ArticleModel>? articles});
  Future<List<ArticleModel>?> getNews();
}

class NewsLocalDataSourceImpl implements NewsLocalDataSource {
  @override
  Future<List<ArticleModel>?> getNews() async {
    final newsData = HiveHelper.getNewsBox().get(kNewsBox);

    if (newsData != null) {
      final List<ArticleModel> newsList = [];
      for (ArticleModel item in newsData) {
        newsList.add(ArticleModel.fromJson(item.toJson()));
      }
      return newsList;
    }

    return null;
  }

  @override
  Future<void> cacheArticles({required List<ArticleModel>? articles}) async {
    try {
      await HiveHelper.getNewsBox().put(
        kNewsBox,
        articles,
      );
    } on HiveError {
      throw CacheException();
    }
  }
}
We start by creating an abstract class, similar to what we did in RemoteDataSource, where we define two primary methods required for caching.
getNews: This method retrieves all the news from the box and converts it into ArticleModel format. If the box is empty, it returns
null.cacheNews: After successfully getting data from the remote data source API, we use this method to save the latest news in local db.
You must be seeing an error with ArticleModel, let's go ahead and create ArticleModel in the models directory.
NewsModel
A quick recap of what Model is:
Models act as blueprints for real-world things in our code, like News in this case, right?
They're quite similar to Entities, and we actually make every model class inherit from its corresponding Entities. The main difference is that models include functions like
fromJson,toJson,toMap, etc. These functions help the data layer convert information/data from third-party APIs or databases into a format we can use.
import 'package:clean_architecture_bloc/features/news/domain/entities/news_entity.dart';
import 'package:hive/hive.dart';

part 'news_model.g.dart';

@HiveType(typeId: 1)
class NewsModel extends NewsEntity {
  const NewsModel({
    required super.status,
    required super.totalResults,
    required super.articles,
  });

  factory NewsModel.fromJson(Map<String, dynamic> json) {
    return NewsModel(
      status: json['status'],
      totalResults: json['totalResults'],
      articles: (json['articles'] as List)
          .map((e) => ArticleModel.fromJson(e))
          .toList(),
    );
  }

  Map<String, dynamic> toJson() {
    return {
      'status': status,
      'totalResults': totalResults,
      'articles':
          articles?.cast<ArticleModel>().map((e) => e.toJson()).toList(),
    };
  }
}

@HiveType(typeId: 2)
class ArticleModel extends ArticlesEntity {
  const ArticleModel({
    required super.source,
    required super.author,
    required super.title,
    required super.description,
    required super.url,
    required super.urlToImage,
    required super.publishedAt,
    required super.content,
  });

  factory ArticleModel.fromJson(Map<String, dynamic> json) {
    return ArticleModel(
      source:
          json['source'] != null ? SourceModel.fromJson(json['source']) : null,
      author: json['author'],
      title: json['title'],
      description: json['description'],
      url: json['url'],
      urlToImage: json['urlToImage'],
      publishedAt: json['publishedAt'],
      content: json['content'],
    );
  }

  Map<String, dynamic> toJson() {
    return {
      'source': (source as SourceModel).toJson(),
      'author': author,
      'title': title,
      'description': description,
      'url': url,
      'urlToImage': urlToImage,
      'publishedAt': publishedAt,
      'content': content,
    };
  }
}

@HiveType(typeId: 3)
class SourceModel extends SourceEntity {
  const SourceModel({
    required super.id,
    required super.name,
  });

  factory SourceModel.fromJson(Map<String, dynamic> json) {
    return SourceModel(
      id: json['id'],
      name: json['name'],
    );
  }

  Map<String, dynamic> toJson() {
    return {
      'id': id,
      'name': name,
    };
  }
}
Here were also annotating the classes with
@HiveType()because we want our NewsModels to be stored in our NewsBox. This helpshive_generatorto generate Adapter classes for each models which we need to register.Now, import this model class into the datasources class where we were getting errors, and everything should work fine.
If you're seeing an error in the
part 'news_model.g.dart'line, you can fix it by running theflutter pub run build_runner buildcommand in the terminal. This will generate the HiveAdapter class.
- After generating the file head over to HiveHelper class and Register those Adapters
class HiveHelper {
  static init() async {
    await Hive.initFlutter();
    Hive.registerAdapter(NewsModelAdapter());
    Hive.registerAdapter(ArticleModelAdapter());
    Hive.registerAdapter(SourceModelAdapter());
    await openBox();
  }
  //...
}
NewsRepository
A quick recape again for Data layers repository:
It directly communicates with either the Remote or Local data sources and sends the data back to the Domain layer. It also handles any errors that occur while accessing data, ensuring these errors are managed in a way that the rest of the app can easily deal with.
Remember we created abstract Repository class inside Domain. We implement every method of it in this class.
Create
news_repository_impl.dartfile and paste below code in it:
class NewsRepositoryImpl implements NewsRepository {
  final NewsRemoteDataSource remoteDataSource;
  final NewsLocalDataSource localDataSource;

  final networkInfo = getIt.get<NetworkInfo>();

  NewsRepositoryImpl(
      {required this.remoteDataSource, required this.localDataSource});

  @override
  Future<Either<Failure, NewsModel>> getNews() async {
    // Checking the connectivity
    if (await networkInfo.isConnected!) {
      try {
        // Getting News from API
        final remoteNews = await remoteDataSource.getNews();
        final newsModel = NewsModel.fromJson(remoteNews.data);
        // Storing news in HiveBox
        await localDataSource.cacheArticles(
          articles: newsModel.articles?.cast<ArticleModel>(),
        );
        return Right(newsModel);
      } on DioException catch (e) {
        final errorMessage = DioExceptions.fromDioError(e);
        return Left(ServerFailure(errorMessage: errorMessage.message));
      }
    } else {
     // If no internet, getting data from database
      try {
        final localNews = await localDataSource.getNews();
        if (localNews != null) {
          return Right(
            NewsModel(
              status: '200',
              totalResults: localNews.length,
              articles: localNews,
            ),
          );
        } else {
          throw CacheException();
        }
      } on HiveError catch (_) {
        return Left(HiveFailure(errorMessage: _.message));
      } on CacheException catch (_) {
        return Left(CacheFailure(errorMessage: 'No News Found'));
      }
    }
  }
}
- Great !! We have successfully completed Data layer implementation. Now it's time to implement UI and get the data.

Implementing Presentation Layer
- Now that we have implemented everything related to data. Let's now get that data by calling our GetNews usecase in our cubit.
News Cubit
Create two files inside Cubit directory:
news_cubit.dart: Where we will write all the business logicnews_state.dart: For managing states like, Success, Failure, etc.
For now we need only two states, NewsSuccess and NewsError. Let's create it.
// news_state.dart
class NewsSuccess extends BaseState {
  final NewsEntity newsEntity;

  NewsSuccess({required this.newsEntity});

  @override
  List<Object?> get props => [newsEntity];
}

class NewsError extends BaseState {
  final String message;

  NewsError({required this.message});

  @override
  List<Object?> get props => [message];
}
- Also let's write the business logic for getting News inside NewsCubit
class NewsCubit extends Cubit<BaseState> {
  NewsCubit() : super(StateInitial());

  final getNewsUserCase = getIt.get<GetNews>();

  Future<void> getNews() async {
    emit(StateLoading());
    final result = await getNewsUserCase.call();
    result.fold(
      (failure) => emit(NewsError(message: failure.errorMessage)),
      (news) => emit(NewsSuccess(newsEntity: news)),
    );
  }
}
We just call the
call()method from GetNews use case. If we get data, we show NewsSuccess; if not, we show NewsError with an error message.Before designing our UI, we need to add this Cubit to our NewsPage. Go to
routes.dartand use BlocProvider to wrap around NewsPage.We also need to run the
getNews()function right when the page loads.
final router = GoRouter(
  initialLocation: Paths.newsPage,
  routes: [
    GoRoute(
      path: Paths.newsPage,
      builder: (context, state) => BlocProvider(
        create: (context) => NewsCubit()..getNews(),
        child: const NewsPage(),
      ),
    ),
  ],
);
NewsPage
- Let's design our news page now.
class NewsPage extends StatelessWidget {
  const NewsPage({Key? key}) : super(key: key);

  @override
  Widget build(BuildContext context) {
    return Scaffold(
      appBar: AppBar(
        title: const Text('News'),
      ),
      body: BlocBuilder<NewsCubit, BaseState>(
        builder: (context, state) {
          if (state is NewsSuccess) {
            return Padding(
              padding: EdgeInsets.all(8.r),
              child: RefreshIndicator(
                onRefresh: () async =>
                    await context.read<NewsCubit>().getNews(),
                child: ListView.separated(
                  itemCount: state.newsEntity.articles?.length ?? 0,
                  separatorBuilder: (BuildContext context, int index) {
                    return Divider(
                      height: 30.h,
                      color: Colors.grey.withOpacity(.3),
                      endIndent: 30,
                      indent: 30,
                    );
                  },
                  itemBuilder: (BuildContext context, int index) {
                    final news = state.newsEntity.articles?[index];
                    return NewsItem(news: news);
                  },
                ),
              ),
            );
          } else if (state is NewsError) {
            return Center(
              child: Text(state.message),
            );
          } else if (state is StateLoading) {
            return const Center(
              child: CircularProgressIndicator(),
            );
          }
          return Container();
        },
      ),
    );
  }
}
- As you can see, we return the Widget based on the state we receive. Let's create a NewsItem widget inside the
widgetdirectory.
class NewsItem extends StatelessWidget {
  const NewsItem({
    super.key,
    required this.news,
  });

  final ArticlesEntity? news;

  @override
  Widget build(BuildContext context) {
    return Column(
      children: [
        Align(
          alignment: Alignment.topLeft,
          child: Text(
            news?.source?.name ?? '',
            style: Theme.of(context)
                .textTheme
                .titleMedium
                ?.copyWith(fontWeight: FontWeight.bold),
          ),
        ),
        SizedBox(height: 5.h),
        Row(
          children: [
            Image.network(
              news?.urlToImage ?? '',
              height: 100.h,
              width: 100.h,
              fit: BoxFit.contain,
            ),
            SizedBox(width: 20.w),
            Expanded(
                child: Column(
              crossAxisAlignment: CrossAxisAlignment.start,
              children: [
                Text(
                  news?.title ?? '',
                  textAlign: TextAlign.justify,
                ),
                SizedBox(height: 10.h),
                Text(
                  news?.author ?? '',
                  style: Theme.of(context)
                      .textTheme
                      .bodySmall
                      ?.copyWith(color: Colors.grey),
                ),
                Text(
                  news?.publishedAt ?? '',
                  style: Theme.of(context)
                      .textTheme
                      .bodySmall
                      ?.copyWith(color: Colors.grey),
                ),
              ],
            )),
          ],
        ),
      ],
    );
  }
}
⚠️ I am not going deep into explaining the UI as it is very simple and require basic understanding of Flutter.
Injecting Dependencies using GetIt
Before we start the app to check the news data, we first need to register the classes we've created. This way, we can use them anywhere without having to initialize them over and over.
We do this using GetIt. You should already have a
service_locator.dartfile in the base project. Go there and add the following code to set it up.
final getIt = GetIt.instance;

Future<void> setupLocator() async {
  await HiveHelper.init();

  getIt.registerLazySingleton<Dio>(() => Dio());
  getIt.registerLazySingleton<DioClient>(() => DioClient(getIt<Dio>()));

  getIt.registerLazySingleton<NetworkInfo>(
      () => NetworkInfoImpl(DataConnectionChecker()));

  // ----------- News -----------
  getIt.registerSingleton<NewsRepository>(NewsRepositoryImpl(
    localDataSource: NewsLocalDataSourceImpl(),
    remoteDataSource: NewsRemoteDataSourceImpl(),
  ));
  getIt.registerSingleton<GetNews>(
      GetNews(newsRepository: getIt.get<NewsRepository>()));
}
Running the Application
- Finger crossed 🤞🏻...let's run the application 🫣


- Ohkay 😅 sorry for the overacting there. But hey, we made it....

Feature 2: Counter
I just realized this blog has gotten really long. So, I'll share the repository where these two features are implemented.
But before that, I highly recommend trying to implement the feature on your own. It will help you understand everything better.
Here's the repo link:
The BONUS
Oh yes, THE BONUS, right? I've got you covered.
The bonus is, as you might have noticed, creating the feature with all these folders and files can take a lot of time. You can save time by using the mason_cli package.
After setting it up, you can visit brickhub.dev where you'll find many templates for Clean Architecture like this one.
- After adding the brick in your system you just have to now hit this command :
mason add clean_architecture_folders
And Voila!!! you will have the feature ready for you:
.
├── home
│   ├── data
│   │   ├── datasources
│   │   ├── models
│   │   └── repositories
│   ├── domain
│   │   ├── entities
│   │   ├── usecase
│   │   └── repositories
│   └── presentation
└── ...
- Let me know in the comments if you're interested in a blog about Mason. I'll definitely write one because it's a very useful tool, not just for this situation but for many others as well.
Conclusion
This is it! We have successfully completed the Clean Architecture series together.
I hope this series has added value to your knowledge. If it did, I would love to hear your thoughts/feedback in the comments.
Thank you for supporting the series. There are many more things on the way. To get notified when the new blog is posted, subscribe to my newsletter.
See you in the next blog, until then...