Becoming an Expert in Flutter with Clean Architecture: Part 2
How to Structure Your Flutter Project for Clean Architecture

Introduction
Hey there 👋🏻 Welcome back to part two of the journey through Clean Architecture, or a big hello if you're here for the first time. I'm really glad you decided to check out this article, and I promise you won't regret it.

Recap of the first article
If you're new to this Clean Architecture series, I've already covered the basics of Clean Architecture. Here's a quick summary:
We started by talking about why Clean Architecture is important.
Next, we looked at the three main parts of Clean Architecture:
Presentation
Domain
Data layer
We explored each layer in detail, explaining what each one does, and using examples to help understand their roles and responsibilities.
If you have not checked it yet go ahead and take a look at it:
Pre-requisites: The pre-requisite for reading this article is above blog on Clean Architecure and a basic knowledge of Flutter.
In this article...
This blog I will show you how to organize your project's folders for Clean Architecture, based on what we covered in the first article.
We'll use flutter_bloc for managing states. If you're not familiar with Bloc, it's okay. You can use any state management method that fits with Clean Architecture.
So, without further ado, let's dive in.
Project Setup
First of all, go to a directory of your choice and hit the below command in termial to create a flutter project.
flutter create my_appAfter creating a project let's now go ahead and add a required dependency. Head over to
pubspec.yamland add the below dependencies:
dependencies:
    data_connection_checker_tv: ^0.3.5-nullsafety // For checking internet connectivity
    flutter_screenutil: ^5.9.0 // For creating responsive
    dio: ^5.4.1 // For making http requests
    get_it: ^7.6.7 // For dependency injection
    logger: ^2.1.0 // For logging debug
    flutter_bloc: ^8.1.4 // For State management
    equatable: ^2.0.5 // For value based equality
    dartz: ^0.10.1 // For functional programming
    go_router: ^13.2.0 // For managing routing
    hive: ^2.2.3 // For local data storage
    hive_flutter: ^1.1.0 // For local data storage
Also, add following dependencies in dev_dependencies:
dev_dependencies:
    flutter_test:
    flutter hive_generator: ^2.0.1 // For generating hive classes
    build_runner: ^2.4.8 // For code generation
- Okay so now that we are all set let's see what the folder structure looks like of Clean Architecture.
Folder Structure
In Clean Architecture, the primary two folders contain most of the necessary components are:
core
features
We also have other folders like
common_widgets,di,routes, and aappfolder. Let's create each folder under the lib folder.

- Let's look at what each folder does:
features
This is the core of Clean Architecture, where we put into practice everything discussed in the first blog about Clean Architecture.
Okay so let's understand this. Our app has different parts, right? Like Login, SignUp, Home, Settings, Product, etc.
For each part, we make a separate folder in a feature folder.
Inside this, we create three more folders:
data,
domain, and
presentation
Yes, these folders are exactly what we talked about in the previous blog.
So as an example, Let's make a feature called Counter.

Cool! Now let's dive deep into each folder and understand how to implement it.
domain
From what we learned in the last article, this layer is at the heart of Clean Architecture. It acts as a bridge between the presentation and data layers.
We'll make 3 more folders named Entities, Repositories, and Usecases and create respectively
.dartfiles in them.
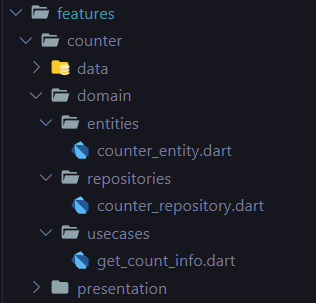
⚠️ Note: Since we'll be coding everything in the next article, I won't be showing all the code with you right now otherwise this blog will become lengthy. So Let's just focus on the structure and how it will look.
// counter_entity.dart
class CounterEntity extends Equatable {
    //...
}
- So, for the counter feature, we've created CounterEntity which we'll be using across the presentation layer.
// counter_repository.dart
abstract class CounterInfoRepository {
    //...
}
- Remember the Repository from the last blog? It's an abstract class that acts as a blueprint for our data layer's repository. So in CounterRepository, we will be creating all the abstract functions.
// get_count_info.dart
class GetCountInfo {
  final CounterInfoRepository counterRepository;

  GetCountInfo({required this.counterRepository});

  //...
}
- Lastly, there's the GetCountInfo use case. It's basically a specific action the user will do, like getting info on a number.
data
The data layer in Clean Architecture manages the app's data. It links the repository layer, which serves as the entry point, to actual data sources such as databases, files, and APIs.
We'll make three folders we're already familiar with: datasources, models, and repositories.
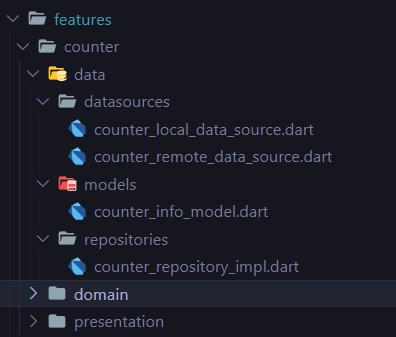
- In the
datasourcesfolder, we have two files. One is for remote data, which usesDioClientto get the data and send it to the repository. The other is for local data, which usesHiveto cache, save, and get the data. Let's take a look at the code.
// counter_local_data_source.dart

abstract class CounterLocalDataSource {
  Future<void> cacheCountInfo({required CounterModel? counterToCache});
  Future<CounterModel?> getCountInfo();
}

class CounterLocalDataSourceImpl implements CounterLocalDataSource {
  @override
  Future<CounterModel?> getCountInfo() async {//...}

  @override
  Future<void> cacheCountInfo({required CounterModel? counterToCache}) async {//...}
}
// counter_remote_data_source.dart

abstract class CounterRemoteDataSource {
  Future<Response> getCounterInfo({required int count});
}

class CounterRemoteDataSourceImpl implements CounterRemoteDataSource {
  final _dioClient = getIt.get<DioClient>();

  @override
  Future<Response> getCounterInfo({required int count}) async {//..}
}
- Now let's create a model class. Models act like blueprints for things in real life within our code. We use them to turn raw data from these data sources into a format that Dart can understand and use where needed.
class CounterModel extends CounterEntity {
  const CounterModel({required super.countInfo});

  factory CounterModel.fromJson({required String json}) {
    return CounterModel(countInfo: json);
  }

  CounterModel copyWith({String? countInfo}) {
    return CounterModel(countInfo: countInfo ?? this.countInfo);
  }
}
- Lastly, create a repository implementation class. This class will handle all the business logic, from fetching data from data sources, converting it into a model, and then passing it to the domain layer with proper error handling.
class CounterRepositoryImpl implements CounterInfoRepository {
  final CounterRemoteDataSource remoteDataSource;
  final CounterLocalDataSource localDataSource;
  final networkInfo = getIt.get<NetworkInfo>();

  CounterRepositoryImpl({
    required this.remoteDataSource,
    required this.localDataSource,
  });

  @override
  Future<Either<Failure, CounterModel>> getCountInfo(
      {required int count}) async {//...}
  }
}
- As you can see, we have expanded our repository implementation class with the domain layer's repository and implemented the method
getCountInfo.
presentation
- This layer connects your user to the application. It mainly consists of three parts: business logic, pages, and widgets. Let's create those folders and files.

If you're using flutter_bloc, put your business logic in the cubit/bloc folder like I did. If not, you can make a folder for your own state management.
And in pages and widgets, it's simple, you code all the UI-related stuff
So, that was the main part of the Clean Architecture which we just finished. Now, let's go through the responsibilities and uses of other folders one by one.
app
This folder contains the entry widget of the application. We use this app widget in the
main.dartfile'srunApp()function.So, make a file named
app.dartand copy the following code into it:
class App extends StatelessWidget {
  const App({super.key});

  @override
  Widget build(BuildContext context) {
    return ScreenUtilInit(
      designSize: const Size(390, 844),
      builder: (_, __) => MaterialApp.router(
        debugShowCheckedModeBanner: false,
        locale: const Locale('en', 'US'),
        title: kAppName,
        theme: themeData,
        routerConfig: router,
      ),
    );
  }
}
- Here, we've defined all the basic elements such as
routing,localisation,screen utils, and more. Simple, right? Okay, let's move forward now.
common_widget
It's where we put all the widgets that are used all over our app. These are the widgets we need to use again and again on different pages and in different situations.
To make it clearer, some widgets in this folder are the Appbar, which gives a consistent top navigation bar on different screens; the BottomNavBar, which lets users easily move between the main features of the app from the bottom of the screen; and the Drawer, a menu that slides out and can be accessed from many places in the app.
⚠️ NOTE: I won't paste the entire code of each file here because some files have a lot of lines. You'll be able to access this code at the end of this blog. So stay tuned and let's keep going.
core
As the name suggests, this section defines all the core functionalities of the application, such as
constants,network,local db, etc. Let's now break down this folder and see what it contains: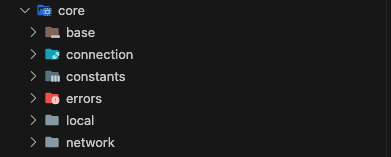
base (optional):
I made this folder because I'm using flutter_bloc in this project for managing states.
This folder contains a bloc class called
base_bloc.dartand a state class calledbase_state.dart.Essentially, this will serve as the foundation for all the cubits we plan to create.
  class BaseBloc extends BlocObserver {
    @override
    void onEvent(Bloc bloc, Object? event) {
      super.onEvent(bloc, event);
    }

    @override
    void onTransition(Bloc bloc, Transition transition) {
      super.onTransition(bloc, transition);
    }

    @override
    void onError(BlocBase bloc, Object error, StackTrace stackTrace) {
      super.onError(bloc, error, stackTrace);
    }
  }
Similarly, we will create a state class where we will define common states as shown below:
  abstract class BaseState extends Equatable {}

  class StateInitial extends BaseState {
    @override
    List<Object> get props => [];
  }
  class StateOnSuccess<T> extends BaseState {
    final T response;
    StateOnSuccess(this.response);
    @override
    List<Object?> get props => [];
  }

  //...define other state
connection
Remember we added the
data_connection_checker_tvpackage inpubspec.yaml? We'll create a class namedNetworkInfoto handle connectivity logic and use this package.
abstract class NetworkInfo {
  Future<bool>? get isConnected;
}

class NetworkInfoImpl implements NetworkInfo {
  final DataConnectionChecker connectionChecker;

  NetworkInfoImpl(this.connectionChecker);

  @override
  Future<bool> get isConnected => connectionChecker.hasConnection;
}
- Whenever we need to check device connectivity, we can use
isConnected, a boolean.
💡Use Case: You will see the use of this in the Data Layer's Repository Implementation.
Constant
- In this section, we set up all the app-level constants such as colors, text, themes, fonts, and more.

Errors
In this folder, we have two files
Exception - This file lists the Remote and Local errors we could encounter when making API calls or fetching local data
  // exceptions.dart
  class ServerException implements Exception{}
  class CacheException implements Exception{}
Failure - We're using
dartz, a package for functional programming, so we'll return two things from a function. If you're not familiar with functional programming, don't worry. We'll cover what we need to know in the next article.We have different types of failures, such as ServerFailure, CacheFailure, NetworkFailure, and more. We define all these types in this class and use them.
    abstract class Failure {
      final String errorMessage;
      const Failure({required this.errorMessage});
    }

    class ServerFailure extends Failure {
      ServerFailure({required String errorMessage})
          : super(errorMessage: errorMessage);
    }

    //..Other failures
local
- We use Hive to store and fetch local data. We've created a helper class to manage all the local database-related tasks.
        class HiveHelper {
          static init() async {
            await Hive.initFlutter();
            // register hive adapters
            await openBox();
          }

          static openBox() async {
               // Open Hive boxes
          }
        }
network
In this folder, we define everything related to networking such as network Clients, Endpoints, and Interceptors. We have created three folders for these:
client
endpoints
interceptors
Let's explore each one and learn what they do.
client
- In this folder, we will define our dio client which we will be using to make API calls.
    // dio_client.dart

    class DioClient {
      // dio instance
      final Dio _dio;

      // injecting dio instance
      DioClient(this._dio) {
        _dio
          ..options.baseUrl = Endpoints.baseUrl
          ..options.connectTimeout =
              const Duration(milliseconds: Endpoints.connectionTimeout)
          ..options.receiveTimeout =
              const Duration(milliseconds: Endpoints.receiveTimeout)
          ..options.responseType = ResponseType.json
          ..interceptors.add(DioInterceptor())
          ..interceptors.add(LogInterceptor());
      }

      Future<Response> get(...) async {...}

      Future<Response> post(...) async {...}

      Future<Response> put(...) async {...}

      Future<Response> delete(...) async {...}
    }
We've made a DioClient class that includes all the necessary network calls such as
get,post,put,delete.There's also a
dioexceptionclass for managing network errors and sending formatted messages to the user.Let's create it too.
// dio_exceptions.dart

class DioExceptions implements Exception {
  late String message;

  DioExceptions.fromDioError(DioException dioError) {
    switch (dioError.type) {
      case DioExceptionType.cancel:
        message = "Request to API server was cancelled";
        break;
      // Handle other DioError
  }

  String _handleError(int? statusCode, dynamic error) {
    switch (statusCode) {
      case 400:
        return error['message'] ?? 'Bad request';
      // Handle other status code
    }
  }
}
Interceptor
The app often includes an authentication module where users register and log in.
To prevent unauthorized access, we require an access token for every request. Instead of manually adding the access token to every API call, which can be time-consuming, we use an interceptor to handle it automatically.
For more information about interceptors, read this blog:
-
Let's create a Dio Interceptor
class DioInterceptor extends InterceptorsWrapper {
  @override
  void onRequest(
      RequestOptions options, RequestInterceptorHandler handler) async {
    log("Request[${options.method}] => PATH: ${options.path}");
    // Pass accessToken in header of every request
    super.onRequest(options, handler);
  }

  @override
  void onResponse(Response response, ResponseInterceptorHandler handler) {
    log("Response Status Code: [$response]");
    super.onResponse(response, handler);
  }

  @override
  void onError(DioException err, ErrorInterceptorHandler handler) {
    log("Error[${err.response?.statusCode}] => PATH: ${err.requestOptions.path}");
    super.onError(err, handler);
  }
}
- Now to use this, visit our DioClient class**.** There you will see we added this interceptor.
Endpoints
In a production app, we'll have many APIs to work with. To organize all the API URLs and their endpoints, we create a separate class called Endpoints. This way, we can easily access the base URL and API endpoints.
Let's create it.
class Endpoints {
  Endpoints._();

  // base url
  static const String baseUrl = "";
  // receiveTimeout
  static const int receiveTimeout = 150000;
  // connectTimeout
  static const int connectionTimeout = 15000;

  // endpoints
  static const String login = "$baseUrl/login";
}
We've finally finished the core folder. I hope you now understand what's inside each folder and their responsibilities.
Let's move on and explore the other folders.
DI (Dependency Injection)
Dependency injection is a way to organize your code so that a class gets its dependencies from somewhere else instead of making them itself. This means your class doesn't have to set up these dependencies; they are given to it by something called an injector.
If you want to learn more about dependency injection, you can check this blog as it will explain to you from the core what is DI and why we need it.
In the context of Clean Architecture, we've made classes like DioClient, NetworkInfo, Hive, etc. Instead of creating a new instance of these classes every time, we inject them at the start of the app and use the same instance everywhere in the app.
Later, we'll add more components like Repository, Data sources, Usecases, etc. We'll inject these into our business logic too, which is why we use dependency injection.
For Flutter, there's a package called get_it that helps with this.
Remember the di folder in the lib folder? We'll create a
service_locator.dartclass there to set this up.
final getIt = GetIt.instance;

Future<void> setupLocator() async {
  await HiveHelper.init();

  getIt.registerLazySingleton<Dio>(() => Dio());
  getIt.registerLazySingleton<DioClient>(() => DioClient(getIt<Dio>()));

  getIt.registerLazySingleton<NetworkInfo>(
      () => NetworkInfoImpl(DataConnectionChecker()));
}
- Now whenever we want to use any of these we use it like this:
final dioClient = getIt.get<DioClient>();
That's it. As simple as that.
routes
We use the go_router package for routing in Flutter. It makes navigating between screens easy by using URLs.
We'll make a
path.dartfile to list all the paths used in the app.
class Paths {
  static const loginPage = '/login';
  static const homePage = '/home';
}
- Now let's create
routes.dartfile where will definerouterfor our application:
final router = GoRouter(
  initialLocation: Paths.login,
  routes: [
    GoRoute(
      path: Paths.login,
      builder: (context, state) => const LoginPage(),
    ),
    GoRoute(
      path: Paths.home,
      builder: (context, state) => const HomePage(),
    ),
  ],
);
- We pass this
routerin MaterialApp.router() 'srouteConfigparameter like this
MaterialApp.router(
        // other config
        routerConfig: router,
),
main.dart
main.dartis the starting point of the application.Here, we set up a logger for debugging, decide the app's orientation, and adjust other settings before the app runs.
final logger = Logger();

Future<void> main() async {
  runZonedGuarded(
    () async {
      WidgetsFlutterBinding.ensureInitialized();
      await setupLocator();

      service.SystemChrome.setPreferredOrientations(
          [service.DeviceOrientation.portraitUp]).then((_) {
        runApp(const App());
      });
    },
    (error, stackTrace) => logger.e(error.toString()),
  );
}
Conclusion
We talked about setting up Flutter project folders for Clean Architecture, including project setup, dependencies, and how to organize folders for core, features, and other key parts.
We discussed the domain, data, and presentation layers, highlighting their role in Clean Architecture.
We explored managing states with flutter_bloc, how to set up dependencies, and how to build a responsive and easy-to-maintain app structure.
We also covered dependency injection, routing, and essential features like networking and error handling, giving a full guide on applying Clean Architecture in Flutter projects.
In the next blog...
We've gone through everything important about Clean Architecture, from the basic ideas and uses to organizing the project.
Now, it's time to start coding, isn't it?
In the next article, the last one in this Clean Architecture series, we'll build an app from the ground up using Clean Architecture concepts.
Oh still here!!!!
If you've read this far, I hope you enjoyed it and learned something. If you did, I'd love to hear your thoughts and would appreciate a like to encourage me to write more articles like this.
We'll meet again in the next article. Until then...