Animation In Flutter: AnimationController
Get more control over the animation

D
I'm a mobile/web developer 👨💻 who loves to build projects and share valuable tips for programmers
Follow me for Flutter, React/Next.js, and other awesome tech-related stuff 😉
- In Flutter, we have basically two types of animation: Implicit, and Explicit.
- The Implicit animations are the pre-built animations available in the Fluter SDK.
- The Explicit animations need a
controllerto perform an animation. - The previous two articles in this series we have seen
AnimatedAlignandAnimationCrossFade, which are nothing but an Implicit animation as they don't require any type of controller. - There are different Implicit animations available in the Flutter For example,
AnimatedContainer,AnimatiedOpacity,AnimatedIcon, etc. - On the other hand, In Explicit animation
AnimationControlleris required. TheAnimationControllerrepresents an interpolated range of values that define all possible frames for a particular animation. Let's take a look at theAnimationControllerin detail.
AnimationController
- The AnimationController, as its name implies, is in charge of the animation. It gives you the values that are interpolated between
upperBoundandlowerBound. - The
upperBoundandlowerBoundparameters are set to0.0and1.0by default. - We may use this controller to play
animationin either a forward or backward motion. - The interpolated values between the
lowerBoundandupperBoundare generated in every new frame as the animation starts. - A
SingleTickerProviderStateMixinis required to function withAnimationController. After extending your state, useSingleTickerProviderStateMixinto accomplish this: class _MyHomePageState extends State<MyHomePage> with SingleTickerProviderStateMixin { //.... }- Now, Let's define one AnimationController :
class _MyHomePageState extends State<MyHomePage> with TickerProviderStateMixin { late AnimationController _controller; }- Let's override the
initStatemethod to create this _controller.AnimationControllercan be instantiated using a variety of lifecycle methods, althoughinitStateis the most frequent (). @override void initState() { super.initState(); _controller = AnimationController( duration: const Duration(milliseconds: 500), vsync: this, ); }- As shown in the code above, we instantiated the controller class by passing two parameters, namely,
duration: This is the total length of time this animation should last.vsync: ATickerProvideris required. As a result, we must employSingleTickerProviderMixin. The value this in this case means nothing but refers to the class's currentcontext.- Offscreen animations are prevented from spending unnecessary resources thanks to the presence of
vsync.Remember to dispose of the
_controllerin thedispose()method. Because it eliminates memory leaks by disposing of theAnimationControllerwhen it is no longer required. @override void dispose() { _controller.dispose(); super.dispose(); }- Now to use this
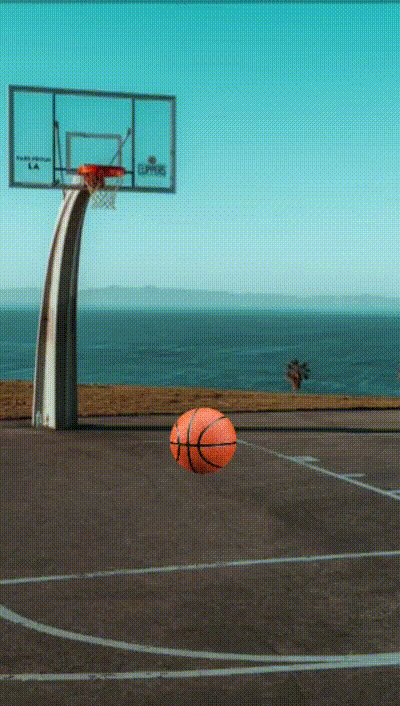
_controllerlet's first design a simple UI. 
- As you can see it's a simple UI with two images defined in the Stack widget. The first one is the basketball area and the second one is the basketball, which we are going to animate.
- Now to move the basketball from top to bottom and bottom to top we need to update the
yoffset of the ball. So let's give the_controllervalue to the Offsety. - Still, there will be no change in the UI. It's because we didn't tell the
_controllerwhen to start the animation. - To update the UI when the
_controllervalue changes, We first need to listen to that update. For that,_controllerhas one methodaddListenerwhich as the name suggests listens to the controller values when it changes. - Let's call that method in the
initState: @override void initState() { super.initState(); // ..... _controller.addListener(() { setState(() {}); }); }- The
setStateis used to update the UI when_controllervalues changes. - Now to run the animation
AnimationControllerprovides many methods : forward: The animation will go fromlowerBoundtoupperBound.reverse: The animation will go fromupperBoundtolowerBound.repeat: The animation will repeat itself fromlowerBoundtoupperBoundand fromupperBoundtoloweBound.stop: The animation will stop running.reset: The animation will go to the initial condition.- In our case, we want to make our ball bounce. To do that we need to call
repeatmethod. So let's call it in theinitState. void initState() { super.initState(); _controller = AnimationController( duration: const Duration(milliseconds: 500), vsync: this, upperBound: 650.0, lowerBound: 400.0, ); _controller.addListener(() { setState(() {}); }); _controller.repeat(reverse: true); }- And Voila!!!
Wrapping Up
- The above animation appears strange because it lacks a smooth bouncing effect. In the next post, we'll look at how to use the Animation class to give the above animation a smooth bouncing motion.
- Thank you for taking the time to read this. If you find it beneficial, please share it with others.
- See you in the upcoming article. Until then...