Introduction:
- We all love Flutter, but what's the best way to make sure it works? The answer is Testing.
- Yup, That was me 👆 😅. If you don't care to test the apps or think that testing is hard like I was, or if you want to begin testing, then I can assure you that if you follow this series of testing, you will at least not dislike testing and start doing it for the apps. You will undoubtedly get the importance of testing.
- Testing can help you to ensure that your application behaves as expected.
- You can write tests in many different ways, but Flutter provides 3 default tests out of the box: Unit Test, Widget Test, and Integration Test.
Unit Test:
- Unit Testing is a great testing technique. It allows us to test a single function, method, or class individually. This is a fantastic way to make sure that a unit of logic produces the expected value.
- In addition to that, Unit Tests are great for checking that external dependency, such as a Network component, GPS location provider, or a Database are working as expected.
- They are also good at simulating errors and checking that error cases are handled correctly.
- Unit tests are really fast to execute, allowing you to run hundreds or even thousands in just a few seconds.
- However, they don't provide much confidence since they focus on small pieces of code and not on how the pieces integrate with each other.
- Widget tests let you interact with an application without having to load up the whole thing. Instead, they focus on a single piece of the application, usually a widget.
- They can be a great way to isolate small parts of your app and find out whether your code is behaving as expected.
- They usually increase the level of confidence compared to unit tests. And the execution time allows us to run hundreds of tests in less than a minute.
- However, the host is the simplified version of the real UI system the level of confidence provided by the widget test is still as not as high as we would like to.
Integration Test:
- Integration tests are recommended when you want to exercise the complete application and its dependencies.
- Integration tests are the highest-level testing technique available in the Flutter SDK, and they provide the highest level of confidence to your application.
- They spin up your application in a real device or a simulator, and from there they isolate the application from the scripted test driver so you can ensure that your results are accurate.
- To run integration tests, you'll need to be using profile or release mode instead of debugging mode: that way, you can measure accurately the performance of the app
Unit Test
- In order to run test on flutter, we need to add test package inside
pubspec.yaml under the dev dependencies section.
- Create a test folder at the root level of the project.
root/
|- test/
    |- calculator_test.dart
- As an entry point, every file must begin with a
main method.
main(){}
- Import the
test package in the file
import 'package:test/test.dart';
main(){}
test() method :
- The
test method accepts two parameters: description, which is just a text describing the test's goal, and the function, which is where we write the logic and then we compare the result with our expectation.
For example, there is one class named Calculator.dart in which, there are different methods defined for calculations like, add, subtract, etc.
class Calculator{
  int add(int a, int b) {
    return a + b;
  }

  int subtract(int a, int b) {
    return a - b;
  }

  int multiply(int a, int b) {
    return a * b;
  }

double divide(double a, double b) {
    return a / b;
  }
}
- Suppose, we want to test an addition unit. where we pass two numbers and expect the result which is nothing but an addition of those two passed numbers.
- Let's see how to test it.
- First of all, create a
test function inside the main() method and write the description.
import 'package:test/test.dart';
main(){
    test('The result of addition should be 8 when adding 6 and 2',(){

    })
}
- Now, inside the body of the test method, we need an instance of a
Calculator class in order to access the methods.
import 'package:test/test.dart';
main(){
    test('The result of addition should be 8 when adding 6 and 2',(){
        final calculator = Calculator();
    })
}
expect() method
- It asserts the first value given called the
actual, matches the second object given called matcher. If that condition is not met then the expect function will throw a test failure.
- It takes two parameters: The first one is the result that we got and the second one is the exact expected value that we want to compare.
- Let's write the
expect method for our test.
main() {
    test('The calculator returns 8 when adding 6 and 2', () {
      final calculator= Calculator();
      expect(calculator.add(6, 2), 8);
    });
}
- In case of failure we can provide some extra information to the person who will be fixing the test.
main() {
  test('The calculator returns 8 when adding 6 and 2', () {
    final calculator= Calculator();
        final result = calculator.add(6,2);
        expect(result,8.000001, reason: 'It should be exactly 8');
  });
}
Running the Unit Test
- To run the unit test we simply have to run the below command or you can click on the
Run on VS Code.
flutter pub run test
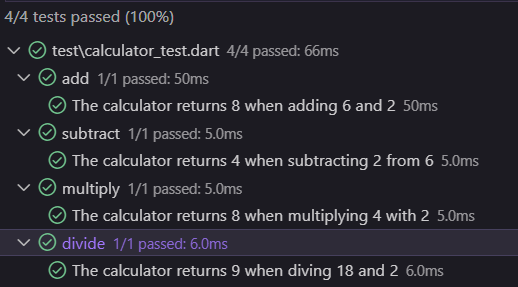
- If everything goes well, then we will get the message in the console that All tests passed!

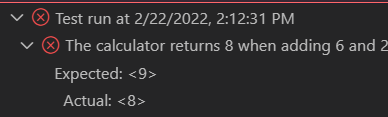
- If we change the expected value from
8 to 9 our test will fail. And it will throw an error shown below.
Structuring of a Good Test
main() {
test('The calculator returns 8 when adding 6 and 2', () {
final calculator= Calculator();
final result = calculator.add(6,2);
});
}
- 3) Expectation
- Finally, the last part of any test should be the expectation phase. That is, validating the result collected during the side effect phase and comparing that result against an expected predefined result.
- In the case of the calculator this means asserting that executing 2 + 2 always returns 4.
main() {
test('The calculator returns 8 when adding 6 and 2', () {
final calculator= Calculator();
final result = calculator.add(6,2);
expect(result,8);
});
}
- It is very important to follow this structure in order to make the test easy to read and maintain as well.
Matchers
group() Function
- It is quite common to have a test file that contains multiple tests. Furthermore, many of the tests may be aimed at the same object or action. Consider the following scenario:
main() {
  test('The calculator returns 8 when adding 6 and 2', () {
    final calculator = Calculator();
    expect(calculator.add(6, 2), 8);
  });

  test('The calculator returns 4 when subtracting 2 from 6', () {
    final calculator = Calculator();
    expect(calculator.subtract(6, 2), 4);
  });

  test('The calculator returns 8 when multiplying 4 with 2', () {
    final calculator = Calculator();
    expect(calculator.multiply(4, 2), 8);
  });

  test('The calculator returns 9 when diving 18 and 2', () {
    final calculator = Calculator();
    expect(calculator.divide(18, 2), 9);
  });
}
- As you can see, once we've added a few tests, it's extremely simple for the test file to get jumbled. Even if all of the tests are written correctly and pass, this jumbled structure makes it difficult for developers to understand what is being tested and how the code is arranged.
group() is a function in the test library. Whose duty is to assist you in structuring the tests by grouping them with a name of your choice.- A useful method to organize a test, for example, might be by the sort of operation that is being performed. In this scenario, it is simple to imagine four groups. - Addition, subtraction, multiplication, and division You may nest as many group functions as you require.
main() {
  group('add', () {
    test('The calculator returns 8 when adding 6 and 2', () {
      final calculator = Calculator();
      expect(calculator.add(6, 2), 8);
    });
  });

  group('subtract', () {
    test('The calculator returns 4 when subtracting 2 from 6', () {
      final calculator = Calculator();
      expect(calculator.subtract(6, 2), 4);
    });
  });

  group('multiply', () {
    test('The calculator returns 8 when multiplying 4 with 2', () {
      final calculator = Calculator();
      expect(calculator.multiply(4, 2), 8);
    });
  });

  group('divide', () {
    test('The calculator returns 9 when diving 18 and 2', () {
      final calculator= Calculator();
      expect(calculator.divide(18, 2), 9);
    });
  });
}
Testing Code that Throws an Error or Exception
- Sometimes your code needs to throw an exception during its execution to account for an expected or invalid state.
- For example in the case of a calculator project we should account for the fact that a computer cannot divide any number by zero. When this happens the code will throw an Argument Error indicating that the zero is not a valid divisor number.
- In order to validate this case in our test we’re going to write this test a little bit differently.
- First of all, throw an Argument error inside the
divide() method in Calculator.dart.
class Calculator {
  int add(int a, int b) {
    return a + b;
  }

  int subtract(int a, int b) {
    return a - b;
  }

  int multiply(int a, int b) {
    return a * b;
  }

  double divide(double a, double b) {
    if (b == 0) throw ArgumentError('Cannot divide by zero');
    return a / b;
  }
}
- Now, create a new test that reflects that dividing by 0 will throw an Argument Error instead of returning a value.
group('divide', () {
test('The calulator throws an Argument Error when diving by zero', () {
});
});
- After that, we’re going to update the matcher inside the expect function to reflect the expectation that now is the code will throw an argument error using the
throwsArgumentError built-in matcher.
group('divide', () {
test('The calulator throws an Argument Error when diving by zero', () {
final calculator= Calculator();
expect(calculator.divide(18, 0), throwsArgumentError);
});
});
- However, when we run the test, it will be marked as Failed. This is due to the fact that an error is not considered as a return value, as it was in all prior tests.
- Instead, we'll wrap our side effect in an anonymous function so that the
expect function may run this code within an internal try-catch statement and compare the error to our matcher.
group('divide', () {
test('The calulator throws an Argument Error when diving by zero', () {
final calculator= Calculator();
expect(() => calculator.divide(18, 0), throwsArgumentError);
});
});
setUp() and tearDown() Method
- The test library includes a few functions for transferring code across tests.
setUpAll(): Runs just once before any test is executed.setUp(): Invoked before every test in a group or test suite.tearDown(): Invoked after every test even if the test has failed.tearDownAll(): Executed after all the tests have been completed.
- To refractor our calculator tests, we will use the
setUp method. Every single test, as you can see, creates an instance of a Calculator object and then applies the side effects.
- We may save time by using the
setUp function. Within this method, we'll generate a new Calculator object that we may reuse in our tests.
main() {
  late Calculator calculator;

  setUp(() {
    calculator = Calculator();
  });

  group('add', () {
    test('The calculator returns 8 when adding 6 and 2', () {
      expect(calculator.add(6, 2), 8);
    });
  });

  group('subtract', () {
    test('The calculator returns 4 when subtracting 2 from 6', () {
      expect(calculator.subtract(6, 2), 4);
    });
  });

  group('multiply', () {
    test('The calculator returns 8 when multiplying 4 with 2', () {
      expect(calculator.multiply(4, 2), 8);
    });
  });

  group('divide', () {
    test('The calculator returns 9 when diving 18 and 2', () {
      expect(calculator.divide(18, 2), 9);
    });

    test('The calculator throws an Argument Error when diving by zero', () {
      expect(() => calculator.divide(18, 0), throwsArgumentError);
    });
  });
}
- We will see the use cases of other functions later in this series.
Testing Futures
- In order to test Futures we need to tell the test to wait for the result. So the Future code can complete and return its result.
- To do that we will prefix the function with
async and await. Indicating that we’re waiting to receive the result.
- Let’s take an example: In the
Calculator.dart file create the below method.
Future<double>? squareRootOf(double a) =>
      Future.delayed(const Duration(seconds: 1), () => math.sqrt(a));
- As you can see we are waiting for 1 second and then returning the square root of the given value.
- Now let’s see how we can write the test for this unit.
group('square root', () {
    test('The calculator returns 5 when the input is 25', () async {
      expect(await calculator.squareRootOf(25), 5);
    });
});
- As we can see we've marked the function as asynchronous and awaiting for the
squareRootOf function to finish.
Testing Streams
- In order to test the values of streams we need to
emitInOrder() matcher inside expect method. Because the stream is going to return the values one by one in order.
- Let’s first create a method inside the Calculator class of type Stream.
Stream<int> fibonacciSequence() => Stream.periodic(
      const Duration(seconds: 1), (count) => _fibonacciValues[count]);

final List<int> _fibonacciValues = [0, 1, 1, 2, 3, 5, 8, 13, 21];
- As you can see the function
fibonacciSequence() is returning the Stream of type int.
- Let’s see, how we can test this Stream inside our test.
group('fibonacci sequence', () {
    test('The calculator return [0, 1, 1, 2, 3, 5, 8, 13, 21] in order', () {
      expect(calculator.fibonacciSequence(),
          emitsInOrder([0, 1, 1, 2, 3, 5, 8, 13, 21]));
    });
});
Wrapping Up
- I hope you enjoyed and learned something from this article. If you have any feedback/queries, leave them in the comments.
- In the next blog we are going to see the next testing method: Widget Test.
- I've learned testing and written this article using the example provided by VGV. So big thanks to VGV.
- Thank you for spending time reading this article. See you in the next article. Until then...

Follow me on : Twitter, LinkedIn, Github