React Query - The Only Guide You Need

React Query - The Only Guide You Need

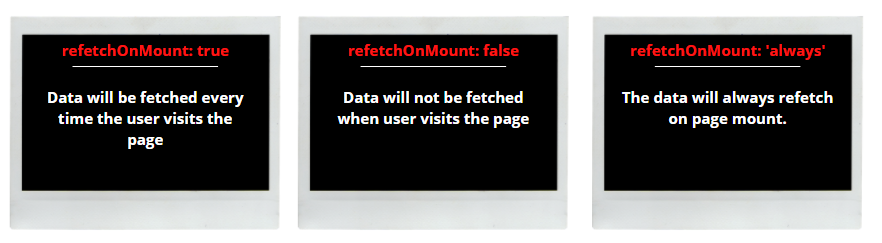
React Query ? What is that? Let me tell you what React Query is, why should you use it? How to use the react query in the react.js application.

·

20 min read

Table of Content

Introduction

  • Hey YOU, yes you 🙋‍♂️!! Thanks for clicking on this article 😊. This is a blog around React Query. In this article, we'll look at what react query is, why we need it, and how to use it in our react application. We'll also look at some of the features it provides.
  • So, first of all, let's begin with question number one :

    What is React Query?

  • Simply put, it's a library for fetching data in a react application.
  • It simplifies the process of fetching, caching, synchronizing, and updating server information in React apps.
  • Okay, so the next thing that should come to mind is,Why do we need it? Right? Let's see it.

    Why React Query?

  • So, in a typical react application, we implement the useEffect hook to fetch the data. We also keep track of component states such as Loading Data and Actual Data. Most of the time, if the application is large, we use state management frameworks like Redux, Mobx, Akita, etc to keep track of the application's state.
  • But the problem with these state management libraries is they're not good for working with asynchronous server state data, they are usually good at working with client-side data like theming, localization, etc.
  • Another issue is, Front-end developers rarely have full control over the data that comes from the server. That means the data is in control of the others. As a result, if any data is changed on the database from the server-side, the UI will crash and numerous other issues would occur. website crash.png
  • When you have a huge application with lots of data, it's also necessary to optimize the application to make it more effective and fast by doing Pagination, Lazy loading, and other optimizations.
  • pagination-scroll.gif
  • So if you want to handle all these issues by yourself, then good luck with that my friend. 👋
  • But if you wanted to make these processes flawless without wasting the time and effort then consider using the library React Query.

Starter Project

  • Now, before we dive into the react query, I'd like you to download the starter project shown below. The project includes a basic navigation UI that uses React-Router.
  • It already has a JSON Server configured, so we can use Axios to perform an API call.
  • In this example, I've already implemented data fetching using useEffect, which is the standard way to do so in any React application.
  • To acquire the node modules, use the npm install command in the terminal before launching the application. When you execute the program after that, you'll get the following result: starter.gif
  • As you can see, the data of Fruits is displayed on the screen. The data is retrieved via useEffect in this case. Now let's perform the same thing using React Query. As we implement, you will see the differences between these two.

Implementing React Query

  • The react-query package must first be installed. You don't need to install this package if you've forked the above git repository because it already has the package installed.
  • If you haven't already, run the command below in the terminal.
  • npm i react-query --save
    
  • Now we have to provide the react-query to our application. To do that go to the App.js file and wrap the whole Router within QueryClientProvider. ```
  • import { QueryClientProvider } from "react-query";
    
    function App() {
    return (
      <QueryClientProvider> 
          <Router>
            ....
          </Router>
      </QueryClientProvider>
    );
    }
    
  • You must additionally pass the QueryClientProvider one argument named client. Simply import the QueryClient from react-query and make a global instance of it to do this. Finally, hand it along to the QueryClientProvider.
  • import { QueryClient, QueryClientProvider } from "react-query";
    
    const queryClient = new QueryClient();
    function App() {
    return (
      <QueryClientProvider client={queryClient}>
          <Router>
            ....
          </Router>
      </QueryClientProvider>
    );
    }
    
  • That's all there is to react-query configuration. In our application, we now have access to all of the react-hooks. Let's see how we can access the data with React Query.

Basic Data Fetching

  • In react-query, we have a hook named useQuery for requesting data.
  • We can do a lot of things with this hook, such as caching data after the initial fetch, re-fetching data in the background, and so on.
  • Import useQuery from react-query inside FruitsReactQuery.js file.
  • import { useQuery } from "react-query";
    
  • Now after that, we need to call this hook inside our component. useQuery requires two arguments: fununique.png
  • Let's give these two arguments to this hook.
  • const results = useQuery('fruits',()=>{
      return axios.get('http://localhost:4000/fruits')
    })
    
  • In this case, I used fruits as a unique key and used Axios to make a GET call, also do not forget to return the result.
  • After the data is fetched, we'll get a lot of information through the 'useQuery' hook. useQueryData.png
  • However, we won't be using all of it, so let's destructure the result variable.
  • The first step is to obtain the real Data that we require. Aside from that, the Loading flag is provided by the useQuery hook. This may be used to simply inform the user that data is being loaded.
  • const {data, isLoading} = useQuery('fruits',()=>{
      return axios.get('http://localhost:4000/fruits')
    })
    
  • Let's now conditionally render our UI based on the isLoading flag.
  • function FruitsReactQuert() {
    const { data, isLoading } = useQuery("fruits", () => {
      return axios.get("http://localhost:4000/fruits");
    });
    
    if (isLoading) return <div className="loading">Loading...</div>;
    
    return (
      <div className="w-full h-screen flex items-center justify-center flex-col">
        {data?.data.map((fruit) => {
          return <div className="text-4xl">{fruit.name}</div>;
        })}
      </div>
    );
    }
    
  • The data contains a lot of information. We must access the data property of it in order to obtain the fruit list.
  • compare.png
  • The difference between traditional and React Query data fetching is obvious. React Query makes things even easier.
  • We must preserve the state for data and loading in Fruits.js. But React Query, on the other hand, encapsulates all of that and makes fetching data in a react component a breeze.

Error Handling

  • Okay, So now you could be worried about the Errors now that we've successfully collected the data using React Query. To handle errors, we just need to destructure two things from the useQuery hook, namely: errorHandling.png
  • Let's use it in our application:
  • function FruitsReactQuert() {
    const { data, isLoading, isError, error } = useQuery("fruits", () => {
      return axios.get("http://localhost:4000/abcd");
    });
    
    if (isLoading) return <div className="loading">Loading...</div>;
    if (isError) return <div className="loading">Error: {error.message}</div>;
    
    return (
      <div className="w-full h-screen flex items-center justify-center flex-col">
        {data?.data.map((fruit) => {
          return <div className="text-4xl">{fruit.name}</div>;
        })}
      </div>
    );
    }
    
  • And now, if you change an API URL to any arbitrary route that doesn't exist, you'll get an Error message like this on your screen: errorSS.png

Caching

  • Caching refers to temporarily storing data for easy access. We don't have a caching method in standard data fetching with useEffect. However, caching is built-in to React Query.
  • The user will always notice a loading for a fraction of the segment in traditional data fetching. If you go back to the Fruits nav item several times, you'll see the loading text each time.

    If you are unable to see, then consider throttling the network speed from the Dev tool to Slow 3G.

cachingTraditional.gif

  • Now do the same thing with the Fruits React Query nav. cachingReactQuery.gif
  • We can clearly see the difference. But what precisely is going on under the hood? The thing is, React Query examines whether or not any cached data is available. If the cache data is present, it will be returned; otherwise, the freshly retrieved data will be shown.
  • What if the data is modified, you might be thinking? So, If the data gets changed then also you will not see the loading text. 🤔Why? It's because for better user experience React Query shows the cached data while the new data is being fetched in the background.
  • If you want to try it out then goto to the db.json file and change the title.
  • cachingReactQuery2.gif
  • As you can see that the loading was not shown even if the data gets changed. The Cached data was shown instead.
  • So, the default caching time is 5 minutes, and the cached data is garbage collected after that. You'll see the Loading text once again after that.
  • However, by simply giving the third option in the useQuery hook, you may adjust the caching time. To do that, update the cacheTime property by giving the milliseconds values.
  • const { data, isLoading, isError, error } = useQuery(
      "fruits",
      () => {
        return axios.get("http://localhost:4000/fruits");
      },
      {
        cacheTime: 10000, // 10 seconds
      }
    );
    
  • Now after 10 seconds the cache data will be garbage collected, and you will see the Loading text.

Data Staling

  • As we've seen in the above examples, that every time you visit the Fruit React Query page you'll not see the loading text. However, data fetching is happening in the background every time you visit the page.
  • If you want to see if the data is currently fetching or not react-query provides a useful boolean called isFetching. You can destructure it from the useQuery hook.
  • const { data, isLoading, isError, error, isFetching} = useQuery(...)
    
  • Now if you console log it, then you will be able to see the data fetching state.
  • isFetching.gif
  • As you can see initially isFetching is true as react query is fetching the data. And after that, it is false as the fetching is completed.
  • Sometimes you have a website where the data is not updating often. Then you might don't want the website to make a request every time. It's okay for the user to see the cached data for a short amount of time.
  • To do that you can use the staleTime option in order to stop the network request for a given amount of time.
  • The default value of the staleTime is 0 seconds. That's why every time the network request happens. If you want to change this time you can simply update the staleTime.
  • const { data, isLoading, isError, error, isFetching } = useQuery(
      "fruits",
      () => {
        return axios.get("http://localhost:4000/fruits");
      },
      {
        staleTime: 10000,
      }
    );
    
  • staleTime.gif
  • As you can see even if I visit that page multiple times the isFetching is still false. But as soon as 10 seconds passes away and I make the request again then the isFetching value changes to true.

Re-fetching Options in React Query

  • React Query provides many re-fetching options. Some of them are explained below:

    refetchOnMount:

  • The default value is set to true. refetchOnMount.png
  • const { data, isLoading, isError, error, isFetching } = useQuery(
      "fruits",
      () => {
        return axios.get("http://localhost:4000/fruits");
      },
      {
        refetchOnMount: true // or false, 'always'
      }
    );
    

refetchOnWindowFocus

  • The value is set to true by default.
  • If you use useEffect to fetch data and the data gets changed, you will not be able to notice the change unless you refresh the entire page.
  • However, if you use React Query, the website will automatically re-fetch the data and display the new data anytime the data in the database changes.
  • You may test it by heading to the Fruits React Query page and altering the title in the db.json file.
  • refetchOnFocus.gif
  • You can also disable this behavior by simply passing false to this parameter
    const { data, isLoading, isError, error, isFetching } = useQuery(
      "fruits",
      () => {
        return axios.get("http://localhost:4000/fruits");
      },
      {
        refetchOnWindowFocus: true, // or false, 'always'
      }
    );
    

refetchInterval

  • If your website's data updates every second, you might want to fetch it every 2 seconds, 5 seconds, and so on.
  • In that situation, you can set the data fetching interval. The data will be re-fetched after that time period has passed.
  • Simply set the refetchInterval attribute to the duration in milliseconds.
  • const { data, isLoading, isError, error, isFetching } = useQuery(
      "fruits",
      () => {
        return axios.get("http://localhost:4000/fruits");
      },
      {
        refetchInterval: 2000, // or false
      }
    );
    
  • refetchOnInterval.gif

refetchIntervalInBackground

  • In the preceding example, fetching occurs every 2 seconds. However, if the user loses focus, that is, if the user switches to another tab or opens something else, the data retrieval is halted.
  • Consider giving the true answer to refetchIntervalInBackground if you want to fetch data even if your website tab is not in focus.
  • const { data, isLoading, isError, error, isFetching } = useQuery(
      "fruits",
      () => {
        return axios.get("http://localhost:4000/fruits");
      },
      {
        refetchInterval: 2000,
        refetchIntervalInBackground: true,
      }
    );
    
  • refetchIntervalspeed.gif
  • As you can see even if I lose focus by either clicking on the VSCode, or by opening the new tab, the data fetching is still going on every 2 seconds in the background.

onSuccess / onError Callbacks

  • When it comes to data retrieval, we may wish to do certain activities after the query is completed.
  • Opening a model, switching to an alternative path, or even showing toast alerts are all examples.
  • React Query allows us to specify Success and Error callbacks as options to the useQuery hook to accomplish this.
  • Let's look at how we might include them in our component.
  • const { data, isLoading, isError, error, isFetching } = useQuery(
      "fruits",
      () => {
        return axios.get("http://localhost:4000/fruits");
      },
      {
        onSuccess: (data) => {
          console.log("Data successfully fetched: "+ data);
        },
        onError: (err) => {
          console.log("Error occured: "+ err);
        },
      }
    );
    

Data Transformation

  • If you want to do something with the data before providing it to the component, you may use the select useQuery option.
  • Filtering, mapping, sorting, slicing, and other operations are examples.
  • function FruitsReactQuert() {
    const { data, isLoading, isError, error, isFetching } = useQuery(
      "fruits",
      () => {
        return axios.get("http://localhost:4000/fruits");
      },
      {
        select: (data) => {     // <--- Here
          const fruitsStartsWithCharA = data?.data.filter((fruit) => {
            if (fruit.name.startsWith("A")) return fruit.name;
            else return null;
          });
          return fruitsStartsWithCharA; // <--- This will be assigned to actual `data`
        },
      }
    );
    
    if (isLoading) return <div className="loading">Loading...</div>;
    if (isError) return <div className="loading">Error: {error.message}</div>;
    
    return (
      <div className="w-full h-screen flex items-center justify-center flex-col">
        {data.map((fruit, index) => {
          return <div className="text-4xl">{fruit.name}</div>;
        })}
      </div>
    );
    }
    

Dynamic Data Fetching

  • In our Fruits React Query Page, we have currently retrieved all of the fruits data.
  • The goal now is to provide detailed information about that specific fruit.
  • This situation is quite frequent in web development where you show a limited amount of info at first with Forex, Title / Image, and then if the user clicks on that post, he or she is sent to the detail page of that post/blog/product.
  • We may accomplish this by retrieving the query by Id.
  • First and foremost, we must construct a new Fruit Detail page.
  • fruitDetail.png
  • FruitDetail.js
    function FruitDetail() {
        return <div>Fruit Detail</div>;
    }
    export default FruitDetail;
    
  • Now create a new route for the same inside App.js
  • function App() {
    return (
      <QueryClientProvider client={queryClient}>
        <Router>
            ......
          <Switch>
            <Route path="/fruit-react-query/:fruitId">
              <FruitDetail />
            </Route>
          </Switch>
        </Router>
      </QueryClientProvider>
    );
    }
    
  • After that go to the Fruits React Query page and wrap the Text around Link tag of react-router-dom.
  • <div className="w-full h-screen flex items-center justify-center flex-col">
        {data?.data.map((fruit) => {
          return (
            <div
              className="text-4xl p-4 hover:bg-blue-500 hover:text-white rounded-lg transition-all duration-150 ease-in"
              key={fruit.id}
            >
              <Link to={`/fruit-react-query/${fruit.id}`}>{fruit.name}</Link>
            </div>
          );
        })}
      </div>
    
  • Now after setting up the new Router and Link you will be able to navigate to the FruitDetails screen by clicking on any of the Fruits
  • fruitDetailRouting.gif
  • Okay so now to get the description of the clicked fruit on the FruitDetail page, We first want the fruitIdinside the FruitDetail page. For that we will use useParams() hook from react-router-dom
  • const { fruitId } = useParams();
    
  • Now we can use useQuery to fetch the individual fruits using their Id.
  • Let me first write the code and then I will explain it.
  • const { data, isLoading, error, isError } = useQuery(
      ["fruit-detail", fruitId],
      () => {
        return axios.get(`http://localhost:4000/fruits/${fruitId}`);
      }
    );
    
  • As you can see, The first argument of useQuery is a key to uniquely identify this query similar to fruits.
  • I could specify fruit-detail, But this query is dependent on the fruitId as well. If you were to leave this as is fruit-detail then the cached value of fruitId 1 would be used for fruit-id 2 and 3 and so on.
  • So what we have to do is include the fruitId as part of the query key by specifying an array. So the first argument is now an array with two elements the string 'fruit-detail' and the dynamic fruitId.
  • React Query will now maintain separate queries for each fruit.
  • Now for the second argument we specify the function. And this function should also accept fruitId to fetch the appropriate fruit Details. So I've used fruiId which we got from useParams.

fruitDetailComplete.gif


useQueryClient

  • Can you optimize the code for quicker execution in the dynamic data fetching example above?
  • When you first click on the fruit, the FruitDetail page will show the Loading text. But haven't we already gotten all of the fruit information? Is there any way to leverage the information to eliminate the loading?
  • The answer is a resounding YES. useQueryClient is the hook that will assist you to achieve this aim.
  • The useQueryClient hook is used to interact with the data in the cache.
  • You can utilize data from the cache that has previously been retrieved by other queries.
  • So, as an example, consider the following: To begin, you must utilize the useQueryClient hook in the component.
  • const queryClient = useQueryClient();
    
  • Now, you have to specify the third argument to useQuery which is an object. The property is called initialData which is a function.
  • const { data, isLoading, error, isError } = useQuery(
      ["fruit-detail", fruitId],
      () => {
        return axios.get(`http://localhost:4000/fruits/${fruitId}`);
      },
      {
        initialData: () => {},
      }
    );
    
  • To begin, we'll need the query that holds the data within the function. By executing queryClient.getQueryData('queryUniqueKey'), you can get the cached data for a specific query.
  • After that, you must use the find method to locate a fruit that corresponds to fruitId and then return that fruit.
  • const { data, isLoading, error, isError } = useQuery(
      ["fruit-detail", fruitId],
      () => {
        return axios.get(`http://localhost:4000/fruits/${fruitId}`);
      },
      {
        initialData: () => {
          const fruit = queryClient
            .getQueryData("fruits")
            ?.data.find((fruit) => fruit.id === parseInt(fruitId));
          if (fruit) {
            return {
              data: fruit,
            };
          } else {
            return undefined;
          }
        },
      }
    );
    
    finaluseQueryClient.gif
  • As you can see how effective it is to use the cached data rather than repeatedly fetching the same data again and again on every visit.

POST Request using React Query

  • We've already gotten the data from the server. It's now time to concentrate on the data posting aspect of your application, which involves sending data from your application to any backend.
  • Let's look at how to use react query to make a basic post request.
  • Before we begin, we must first develop a form in which we may enter and transmit data to the server. Let's start by making a form component.
  • And add this component above the fruit list
  • <div className="w-full h-screen flex items-center justify-center flex-col">
        <FruitForm />
        {data?.data.map((fruit) => {
          return (
            <div
              className="text-4xl p-4 hover:bg-blue-500 hover:text-white rounded-lg transition-all duration-150 ease-in"
              key={fruit.id}
            >
              <Link to={`/fruit-react-query/${fruit.id}`}>{fruit.name}</Link>
            </div>
          );
        })}
      </div>
    
  • OUTPUT
  • fruitFormUI.png
  • Now we have to define a two-state variable for handling the input of Fruit Name and Fruit Description. And a function for making a POST request.
  • FruitForm.js

    function FruitForm() {
    const [fruitName, setFruitName] = useState("");
    const [fruitDescription, setFruitDescription] = useState("");
    
    const handleAddFruit = () => {};
    
    return (
      <section class="max-w-4xl p-6 mx-auto bg-white rounded-md shadow-md dark:bg-gray-800">
        <form>
          <div class="grid grid-cols-1 gap-6  sm:grid-cols-2">
            <div>
              <label class="text-gray-700 dark:text-gray-200" for="username">
                Fruit Name
              </label>
              <input
                id="fruitName"
                type="text"
                class="block w-full px-4 py-2 mt-2 text-gray-700 bg-white border border-gray-300 rounded-md dark:bg-gray-800 dark:text-gray-300 dark:border-gray-600 focus:border-blue-500 dark:focus:border-blue-500 focus:outline-none focus:ring"
                onChange={(e) => setFruitName(e.target.value)}
                value={fruitName}
              />
            </div>
    
            <div>
              <label class="text-gray-700 dark:text-gray-200" for="emailAddress">
                Fruit Description
              </label>
              <input
                id="description"
                type="text"
                class="block w-full px-4 py-2 mt-2 text-gray-700 bg-white border border-gray-300 rounded-md dark:bg-gray-800 dark:text-gray-300 dark:border-gray-600 focus:border-blue-500 dark:focus:border-blue-500 focus:outline-none focus:ring"
                onChange={(e) => setFruitDescription(e.target.value)}
                value={fruitDescription}
              />
            </div>
          </div>
    
          <div class="flex justify-end mt-6">
            <button
              onClick={handleAddFruit}
              class="px-6 py-2 leading-5 text-white transition-colors duration-200 transform bg-gray-700 rounded-md hover:bg-gray-600 focus:outline-none focus:bg-gray-600"
            >
              Add
            </button>
          </div>
        </form>
      </section>
    );
    }
    

useMutation Hook

  • Unlike queries, mutations are typically used to create/update/delete data or perform server side-effects.
  • First of all import useMutation hook
  • import { useMutation } from "react-query";
    
  • The useMutation hook doesn't need a unique key. So the first argument of this hook is a function that will post data to the back-end.
  • The function is going to accept the fruit details that we pass in from our component.
  • Let me first write the code and then I will explain
  • function FruitForm() {
    const [fruitName, setFruitName] = useState("");
    const [fruitDescription, setFruitDescription] = useState("");
    
    const addFruit = (fruit) => {
      return axios.post("http://localhost:4000/fruits", fruit);
    };
    const { mutate } = useMutation(addFruit);
    
    const handleAddFruit = (e) => {
      e.preventDefault();
      mutate({
        name: fruitName,
        description: fruitDescription,
      });
      setFruitName("");
      setFruitDescription("");
    };
    
    return (...)
    }
    
  • As you can see in useMutation hook we passed a function called addFruit.
  • Similar to useQuery, useMutation returns some value that we can destructure. In our case, we need mutate. This is a function that we need to call to make a POST request.
  • That's why I called the mutate function and passed the object that contains fruit information.
  • Now, if you go to your browser and type in the fruit's name and description, then click the ADD button, the list of fruits will be updated once you reload the website.
  • useMutate.gif
  • Also the db.json will be updated.
  • db.png

Query Invalidation

  • In the preceding example, we learned about mutations. We call the use mutation hook passing in a mutation function. . When you click the Add button, the fruit name and description are recorded in db.json. Everything is in working order.
  • There is one area where we can make improvements. We have to reload the page in order to observe changes in the above example - wouldn't it be wonderful if we could instruct react query to immediately refetch the fruits query as soon as the mutation succeeds?
  • Invalidation is a feature that will assist you in accomplishing this. Let's see how we can put that into practice.
  • The first step is to get hold of the query client instance similar to what we did when specifying initial query data.
  • import { useQueryClient } from 'react-query';
    
  • Then within the component get hold of the instance.
  • const queryClient = useQueryClient()
    
  • Then we need to get hold of the success callback on the use mutation.
  • const { mutate } = useMutation(addFruit,{
      onSuccess: () => {}
    });
    
  • This function's code is run as soon as the mutation is successful. And what we're trying to do here is make the fruits query invalid. The invalidate queries method on the query client instance is used to do this.
  • const { mutate } = useMutation(addFruit,{
      onSuccess: () => {
        queryClient.invalidateQueries('fruits')
      }
    });
    
  • By invalidating the query react query will re-fetch the fruits query. That's pretty much it. Now we can test it.

invalidation.gif

  • As you can see the fruit list automatically updates to display the new fruit. We don't have to manually re-fetch it.
  • So when the mutation succeeded a background re-fetch was initiated which resulted in the UI displaying the newly added fruit.

React Query DevTools

  • React Query comes with dedicated dev tools. It helps visualize all of the inner workings of React Query and will likely save you hours of debugging if you find yourself in a pinch!
  • To use it you need to first import ReactQueryDevtools
  • import { ReactQueryDevtools } from 'react-query/devtools'
    
  • Place the following code as high in your React app as you can. The closer it is to the root of the page, the better it will work!
  • function App() {
     return (
       <QueryClientProvider client={queryClient}>
         {/* The rest of your application */}
         <ReactQueryDevtools initialIsOpen={false} />
       </QueryClientProvider>
     )
    }
    
  • devtool.png

Wrapping Up

  • That's pretty much all you need to know about React Query to get started. But there's still a lot to learn. You can always visit the website to learn more about React Query.
  • I hope you found this article helpful. If you enjoyed it, please share it with others and leave a comment and a like on this blog.
  • Thank you for taking the time to read this article. See you in the next article. Until then...
  • PeaceOutImOutGIF.gif

Did you find this article valuable?

Support Dhruv Nakum by becoming a sponsor. Any amount is appreciated!