

FlutterFire x Bloc: Phone Authentication
Authenticate user with phone number using Firebase 🔥


Introduction
- Hello there, Flutter Devs!!! In this blog, we'll look at how to use Firebase to authenticate users using their phone numbers.
- For authentication, we'll use Firebase, and for state management, we'll utilize Bloc.
- So, without further ado, let's get started.
Starter Project
A basic starter project is shown above. The following dependencies are included in it:
dependencies:
  flutter:
      sdk: flutter

  cupertino_icons: ^1.0.2
  flutter_bloc: ^8.0.1                               # for state management
  firebase_core: ^1.12.0                          #  for firebase
  firebase_auth: ^3.3.7                           # for firebse authentication
  equatable: ^2.0.3
  country_code_picker: ^2.0.2               # for picking up different countries with its code
Starter Project Folder Structure
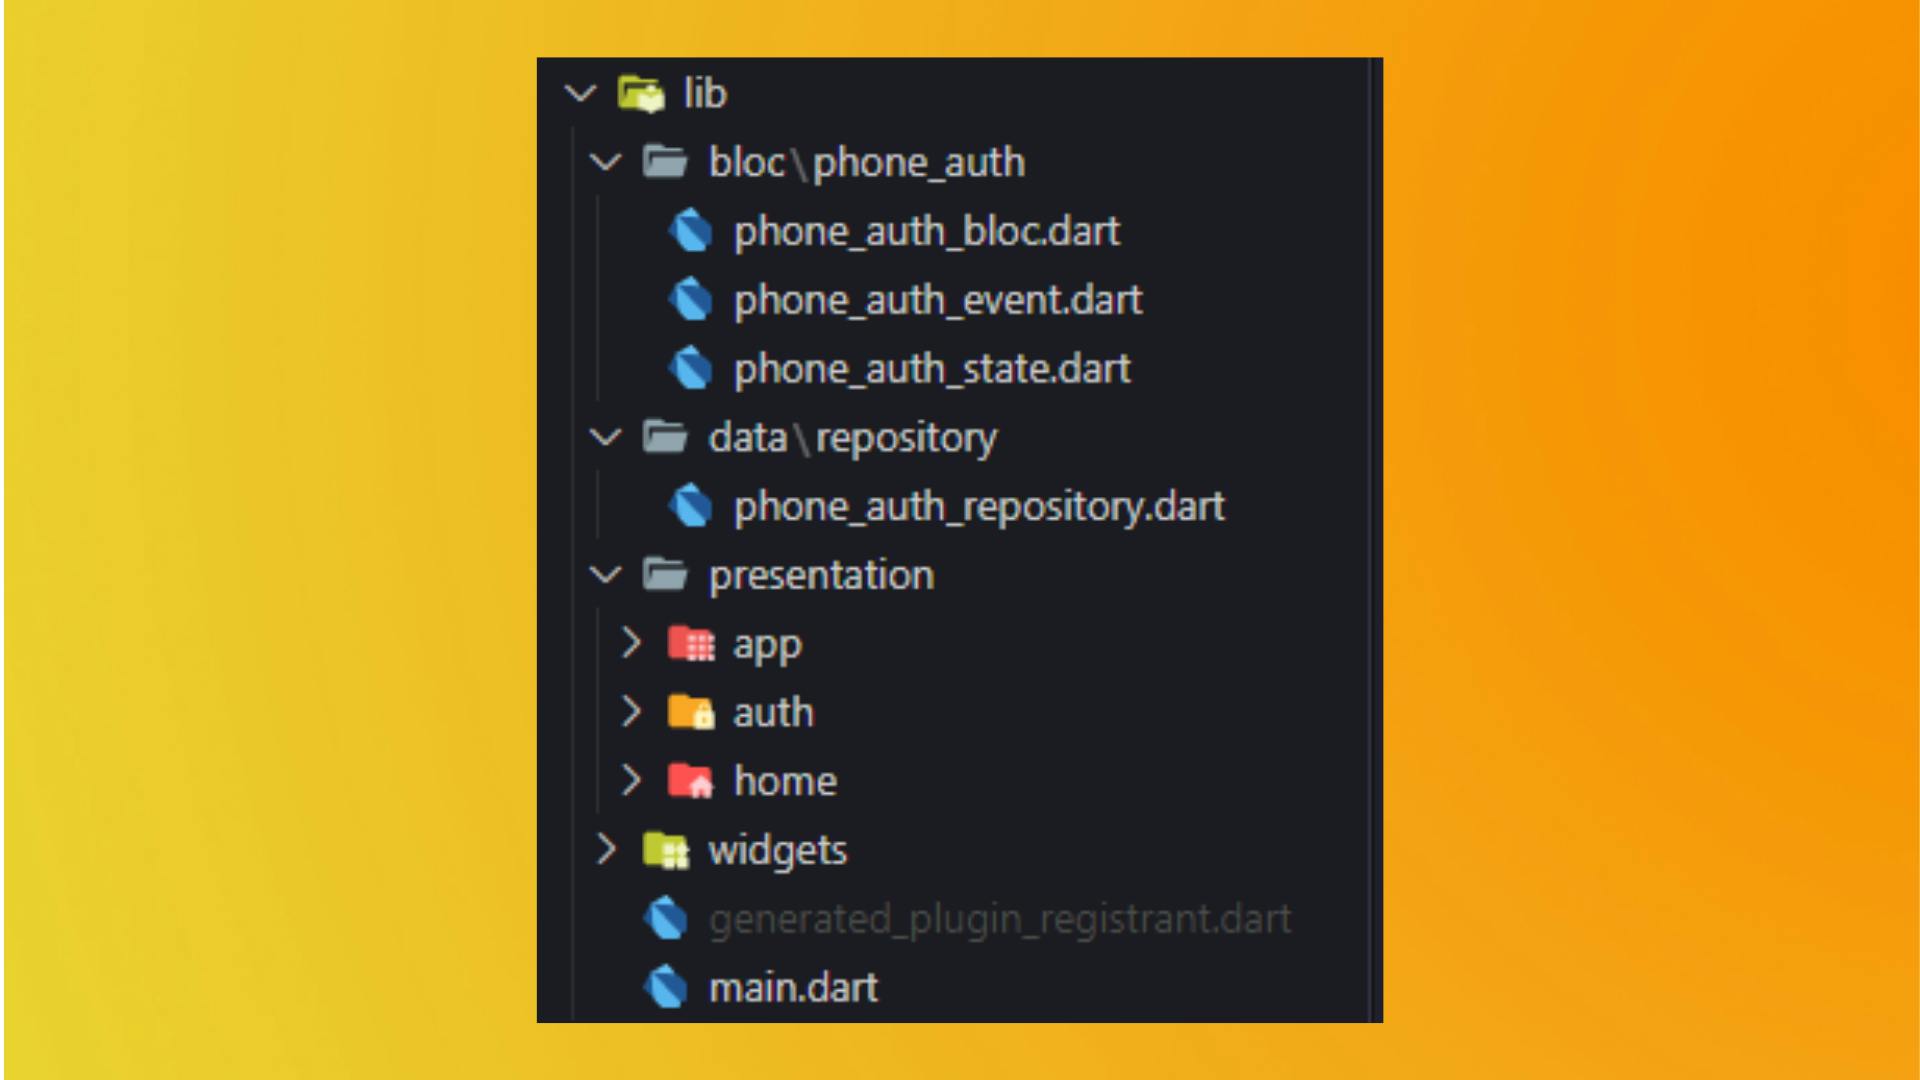
- As you can see, the folder structure is pretty straightforward :
- The
blocfolder contains all the business logic-related files. - The
datafolder contains a repository for phone authentication in which we will write methods of verifying the phone number. - The
presentationfolder contains 3 screens. In which the auth folder has aphone_authscreen, and thehomeis just an empty screen that the user will be able to see only after the successful authentication. - The
widgethas two files. One for OTP Textfield and the second for Phone Number Textfield.
Starter Project Output

Setting up Firebase
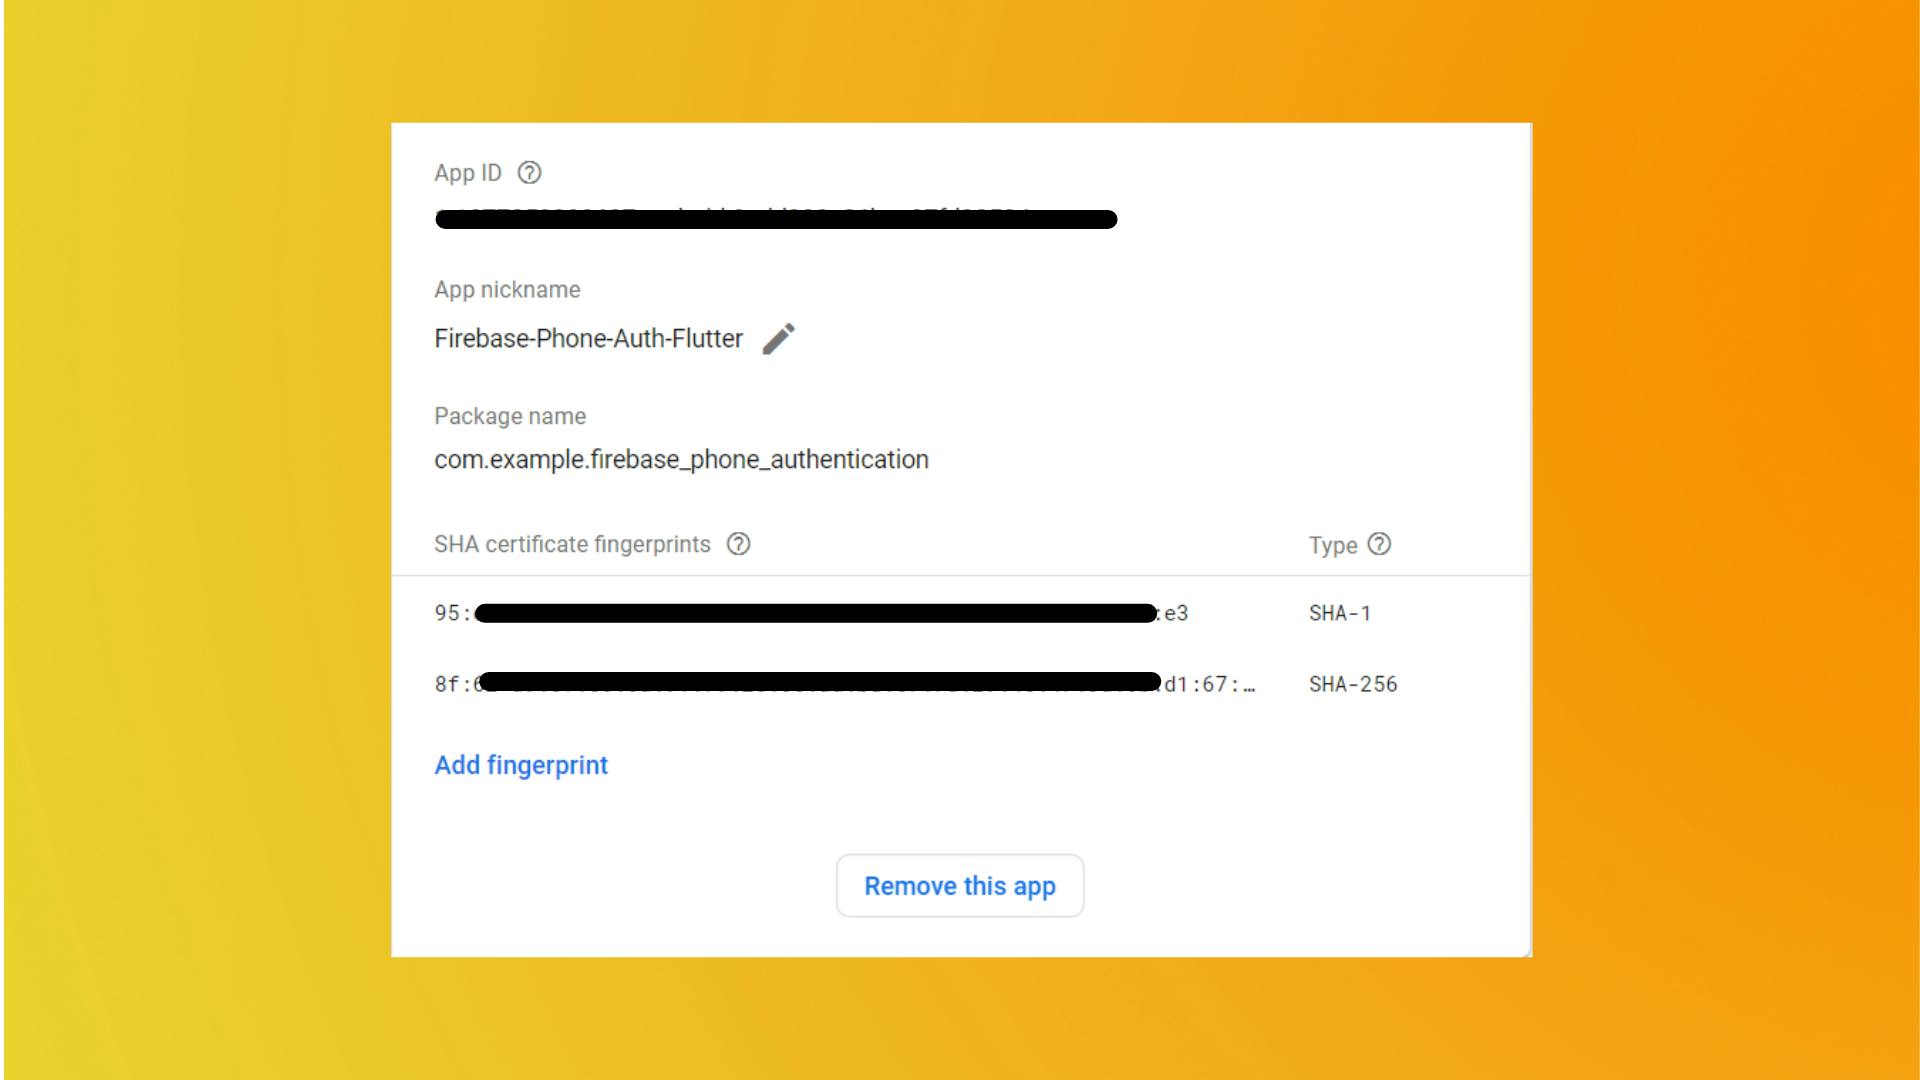
- First and foremost, we must connect our app to a Firebase server. Create a project in the Firebase Console.
- You will be requested to input the SHA keys here during the project creation process. In order to operate with phone authentication, the firebase project must have both SHA-1 and SHA-256.
- To generate SHA keys in your code, go to the project terminal and type the following command.
cd android/ gradlew signingReport - The keys will be generated as a result of this. If you already have a Firebase project, you can find it under the Project Settings section. The keys may then be added over there.
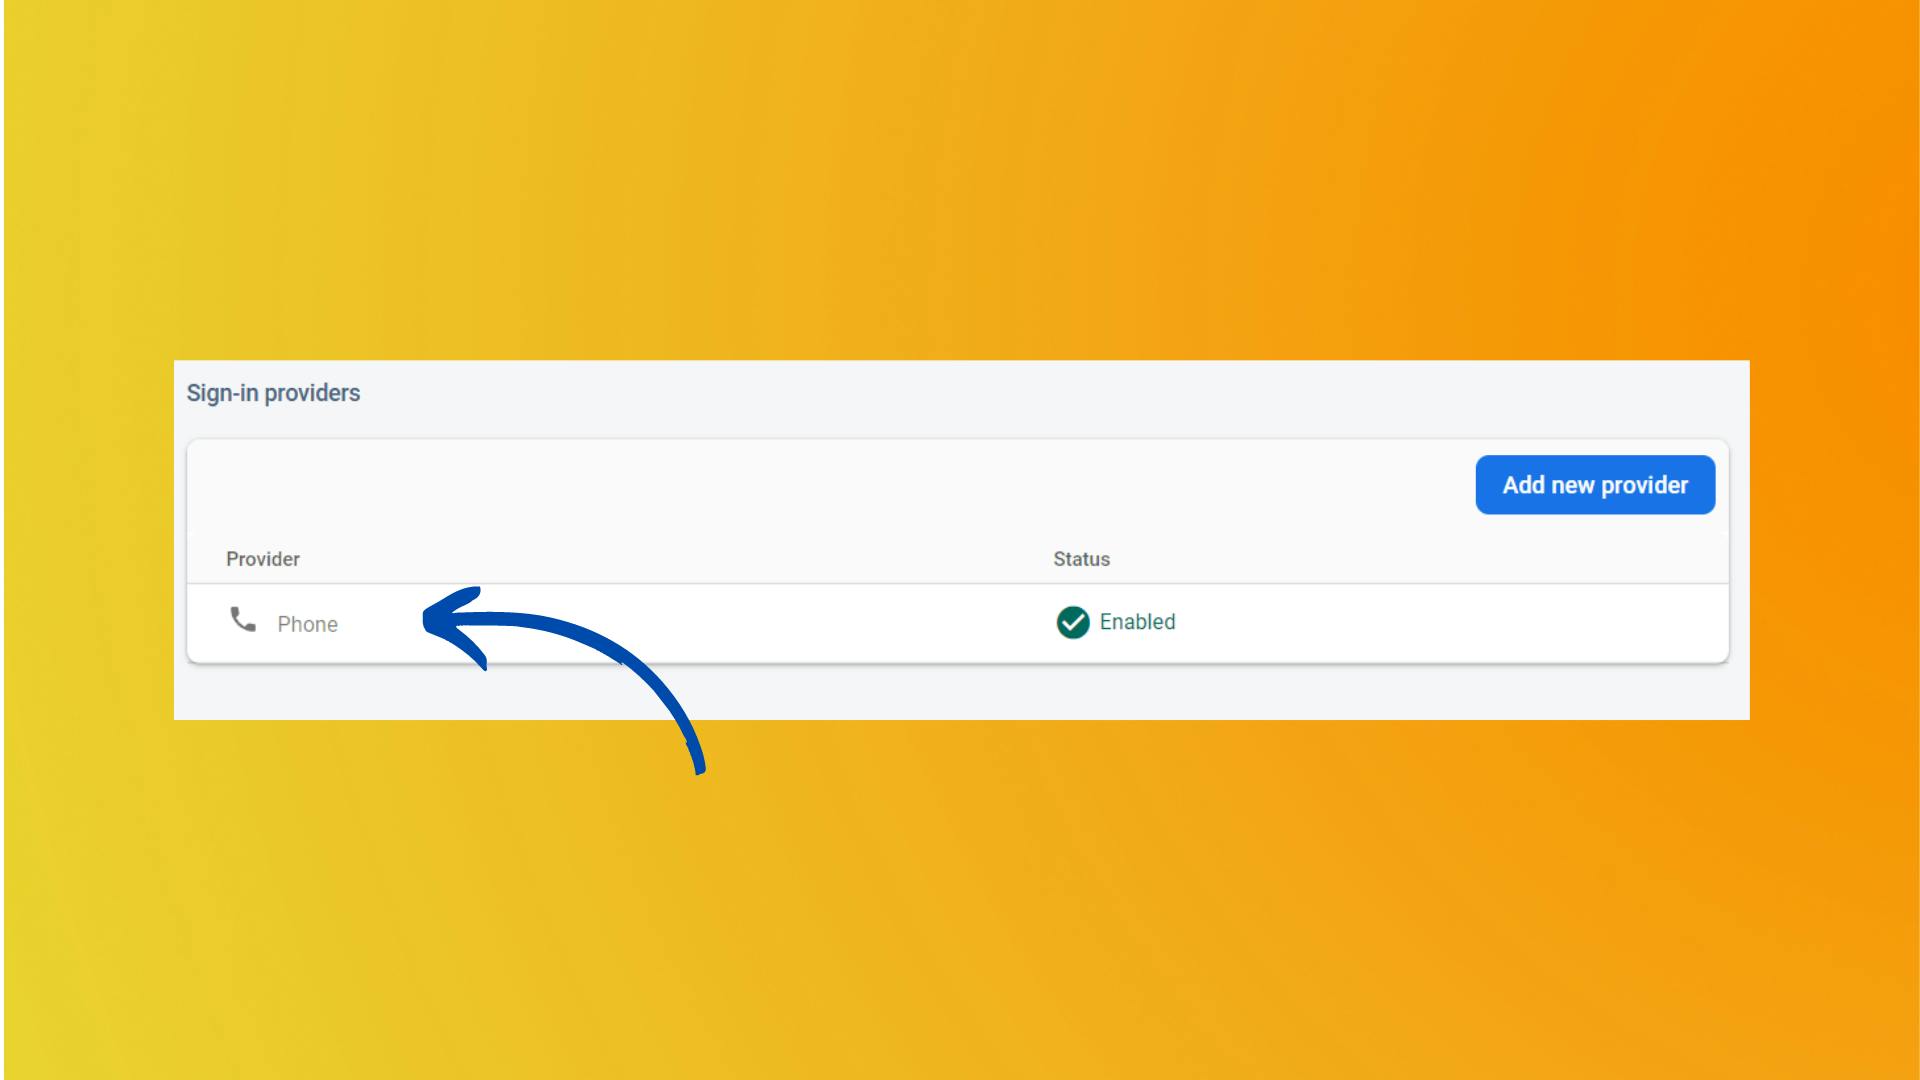
- Also do not forget to enable the sign-in method for Phone in the Authentication section.
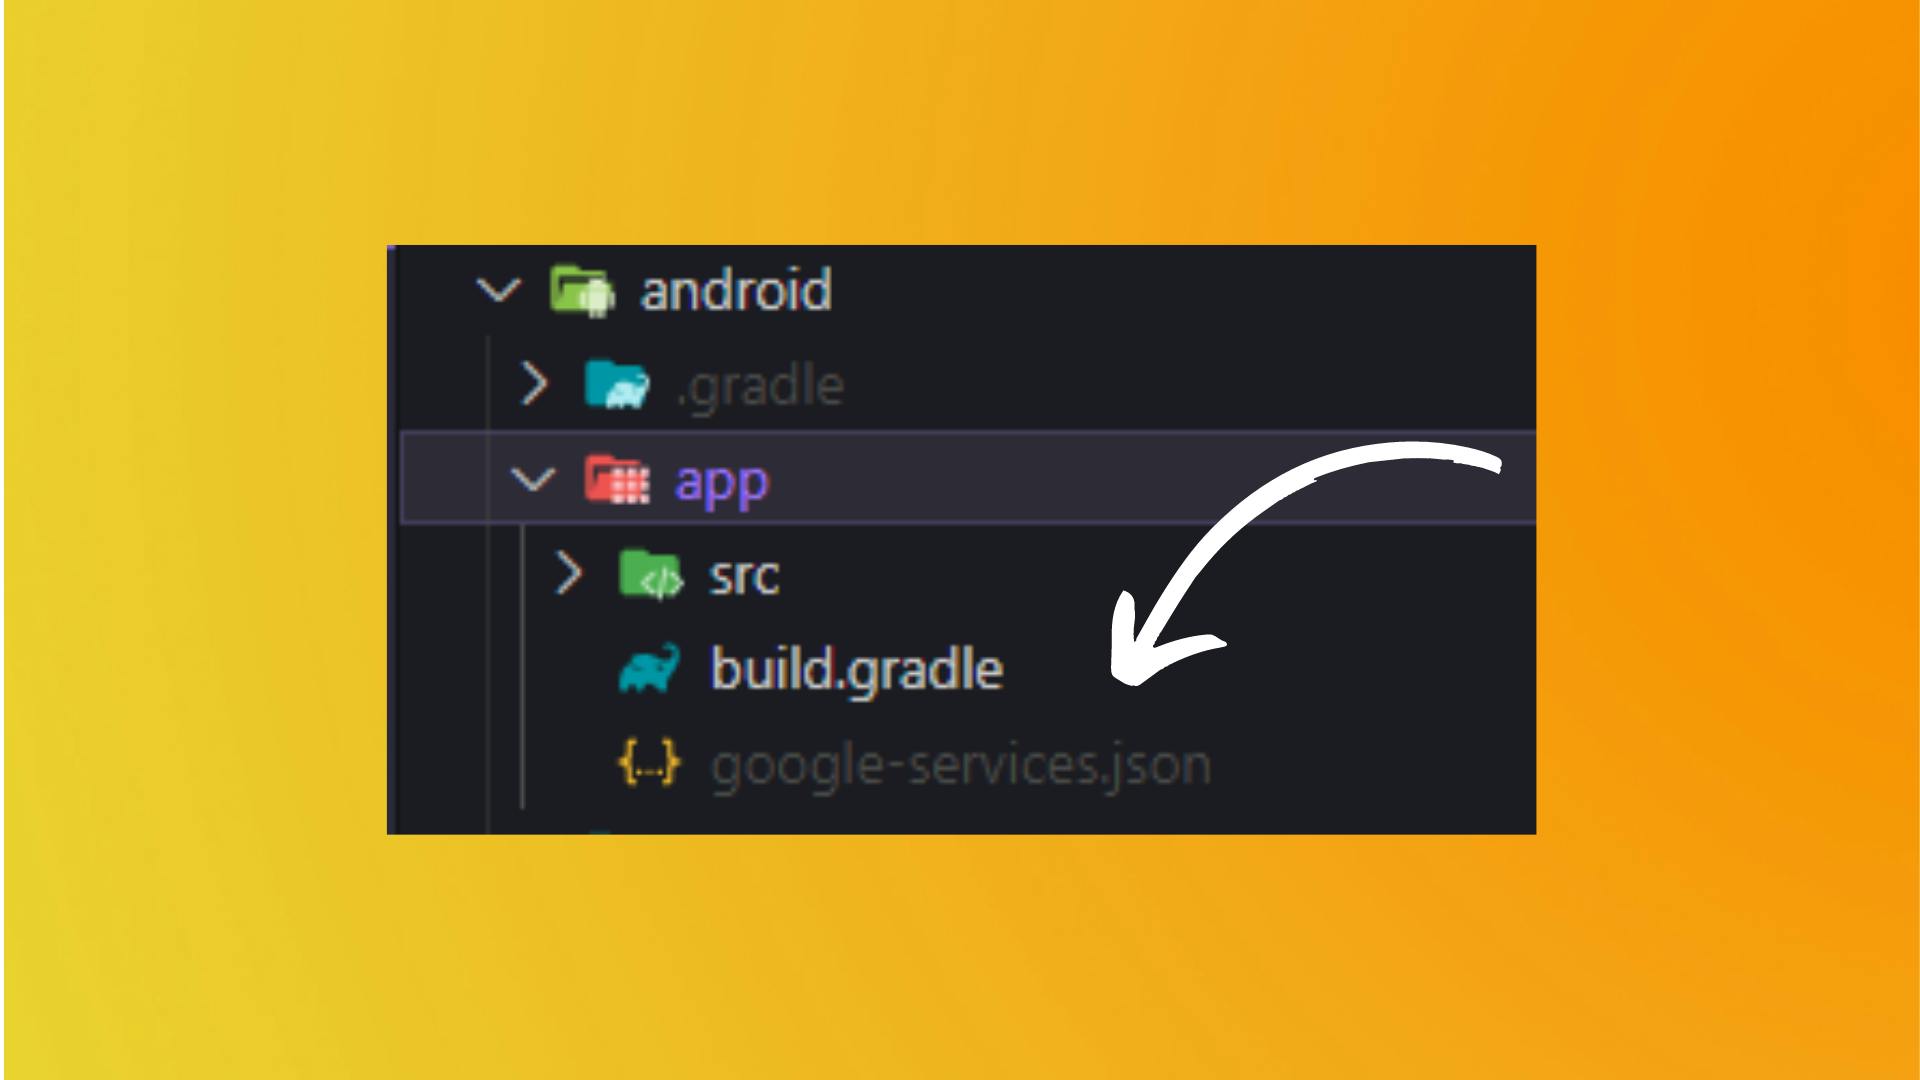
- After that add the updated
google_services.jsonfile in your project.
Enable Android Device Verification
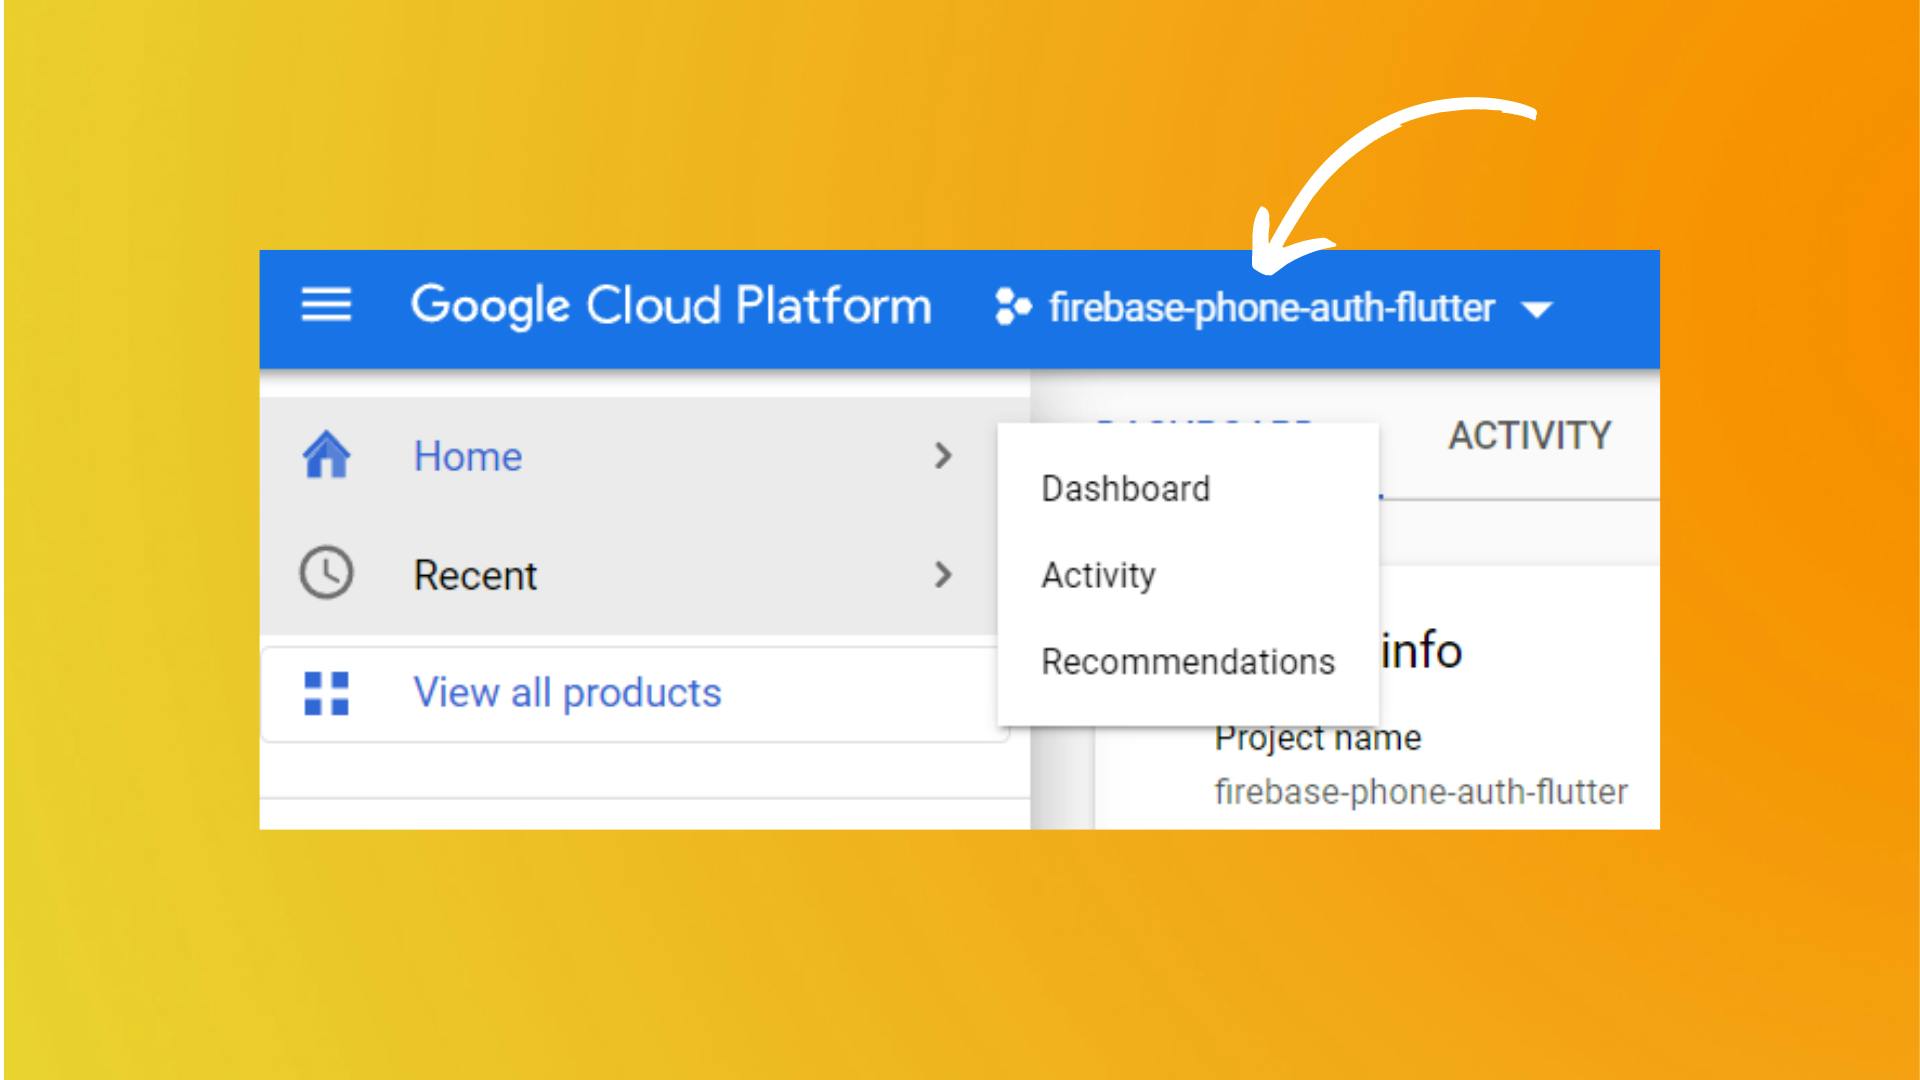
- In order to enable the device verification for your app, you need to enable the Android Device Verification service on your Cloud Console.
- To enable it, head over to Google Cloud Console and select your project
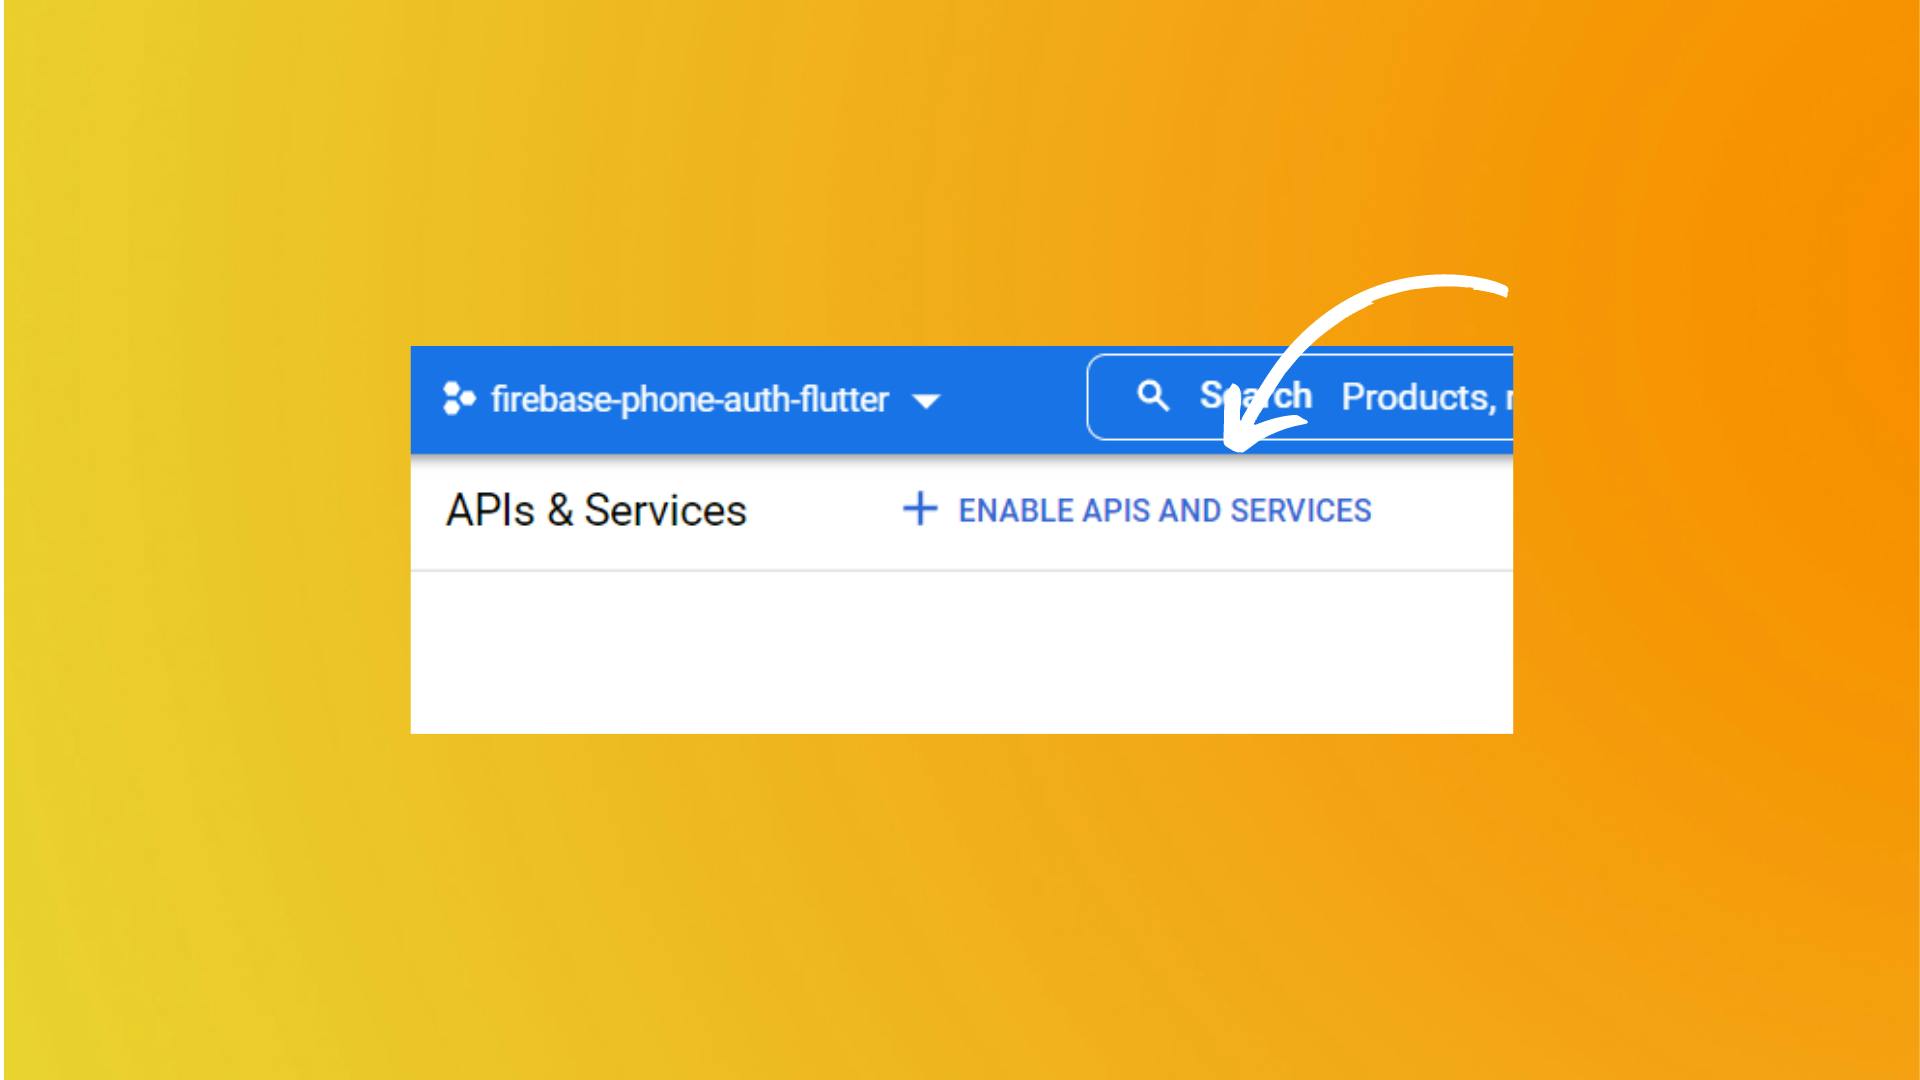
- Now find and go to API & Services section. Over there click on the Enable APIS and Services button.
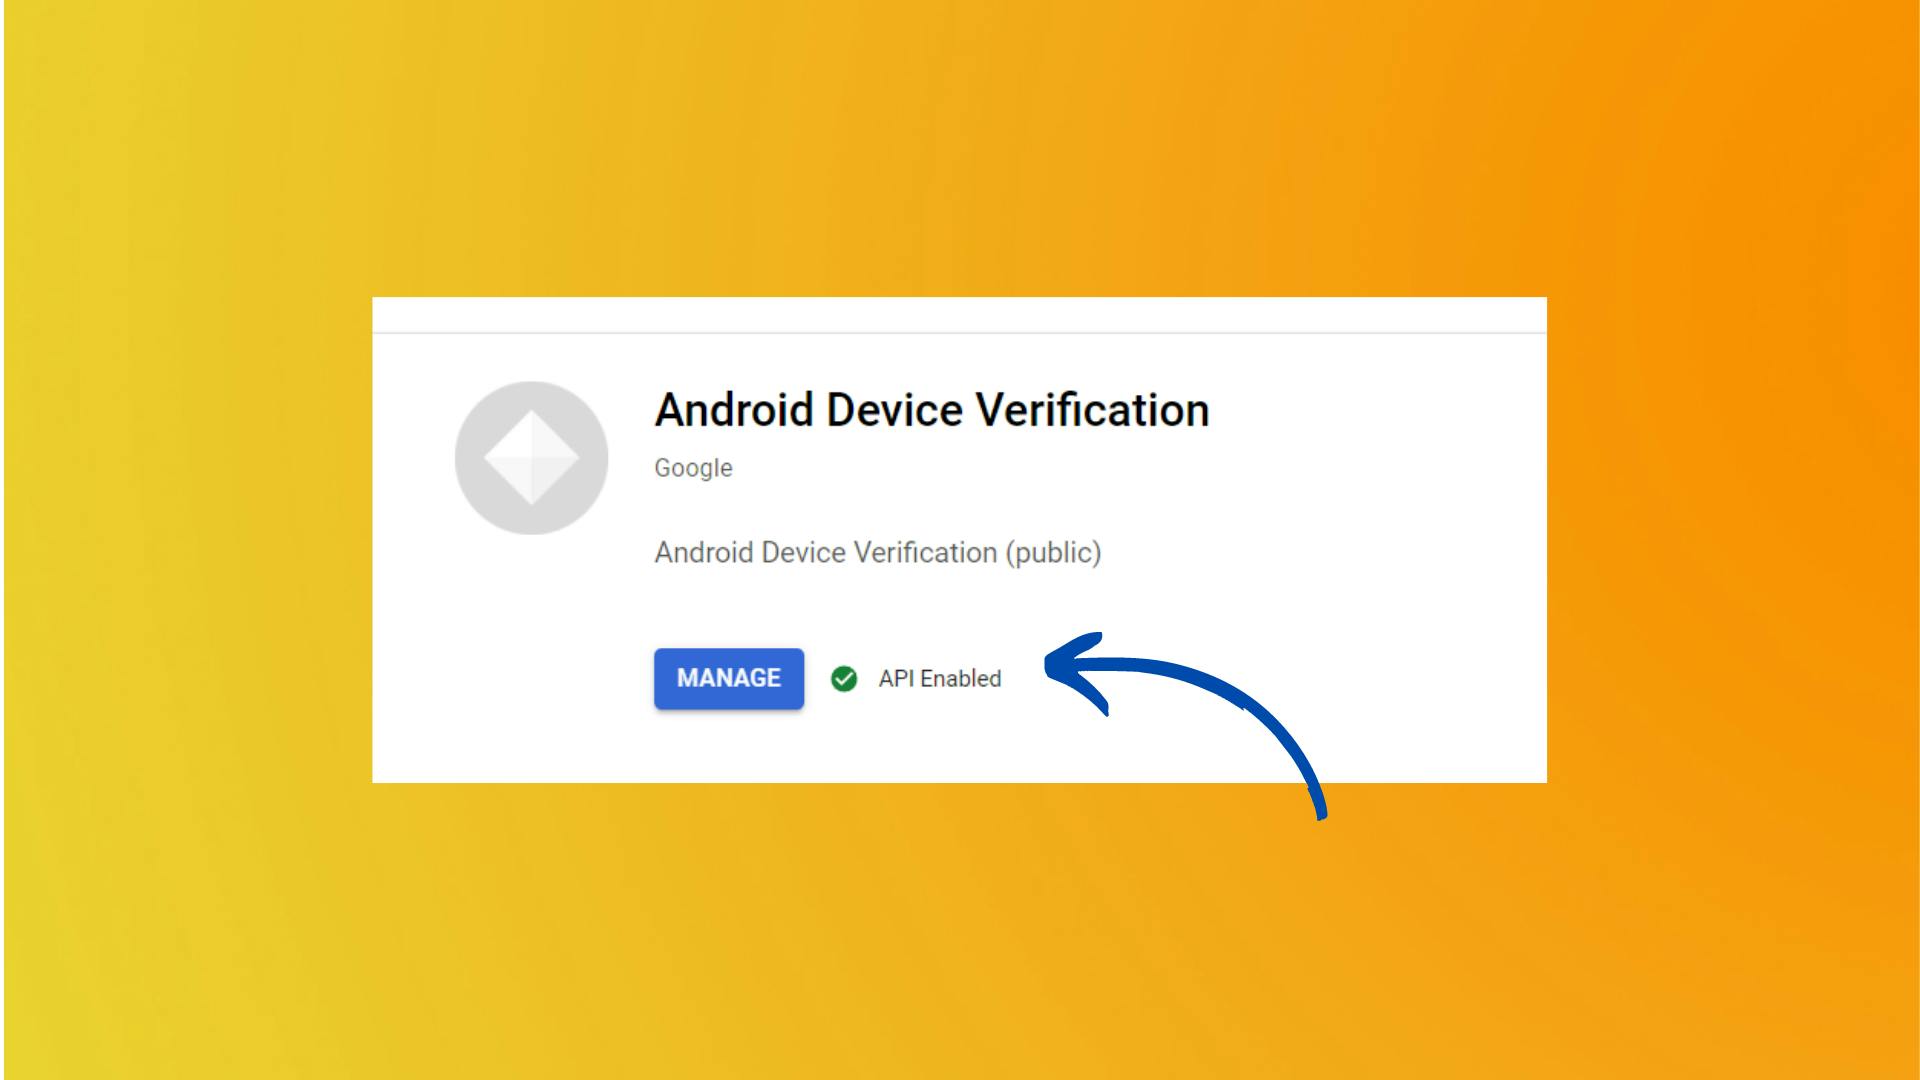
- Now, search for Android Device Verification and enable that service.
Firebase Initialization
- We need to initialize the Firebase in order to use the Firebase services. Let's do it before running the app.
void main() async {
   WidgetsFlutterBinding.ensureInitialized();
   await Firebase.initializeApp();
   runApp(const MyApp());
}
BLoC Implementation
- As we've set up all the necessary things in order to authenticate users with their phone numbers. Let's now write the logic for it in our flutter app.
Event
- There are mainly 5 events that we need to handle. Let us try to understand all the events one by one. Head over to
bloc \ phone_auth \ phone_auth_event.dartfile.
SentOtpToPhoneEvent :
This event will be triggered when the user enters the phone number and presses the Send OTP button on the UI. Once Send Otp button is pressed we will send the phone number with the event to the bloc.
class SendOtpToPhoneEvent extends PhoneAuthEvent {
  final String phoneNumber;

  const SendOtpToPhoneEvent({required this.phoneNumber});

  @override
  List<Object> get props => [phoneNumber];
}
VerifySentOtpEvent :
Once the user requested the OTP after entering the phone number, the OTP field will get appeared on the screen. After the OTP is entered by the user this event will get fired.
class VerifySentOtpEvent extends PhoneAuthEvent {
  final String otpCode;
  final String verificationId;

  const VerifySentOtpEvent(
      {required this.otpCode, required this.verificationId});

  @override
  List<Object> get props => [otpCode, verificationId];
}
OnPhoneOtpSent :
After the user request the OTP from the server, the Firebase will send the OTP to the user's phone number. Firebase will send the
token,verificationIdwith the response. ThisverificationIdis then used to log in to the user.class OnPhoneOtpSent extends PhoneAuthEvent { final String verificationId; final int? token; const OnPhoneOtpSent({ required this.verificationId, required this.token, }); @override List<Object> get props => [verificationId]; }
OnPhoneAuthErrorEvent :
This event will be triggered when an error occurs while sending the OTP to the user's phone number. This can be due to network issues or firebase's error.
class OnPhoneAuthErrorEvent extends PhoneAuthEvent {
   final String error;
   const OnPhoneAuthErrorEvent({required this.error});

   @override
   List<Object> get props => [error];
}
OnPhoneAuthVerificationCompleteEvent :
- This event will be triggered when the verification of the OTP is successful.
class OnPhoneAuthVerificationCompleteEvent extends PhoneAuthEvent {
   final AuthCredential credential;
   const OnPhoneAuthVerificationCompleteEvent({
     required this.credential,
   });
}
State
- There are mainly 3 states that we need to handle. Let us try to understand all the events one by one. Head over to
bloc \ phone_auth \ phone_auth_state.dartfile.
PhoneAuthLoading :
- This state is used to show the loading indicator when the phone number is being sent to the server for verification and the user is being redirected to the verification page.
class PhoneAuthInitial extends PhoneAuthState {}
PhoneAuthError
This state is used to show the error message.
class PhoneAuthError extends PhoneAuthState {
   final String error;

   const PhoneAuthError({required this.error});

   @override
   List<Object> get props => [error];
}
PhoneAuthVerified
- This state indicates that verification is completed and the user is being redirected to the home page.
class PhoneAuthVerified extends PhoneAuthState {}
PhoneAuthCodeSentSuccess
- This state is used to show the OTP widget in which the user enters the OTP sent to his/her phone number.
class PhoneAuthCodeSentSuccess extends PhoneAuthState {
   final String verificationId;
   const PhoneAuthCodeSentSuccess({
     required this.verificationId,
   });
   @override
   List<Object> get props => [verificationId];
}
Bloc
In this file, we will handle all the events triggered during the authentication.
class PhoneAuthBloc extends Bloc<PhoneAuthEvent, PhoneAuthState> { final PhoneAuthRepository phoneAuthRepository; final auth = FirebaseAuth.instance; PhoneAuthBloc({required this.phoneAuthRepository}) : super(PhoneAuthInitial()) { // When user clicks on send otp button then this event will be fired on<SendOtpToPhoneEvent>(_onSendOtp); // After receiving the otp, When user clicks on verify otp button then this event will be fired on<VerifySentOtpEvent>(_onVerifyOtp); // When the firebase sends the code to the user's phone, this event will be fired on<OnPhoneOtpSent>((event, emit) => emit(PhoneAuthCodeSentSuccess(verificationId: event.verificationId))); // When any error occurs while sending otp to the user's phone, this event will be fired on<OnPhoneAuthErrorEvent>( (event, emit) => emit(PhoneAuthError(error: event.error))); // When the otp verification is successful, this event will be fired on<OnPhoneAuthVerificationCompleteEvent>(_loginWithCredential); } }- Let's now implement all the methods in order to handle the different events
- The first is
_onSendOtp.FutureOr<void> _onSendOtp( SendOtpToPhoneEvent event, Emitter<PhoneAuthState> emit) async { emit(PhoneAuthLoading()); try { await phoneAuthRepository.verifyPhone( phoneNumber: event.phoneNumber, verificationCompleted: (PhoneAuthCredential credential) async { // On [verificationComplete], we will get the credential from the firebase and will send it to the [OnPhoneAuthVerificationCompleteEvent] event to be handled by the bloc and then will emit the [PhoneAuthVerified] state after successful login add(OnPhoneAuthVerificationCompleteEvent(credential: credential)); }, codeSent: (String verificationId, int? resendToken) { // On [codeSent], we will get the verificationId and the resendToken from the firebase and will send it to the [OnPhoneOtpSent] event to be handled by the bloc and then will emit the [OnPhoneAuthVerificationCompleteEvent] event after receiving the code from the user's phone add(OnPhoneOtpSent( verificationId: verificationId, token: resendToken)); }, verificationFailed: (FirebaseAuthException e) { // On [verificationFailed], we will get the exception from the firebase and will send it to the [OnPhoneAuthErrorEvent] event to be handled by the bloc and then will emit the [PhoneAuthError] state in order to display the error to the user's screen add(OnPhoneAuthErrorEvent(error: e.code)); }, codeAutoRetrievalTimeout: (String verificationId) {}, ); } catch (e) { emit(PhoneAuthError(error: e.toString())); } } onVerifyOtpFutureOr<void> _onVerifyOtp( VerifySentOtpEvent event, Emitter<PhoneAuthState> emit) async { try { emit(PhoneAuthLoading()); // After receiving the otp, we will verify the otp and then will create a credential from the otp and verificationId and then will send it to the [OnPhoneAuthVerificationCompleteEvent] event to be handled by the bloc and then will emit the [PhoneAuthVerified] state after successful login PhoneAuthCredential credential = PhoneAuthProvider.credential( verificationId: event.verificationId, smsCode: event.otpCode, ); add(OnPhoneAuthVerificationCompleteEvent(credential: credential)); } catch (e) { emit(PhoneAuthError(error: e.toString())); } }_loginWithCredentialFutureOr<void> _loginWithCredential( OnPhoneAuthVerificationCompleteEvent event, Emitter<PhoneAuthState> emit) async { // After receiving the credential from the event, we will login with the credential and then will emit the [PhoneAuthVerified] state after successful login try { await auth.signInWithCredential(event.credential).then((user) { if (user.user != null) { emit(PhoneAuthVerified()); } }); } on FirebaseAuthException catch (e) { emit(PhoneAuthError(error: e.code)); } catch (e) { emit(PhoneAuthError(error: e.toString())); } }
Phone Auth Repository
- If you've noticed in the above code, I've called a method
verifyPhone(). We need to implement this method in the Phone Auth Repository. Let's do it. Head over to
lib \ data \ repository \ phone_auth_repository.dartfileclass PhoneAuthRepository { FirebaseAuth auth = FirebaseAuth.instance; Future<void> verifyPhone({ required String phoneNumber, required Function(PhoneAuthCredential) verificationCompleted, required Function(FirebaseAuthException) verificationFailed, required Function(String, int?) codeSent, required Function(String) codeAutoRetrievalTimeout, }) async { await auth.verifyPhoneNumber( phoneNumber: phoneNumber, verificationCompleted: verificationCompleted, verificationFailed: verificationFailed, codeSent: codeSent, codeAutoRetrievalTimeout: codeAutoRetrievalTimeout, ); } }- The
authwhich we have initialized with the FirebaseAuth instance has a method calledverifyPhoneNumber. - We need to simply call this method, and also we need to pass those methods that we've implemented in the
phone_auth_blocfile.
Updating UI
- Now that we've implemented all the functionalities in order to authenticate the user. Let's update the UI according to the state which we've defined in
phone_auth_state. Head over to
phone_auth_page.dartand wrap the body of the Scaffold around theBlocBuilder.@override Widget build(BuildContext context) { return Scaffold( body: BlocListener<PhoneAuthBloc, PhoneAuthState>( listener: (context, state) { // If Phone Otp Verified. Send User to Home Screen if (state is PhoneAuthVerified) { Navigator.of(context).pushReplacement( MaterialPageRoute( builder: (_) => const HomePage(), ), ); } // Show error message if any error occurs while verifying phone number and otp code if (state is PhoneAuthError) { ScaffoldMessenger.of(context).showSnackBar( SnackBar( content: Text(state.error), ), ); } }, child: BlocBuilder<PhoneAuthBloc, PhoneAuthState>( builder: (context, state) { if (state is PhoneAuthLoading) { return const Center( child: CircularProgressIndicator(), ); } return Center( child: Padding( padding: const EdgeInsets.all(18.0), child: Column( mainAxisAlignment: MainAxisAlignment.center, children: [ const Text( "Firebase x Flutter: \nPhone Authentication", style: TextStyle(fontSize: 24), textAlign: TextAlign.center, ), const Divider( height: 30, endIndent: 20, indent: 20, thickness: 1.5, color: Colors.grey, ), const SizedBox( height: 30, ), // Here we are conditionally rendering the OtpWidget. When the user presses the Send OTP button we will update the PhoneNumberWidget with the OtpWidget. So that user can enter the OTP. if (state is! PhoneAuthCodeSentSuccess) PhoneNumberWidget( phoneNumberController: _phoneNumberController, ) else OtpWidget( codeController: _codeController, verificationId: state.verificationId, ), ], ), )); }, ), ), ); }Now head over to
otp_field.dartfile. Here we need to implement the_verifyOtpmethod. This method is called when the user has entered the OTP and presses the Verify button.void _verifyOtp({required BuildContext context}) { context.read<PhoneAuthBloc>().add(VerifySentOtpEvent( otpCode: codeController.text, verificationId: verificationId)); codeController.clear(); }Also in the
phone_number_field.dartfile we need to implement_sendOtpfunction.void _sendOtp({required String phoneNumber, required BuildContext context}) { final phoneNumberWithCode = "${_countryCode.dialCode}$phoneNumber"; context.read<PhoneAuthBloc>().add( SendOtpToPhoneEvent( phoneNumber: phoneNumberWithCode, ), ); setState(() { widget.phoneNumberController.clear(); }); }
Providing Repository and Bloc
In order to provide the PhoneAuthRepository and PhoneAuthBloc we need to wrap the parent with the
RepositoryProviderandBlocProvider.class MyApp extends StatelessWidget { const MyApp({Key? key}) : super(key: key); @override Widget build(BuildContext context) { return MaterialApp( title: 'Firebase Phone Auth Demo', theme: ThemeData( primarySwatch: Colors.blue, ), home: RepositoryProvider( create: (context) => PhoneAuthRepository(), child: BlocProvider( create: (context) => PhoneAuthBloc( phoneAuthRepository: RepositoryProvider.of<PhoneAuthRepository>(context), ), child: const PhoneAuthPage(), ), ), ); } }
Final Output

- As you can see the OTP gets auto validated as soon as the user gets it.
Final Repo
Wrapping Up
- I hope you enjoyed and learned something from this article. If you have any feedback/queries, leave them in the comments.
- Thank you for spending time reading this article. See you in the next article. Until then...
