
Flutter Bloc : A Complete Guide
What is Bloc and its Architecture? What is BlocBuilder, BlocProvider, BlocListener, BlocConsumer, RepositoryProvider? Folder Structure For Bloc.

D
I'm a mobile/web developer 👨💻 who loves to build projects and share valuable tips for programmers
Follow me for Flutter, React/Next.js, and other awesome tech-related stuff 😉
Intro
- When it comes to building an application, Flutter is the easiest and powerful framework.
- But building an application without any strong architecture is like building a house without any planning and blueprints.

- You won't understand the uses of architecture when building small applications.
- But when it comes to building a big production level application where you have many screens, animations, methods, classes, etc, without any proper architecture you will end up in a state where everything is messed up and you don't know how all the components, classes, methods are communicating and functioning.

- So it is very necessary to maintain the code make code more readable and testable, and easily trackable when designing and developing this kind of big application.
- There are many different packages available, and all have their own way to handle application states.
- In this article, I am going to talk about
Bloc. Bloc is not just a state management, but it's also an architectural design pattern which helps us to build production-level applications.
What is Bloc?
- Bloc stands for Business Logic Component.

- In computer software, business logic or domain logic is the part of the program that encodes the real-world business rules that determine how data can be created, stored, and changed. - wiki
- Bloc separates the UI from the business logic. When we build an application without any architecture, we most probably write our logic directly inside the UI. But when we use Bloc we have to write the business logic in a separate file, i.e separated from UI and then we link it to the UI.
- Bloc makes the application easily testable, fast, reactive.
- The Bloc is distinguished into four layers -
🖼️ UI (Presentation Layer) :
- All the component(Widgets) of the app which is visible to the user is defined here.

🦾Bloc (Business Logic Layer):
- It acts as a middle man between UI and Data layer, Bloc takes an event triggered by the user (ex: GetWeatherData button press, Submit form button press, etc) as an input, and responds back to the UI with the relevant state.

⚙️Data Layer :
- This layer has further two parts. Repository and Data Provider.

- Data Provider - This layer retrieves/fetches the raw data from different data sources (ex: different APIs, DBs, Network, Shared preferences, etc). For example: If you are building a weather app. Then you might use external APIs like OpenWeatherAPI, from where you will get raw data. You can have
GET,POST,DELETE, etc methods inside this class. For example, To get therawdata fromOpenWeatherMapAPI we can do something like// weather_data_provider.dart class WeatherDataProvider { Future<http.Response> getRawWeatherData(String city) async { http.Response rawWeatherData = await http.get( Uri.parse("Url"), ); return rawWeatherData; } }//Sample Raw Data looks like this { "weather": [ { "id": 800, "main": "Clear", "description": "clear sky", "icon": "01d" } ], "main": { "temp": 282.55, "feels_like": 281.86, "temp_min": 280.37, "temp_max": 284.26, "pressure": 1023, "humidity": 100 }, "name": "Mountain View", } - Repository - This layer contains one or more than one Data Providers. The transformation is done on the
rawdata returned by the Data Provider in this layer. (For ex: converting therawinto some kind of Model). Bloc communicates with this layer when the user requests the data. This layer requests raw data from the Data Provider and after that, this layer performs some kind of transformation. For example, convertingrawweather data toWeatherModel.// weather_repository.dart class WeatherRepository { late final WeatherDataProvider weatherDataProvider; Future<Weather> getWeather(String location) async { final http.Response rawWeather = await weatherDataProvider.getRawWeatherData(location); final json = jsonDecode(rawWeather.body); final Weather weather = Weather.fromJson(json); return weather; } } - This Repository layer directly communicates with bloc in order to pass data

- The above figure is showing exactly how every layer is communicating with each other.
- There are two very important terms that you need to understand : Event and State.
Event
- Event is nothing but different actions (button click, submit, etc) triggered by the user from UI. It contains information about the action and gives it to the Bloc to handle.
State
- The UI will update according to the
Stateit receives from the Bloc. For example, there could be different kinds of states -LoadingState - Will Show Progress Indicator
LoadedState - Will Show Actual widget with data
ErrorState - Will show an error that something went wrong.
- Okay, so now we've covered all the basic concept that is required to understand in order to implement bloc in flutter application. If you have still not understood or had any confusion, don't worry it'll be cleared when we see an example.
- So let's make a simple app by using all the concepts that we've learned so far.
Note: If you don't know about
Streamsthen please learn it first as it is the base of the bloc, I'll not cover it in this article as I've already covered it in my previous article, So make sure you check it.
Implementing Bloc:
- Before diving into implementation VS Code has a very handy extension for Bloc. Make sure you install it.
Step 1: Create a Flutter Application
flutter create bloc_example
Step 2: Project Setup
main.dartvoid main() { runApp(MyApp()); }class MyApp extends StatelessWidget { @override Widget build(BuildContext context) { return MaterialApp( home: WeatherApp(), ); } }
weather_app.dartclass WeatherApp extends StatelessWidget { @override Widget build(BuildContext context) { return Scaffold( appBar: AppBar( title: Text("Weather App"), centerTitle: true, ), body: Padding( padding: EdgeInsets.symmetric(horizontal: 12.0), child: Column( mainAxisAlignment: MainAxisAlignment.spaceAround, children: [ TextField( decoration: InputDecoration( hintText: "Enter city name", border: OutlineInputBorder(), ), ), Column( children: [ Image.asset( "assets/images/sun.png", height: 200, width: 200, ), SizedBox( height: 20, ), Text( "New York", style: Theme.of(context).textTheme.headline3, ), SizedBox( height: 5, ), Text( "38", style: Theme.of(context).textTheme.headline4!.copyWith( fontWeight: FontWeight.bold, color: Colors.black), ), ], ), ElevatedButton( onPressed: () {}, child: Text("Get Weather"), ) ], ), ), ); } }Final UI

Step 3: Install packages
- Go to
pubspec.yamland add flutter_bloc, bloc, and http packages insidedependenciesdependencies: flutter: sdk: flutter flutter_bloc: ^7.1.0 bloc: ^7.1.0 http: ^0.13.3
Step 4: Create bloc files
- Now right click on the
libfolder of your application, here you'll seeBloc: New Blocoption if you've installed theblocextension that I've mentioned earlier. 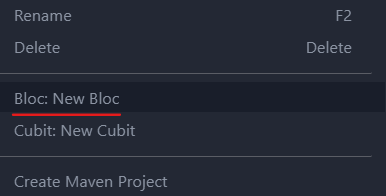
- After clicking on this, the dialog will pop up for giving the name to the bloc. Give the name and press Enter.

Now If you see in the
libdirectory the folder namedblocis created and it has 3 different file -weather_bloc,weather_event, andweather_stateweather_bloc.dart:import 'dart:async'; import 'package:bloc/bloc.dart'; import 'package:meta/meta.dart'; part 'weather_event.dart'; part 'weather_state.dart';class WeatherBloc extends Bloc<WeatherEvent, WeatherState> { WeatherBloc() : super(WeatherInitial()); @override Stream<WeatherState> mapEventToState(WeatherEvent event) async* { // TODO: implement mapEventToState } }- As you can see the extension has already generated some code for us. So let's try to understand what this code means.
- The
weather_bloc.dartclass is a bridge between our UI and the Data class, In other words, this class will handle all the Events triggered by the User and sends the relevant State back to the UI. 
- We are extending our
WeatherBlocclass withBlocwhich takes two thingsWeatherEventandWeatherState. As the name suggests, they handle the applications State and Events respectively. - These two classes are implemented in the
weather_event.dartandweather_state.dartrespectively. - In the second line the
constructorof our class is created. In this, we need to provide aninitialstate. It's not going to do anything. It simply represents that the app is now in its initial stage and nothing has happened yet. - After that, we have to implement the
mapEventToStatemethod. As the name suggests, It will Map the Events to State. In other words, what this is gonna do is, It's gonna take some kind ofEvent(ex: Increment Counter event, Get Weather event, Decrement Counter event, etc). And it's our responsibility to write the functionality of what suppose to happen after that event is triggered. - And what
stateis going to result as an effect of that event. - Now let's implement weather_event.dart and weather_state.dart first and then we will come back and implement this
mapEventToStatemethod.
weather_event.dart:/*import statements*/ part of 'weather_bloc.dart';@immutable abstract class WeatherEvent {} class WeatherRequest extends WeatherEvent { final String cityName; WeatherRequest({required this.cityName}); }- In this class, we define different kinds of events by extending the abstract event class.
- For example, when the user presses the
Get Weatherbutton, the WeatherRequest event is triggered. - Here I've also created a final field called
cityName. It's nothing but a string inputted by the user in the search text field. - We have to pass it to the event in order to access it in our bloc.
- Now let's implement
weather_state.dartclass
weather_state.dart:/*import statements*/ part of 'weather_bloc.dart';@immutable abstract class WeatherState {} class WeatherInitial extends WeatherState {} class WeatherLoadInprogress extends WeatherState {} class WeatherLoadSuccess extends WeatherState { final Weather weather; WeatherLoadSuccess({required this.weather}); } class WeatherLoadFailure extends WeatherState { final String error; WeatherLoadFailure({required this.error}); }- In this class, we define different kinds of states (For example, LoadingInProgress state, LoadSuccess state, LoadFailure state).
- For example, your app is fetching user data from an external API. Now when the user requests their data, initially we passLoadingInProgress which represents that the data is currently loading and we can show ProgressIndicator in UI. After data is received we change the state and pass the LoadSuccess state with the requested data. And if for some reason, something went wrong or some error occurred then we will pass LoadFailure for showing the user that the app has failed to fetch data.
- In our case, we have 4 states -
- WeatherInitial - For initial stage
- WeatherLoadInprogress - For telling the app that weather data is in progress,
- WeatherLoadSuccess - After weather data has been received we change our UI state and show the temperature data of the specified city.
- WeatherLoadFailure - For Error handling .
- Now that we've implemented all the
EventsandStates. We can now go toweather_bloc.dartand can start implementmapEventToStatemethod.
Back to weather_bloc.dart:
- So now that we have Events, we can now handle those events and perform our operation.
class WeatherBloc extends Bloc<WeatherEvent, WeatherState> { final _weatherRepository = WeatherRepository(); WeatherBloc() : super(WeatherInitial()); @override Stream<WeatherState> mapEventToState(WeatherEvent event) async* { if (event is WeatherRequest) { yield WeatherLoadInprogress(); try { final weatherResponse = await _weatherRepository.getWeather(event.cityName); yield WeatherLoadSuccess(weather: weatherResponse); } catch (e) { yield WeatherLoadFailure(error: e.toString()); } } } }- Here we are handling different events with
if-else if-else. You can useswitch-case too. - In this, we check for different events and return the relevant states to the UI.
- In our case, we are checking if the
EventisWeatherRequest, then we have to first of all pass theWeatherLoadInProgressstate that tells the app that data is currently fetching. - And after receiving the response from the Repository we can then pass the WeatherLoadSuccess state with the data, and update the UI state.
- Now the final step is to provide this data to the UI. Let's do this.
Step 5: How to access bloc data in UI?.
- Now that we have created the bloc and implemented all the functionalities
we need to somehow provide this bloc to the widget tree so that we can use the
weatherdata and display it on the screen. And also we have to bind theGet Weatherbutton. - Before that, we have to understand different Widgets provided by bloc -
- BlocProvider, BlocBuilder, BlocListener, BlocConsumer, RepositoryProvider.
BlocProvider
- BlocProvider widget provides a bloc to its children (i.e Widgets).
- BlocProvider is used as dependency injection (DI) widget so that a single instance of a bloc can be provided to multiple widgets within a subtree.
- If you don't know about Dependency Injection, you can check this out -
- Okay. So now we know what BlocProvider does, where can we put it?
- We have to put it at the place from where all the children can access the bloc. Can you guess that place?

- Its non-other than our favorite MaterialApp 🎉🎉
- So let's wrap the BlocProvider inside MaterialApp
- Go to
main.dart. class MyApp extends StatelessWidget { @override Widget build(BuildContext context) { return BlocProvider( create: (context) => WeatherBloc(), child: MaterialApp( home: WeatherApp(), ), ); } }- That's it. Now we can access our bloc via
BlocProvider.of<WeatherBloc>(context). - BlocProvider has one
lazyparameter. By default, it'strue. It is used to lazily load thebloc. It means whenever anyone tries to use theblocthen it will be initialized. - To override this functionality we can change the value of
lazytofalse. - Now you might have asked a question, that what if we have multiple blocs. How can we provide all the bloc from the
main.dart? - One way is to nest all the bloc one inside another -
BlocProvider(
  BlocProvider(
    BlocProvider(
        .....
- 😅 Don't be scared. There is an easy approach. Don't use this
MultiBlocProvider
- Bloc provides us a MultiBlocProvider widget that takes a List of Bloc and provides it to its children. Let me demonstrate.
class MyApp extends StatelessWidget { @override Widget build(BuildContext context) { return MultiBlocProvider( providers: [ BlocProvider(create: (context) => WeatherBloc(),), BlocProvider(create: (context) => NetworkBloc(),), BlocProvider(create: (context) => StorageBloc(),), ], child: MaterialApp( home: WeatherApp(), ), ); } }- Isn't it cool? That's the power of MultiBlocProvider 🦾
BlocBuilder:
- BlocBuilder is a widget that helps Re-building the UI based on State changes.
- In our case we want our UI to update the state when the user presses the
Get Weatherbutton. - BlocBuilder builds the UI every single time state changes
- So, it's very necessary to place BlocBuilder around the Widget that we want to rebuild.
- You can also wrap the whole Widget inside the BlocBuilder (i.e around the Scaffold), but it's not a good way. Because think about the time and processing power that will be consumed when your whole widget tree rebuilds just to update a Text widget inside the tree. So make sure you wrap the BlocBuilder around the widget that needs to be rebuild when the state changes.
- In our case, we have to update the whole page. Because when the user presses the
GetWeatherbutton we want to show a Circular Progress Indicator instead of what we have previously. - So let's add BlocBuilder inside the
body body: BlocBuilder<WeatherBloc, WeatherState>( builder: (context, state) { return ... } )- BlocBuilder takes two things
bloc, andstate. builderfunction is required which takes two parameters. context and thestatewhich is of typeWeatherStatein our case. And it should return Widget in response.- We can explicitly provide the
blocin BlocBuilder by passing the bloc insideblocproperty of BlocBuilder BlocBuilder<WeatherBloc, WeatherState>( bloc: blocA, // provide the local bloc instance builder: (context, state) { return ... } )- If the bloc parameter is omitted, BlocBuilder will automatically perform a lookup using BlocProvider and the current BuildContext.
- Only specify the bloc if you wish to provide a bloc that will be scoped to a single widget and isn't accessible via a parent BlocProvider and the current BuildContext.
buildWhenparameter takes the previous bloc state and current bloc state and returns a boolean. IfbuildWhenreturns true,builderwill be called with state and the widget will rebuild. IfbuildWhenreturns false,builderwill not be called with state and no rebuild will occur.BlocBuilder<WeatherBloc, WeatherState>( buildWhen: (previousState, state) { }, builder: (context, state) { return ... } )- We can conditionally render our widget based on the state with the help of the
stateparameter. Let's conditionally render the widget of our weather app based on different states. And call the WeatherRequest event on theGet Weatherbutton press. BlocBuilder<WeatherBloc, WeatherState>( builder: (context, state) { if (state is WeatherLoadInprogress) return Center( child: CircularProgressIndicator(), ); else if (state is WeatherLoadFailure) return Center( child: Text("Something went wrong"), ); else if (state is WeatherLoadSuccess) return WeatherWidget() else return Container(); }, ), ); } }- You can access your Bloc by - BlocProvider.of(context) or context.
context.read<WeatherBloc>().add(Event());
// or
BlocProvider.of<WeatherBloc>(context)add(Event())
BlocListener:
- As the name suggests, this will listen to any state change as BlocBuilder does.
- But instead of building the widget like BlocBuilder, it takes one function,
listener, which is called only once per state, not including the initial state. - Example: Navigation, Showing a SnackBar, Showing a Dialog, etc...
- It also has a
blocparameter. Only specify theblocif you wish to provide a bloc that is otherwise not accessible via BlocProvider and the current BuildContext. - The
listenWhenparameter is the same as BlocBuilder'sbuildWhenbut for Listener. - The whole idea of BlocListener is - It is not responsible for building/updating the widget like BlocBuilder does.
- It only listens to the state changes and performs some operation. The operation could be (Navigating to other screens when state changes, Showing Snackbar on a particular state, etc).
- Let's say we want to show a snackbar on WeatherLoadInProgress state -
- Wrap the body inside BlocListener
body: BlocListener<WeatherBloc, WeatherState>( listener: (context, state) { if (state is WeatherLoadInprogress) { ScaffoldMessenger.of(context).showSnackBar( SnackBar( content: Text("Loading"), ), ); } }, child : BlocBuilder<WeatherBloc, WeatherState>( builder: // ... ) ) - Output:

MultiBlocListener:
- MultiBlocListener is a Flutter widget that merges multiple BlocListener widgets into one. MultiBlocListener improves the readability and eliminates the need to nest multiple BlocListeners
- By using MultiBlocListener we can go from:
BlocListener<BlocA, BlocAState>( listener: (context, state) {}, child: BlocListener<BlocB, BlocBState>( listener: (context, state) {}, child: BlocListener<BlocC, BlocCState>( listener: (context, state) {}, child: ChildA(), ), ), )- to
MultiBlocListener(
listeners: [
  BlocListener<BlocA, BlocAState>(
    listener: (context, state) {},
  ),
  BlocListener<BlocB, BlocBState>(
    listener: (context, state) {},
  ),
  BlocListener<BlocC, BlocCState>(
    listener: (context, state) {},
  ),
],
child: ChildA(),
)
BlocConsumer:
- As of now we are building a widget using BlocBuilder and showing the snackbar using BlocListener.
- Is there any easy way to combine both in a single widget? Hell yeah 😎
- Bloc provide BlocConsumer widget, which combines both BlocListener and BlocBuilder.
- So instead of writing BlocListener and BlocBuilder separately we can do -
BlocConsumer<BlocA, BlocAState>( listener: (context, state) { if (state is WeatherLoadInprogress) { ScaffoldMessenger.of(context).showSnackBar( SnackBar( content: Text("Loading"), ), ); } }, builder: (context, state) { // return widget } )- An optional
listenWhenandbuildWhencan be implemented for more granular control over when listener and builder are called.
RepositoryProvider:
- It is the same widget as BlocProvider.
- But the main difference is BlocProvider provides a single instance of
blocto its children whereas RepositoryProvider providesrepositoriesto its children. - It is used as a dependency injection (DI) widget so that a single instance of a repository can be provided to multiple widgets within a subtree.
- If you want to know more about dependency injection -
- Example:
RepositoryProvider( create: (context) => WeatherRepository(), child: ChildWidget(), );- Widget can access this repository by -
context.read<WeatherRepository>();
// or
RepositoryProvider.of<WeatherRepository>(context)
MultiRepositoryProvider:
- As the name suggests, it provides multiple repositories.
- Example:
MultiRepositoryProvider(
providers: [
  RepositoryProvider<RepositoryA>(
    create: (context) => RepositoryA(),
  ),
  RepositoryProvider<RepositoryB>(
    create: (context) => RepositoryB(),
  ),
  RepositoryProvider<RepositoryC>(
    create: (context) => RepositoryC(),
  ),
],
child: ChildA(),
)
Step 6: Final Step
- Now by using the above knowledge of BlocBuilder, BlocProvider, BlocListener, etc we can now complete our weather app.
- So Let's first provide our bloc :
- main.dart
class MyApp extends StatelessWidget { @override Widget build(BuildContext context) { return BlocProvider( create: (context) => WeatherBloc()..add(WeatherRequest(cityName: "Ahmedabad")), child: MaterialApp( home: WeatherApp(), ), ); } }- Here I've added an Event
WeatherRequestwhen calling WeatherBloc, because we want the initial city to show. here I've provided a static city name. You can take the user's current location and provide it here to show the initial location of the user. - Wrap
bodyinside BlocConsumer and add WeatherRequest Event on button click to fetch new city weather: - weather_app.dart
class WeatherApp extends StatelessWidget { final _cityController = TextEditingController(); @override Widget build(BuildContext context) { return Scaffold( resizeToAvoidBottomInset: false, appBar: AppBar( title: Text("Weather App"), centerTitle: true, ), body: BlocConsumer<WeatherBloc, WeatherState>( listener: (context, state) { if (state is WeatherLoadInprogress) { ScaffoldMessenger.of(context).showSnackBar( SnackBar( content: Text("Loading"), ), ); } }, builder: (context, state) { if (state is WeatherLoadInprogress) return Center( child: CircularProgressIndicator(), ); else if (state is WeatherLoadFailure) return Center( child: Text("Something went wrong"), ); else if (state is WeatherLoadSuccess) return Padding( padding: EdgeInsets.symmetric(horizontal: 12.0), child: Column( mainAxisAlignment: MainAxisAlignment.spaceAround, children: [ TextFormField( controller: _cityController, decoration: InputDecoration( hintText: "Enter city name", border: OutlineInputBorder(), ), ), Column( children: [ Image.asset( "assets/images/sun.png", height: 200, width: 200, ), SizedBox( height: 20, ), Text( state.weather.name, style: Theme.of(context).textTheme.headline3, ), SizedBox( height: 5, ), Text( state.weather.main["temp"].toString(), style: Theme.of(context).textTheme.headline4!.copyWith( fontWeight: FontWeight.bold, color: Colors.black), ), ], ), ElevatedButton( onPressed: () { if (_cityController.text.isNotEmpty) { context.read<WeatherBloc>().add( WeatherRequest( cityName: _cityController.text, ), ); } }, child: Text("Get Weather"), ) ], ), ); else return Container(); }, ), ); } }- Final Output:

Folder Structure For Bloc:
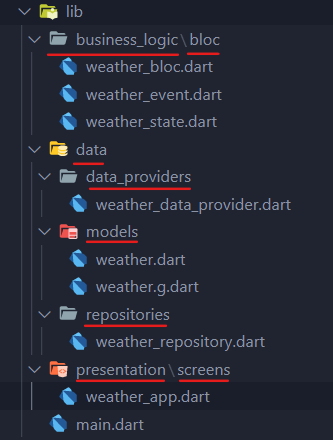
- In
business_logicfolder you can provide all your bloc. - In
datafolder we havedata_providerwhere you provide different providers,modelwhere you define your data model, andrepositoriesfolder where you define all the repositories. - In
presentationfolder you can havescreenfolder,pages,widgetsfolder where you implement UI.
Final Project Repo:
Wrapping Up
- Bloc pattern is quite hard to understand as it involves advance many concepts. But as soon as you start using it and playing around with it, you'll definitely master it. Trust me.
- When I started learning Bloc, trust me it took a lot of time to understand all the concepts. But as soon as I started using it by making small applications it felt easy.
- So, my advice is to start applying the concepts you have learned in this article by making small applications.
- Hope this article helped to clear your doubts and concepts about Bloc. If It did then make sure you share it with others.
- And also don't forget to share your feedback in the comment.
- Thanks for reading 😀. See you in the next article
- Until then...


